The West Coast Trail is one of Canada’s most iconic hiking trails.
The demanding 75km journey traverses Vancouver Island’s rugged coastline, taking in windswept sandy beaches, gnarled old-growth forest, slippery boulder fields, surge channels and tidal pools.
Most thru-hikers spend 6 to 8 days on the West Coast Trail (WCT), camping at designated beach campgrounds along the way.
Hikers can also enter at a midpoint location and enjoy a shorter 3-5 day adventure on the trail.
This comprehensive guide will help you prepare to hike the West Coast Trail.
It features an overview of the trail plus all the planning information you need to know.
This includes the low down on how much the West Coast Trail costs, how reservations work, safety considerations and essential items to bring.

Since I had so much information to share, I also created some separate, dedicated guides to the most discussed topics:
- Complete West Coast Trail Campground Guide
- West Coast Trail Transportation Logistics
- WCT Hiking Itineraries: 5, 6, 7 + 8 Days
- WCT Packing List: The Best Items to Bring
The breakdown of this post looks like this:
- About the West Coast Trail
- Our experience
- West Coast Trail Hiking Guide
- Location
- Trail length
- Difficulty
- When to hike
- Trailheads
- Parking
- Orientation
- Reservation system
- Cost
- Campgrounds
- Trail accommodation
- Navigation
- Tides
- River and creek crossings
- Hiking direction
- Itinerary suggestions
- Wildlife
- Safety information
- Water
- Essential items to bring
- Trail restaurants
- Where to stay pre and post hike
- Planning resources
- Souvenirs

West Coast Trail (WCT)
Location: Gordon River to Pachena Bay, Vancouver Island
Distance: 74km
Elevation change: Minimal
Hike type: One-way
Time: 5-8 days
Difficulty: Challenging
Dogs: Not permitted
Backpacking necessities
Before attempting the West Coast Trail:
- Remember to bring the 10 Essentials
- Know how to stay safe and also avoid negative bear encounters
- Understand how to Leave No Trace to help keep the WCT beautiful
- Be prepared to pack out everything you bring with you
- Check out our recommended gear for backpacking
- Need a backpacking checklist? Sign up to our newsletter for a free one
About the West Coast Trail (WCT)
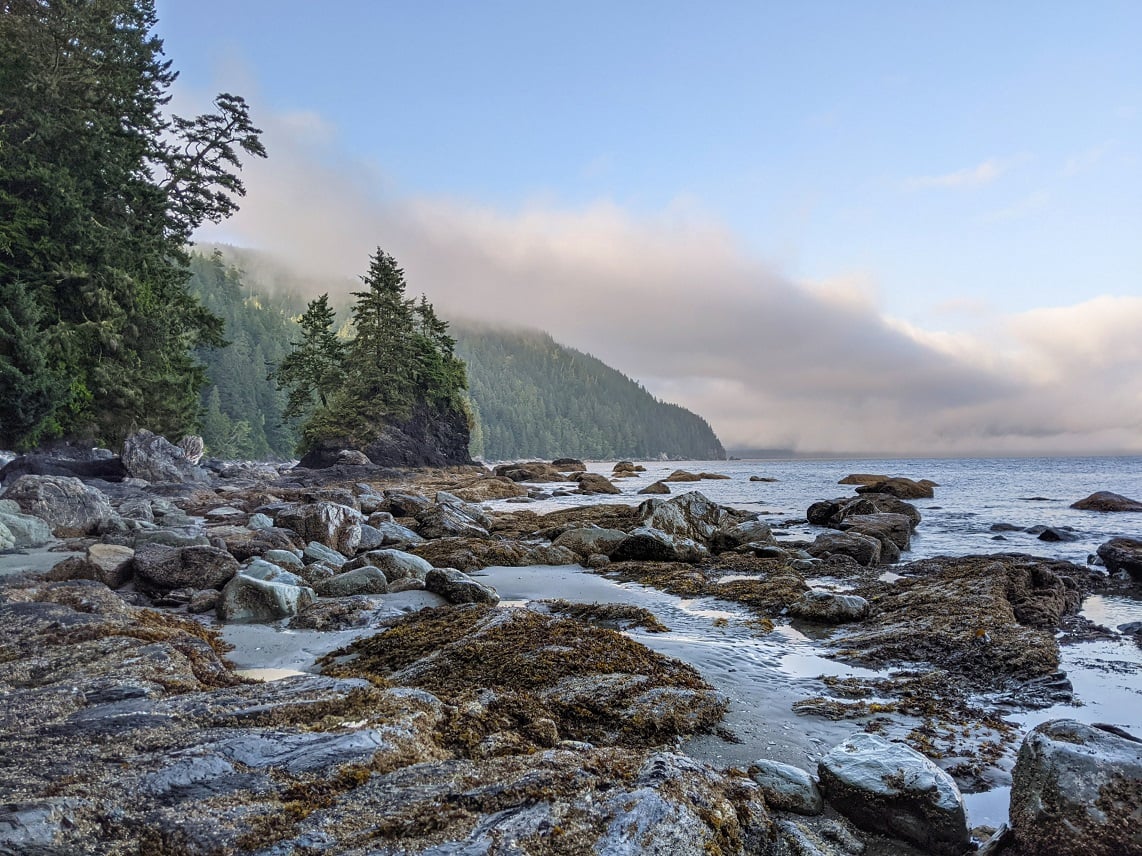
The West Coast Trail is located in Pacific Rim National Park Reserve, on Vancouver Island, British Columbia, Canada.
Despite being one of Canada’s most famous hikes, not everyone may know the interesting story of how the West Coast Trail came to be.
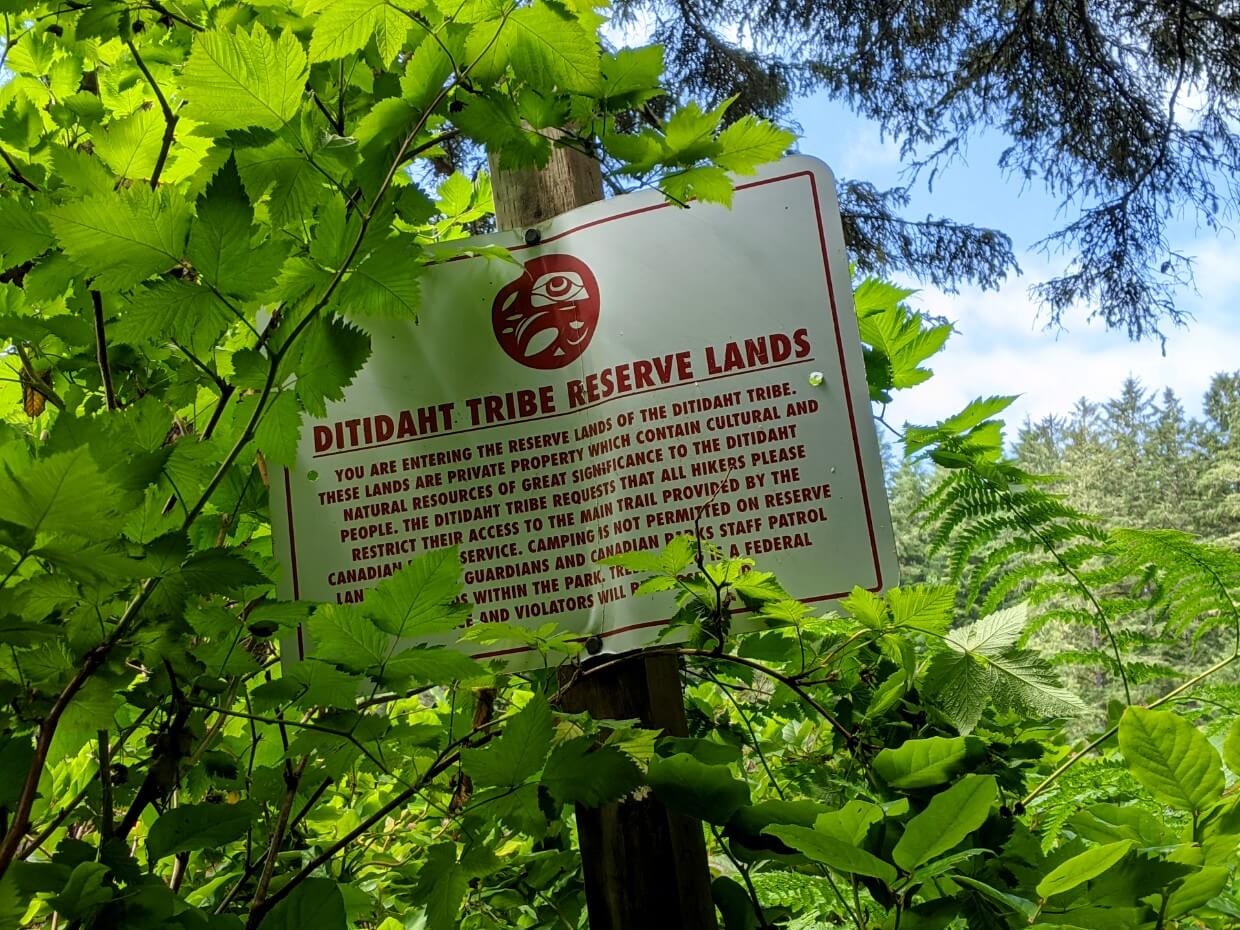
Land of the Huu-ay-aht, Ditidaht, and Pacheedaht
The West Coast Trail is located on the traditional territory of the Huu-ay-aht, Ditidaht, and Pacheedaht First Nations.
Rich in food sources (salmon, mussels, sea urchins, crabs, deer, elk, berries), villages and camps have been established on this coastline for thousands of years. The West Coast Trail follows ancient First Nation paths used for travel and trade.
Members of the Huu-ay-aht, Ditidaht, and Pacheedaht First Nations work with Parks Canada as West Coast Trail Guardians, to protect and care for the trail as well as visiting hikers. There are Guardian cabins at two WCT locations.
Learn more about each nation’s culture and history:
- Huu-ay-aht (“hoo-ay-at”)
- Ditidaht (“dee-tee-daht”)
- Pacheedaht (“pah-chee-dat”)

The Dominion Life Saving Trail
European ships began to arrive on the west coast of Vancouver Island in the late 18th century.
As the number of boats increased throughout the 19th century, as did the number of shipwrecks and drownings.
In 1889, the Dominion of Canada built a telegraph system along the coast from Victoria to Cape Beale (southwest of Bamfield).
But the danger remained and this coastline became known as ‘the Graveyard of the Pacific.’
The government was soon forced to take further action. In 1906, The SS Valencia ran aground near Tsocowis Creek with more than 125 lives lost from a total of 160 passengers.
Soon afterwards, the Pachena Lighthouse was built and the telegraph route was upgraded to become the Dominion Life Saving Trail.
The path featured six shelters stocked with essential supplies for shipwreck victims and their rescuers.

Transformation to the West Coast Trail
Navigational equipment continued to improve over the next few decades. The Dominion Life Saving Trail eventually fell out of use.
Fast forward to 1970 and the establishment of the Pacific Rim National Park Reserve. The Dominion Life Saving Trail was converted to a recreational hiking trail a few years later.
In 2025, more than 11,000 hikers will set out on the West Coast Trail.
The official Parks Canada West Coast Trail map, given to all hikers at orientation, pays respect to the trail’s history with original First Nation place names as well as shipwreck locations.

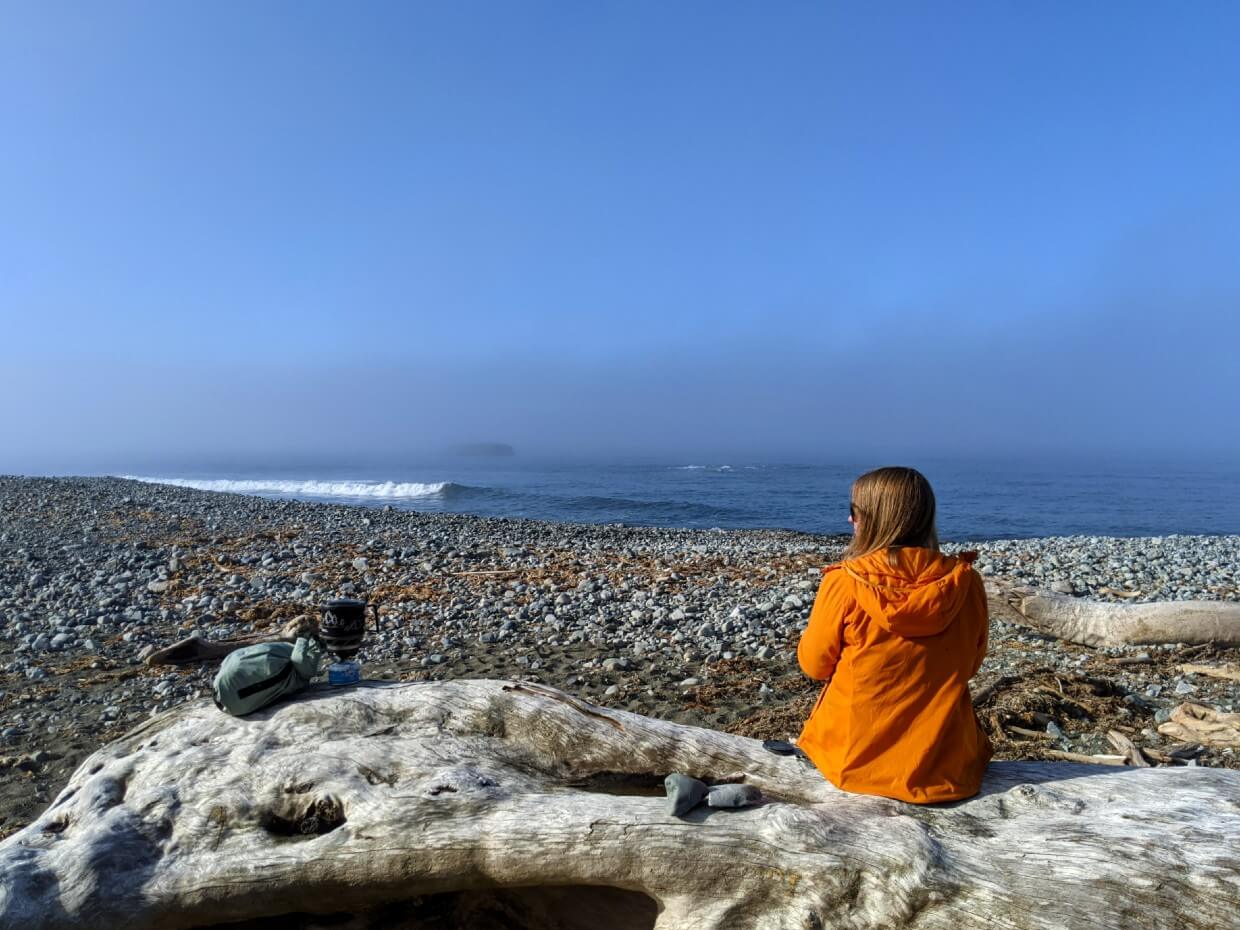
Hiking the WCT: Our experience
Before getting into the trail guide, I’m going to share an overview of our own 8 day northbound hike on the West Coast Trail.
If you like, you can skip to the trail guide by clicking here.
For each day of hiking, I have provided our total time as well as moving time.
We took a pretty relaxed approach to the West Coast Trail, stopping often for rest breaks, beach combing, wildlife watching, swimming and lengthy chats with other hikers. Some days, we ate breakfast on the trail.
Most of our hiking days therefore appear to be quite long. The moving time provides a better guide as to what to expect, especially if you usually hike around 3-4km/h like we do.
Day 1 – Gordon River to Thrasher Cove
Distance: 6km
Total Time: 4.5 hours
Moving time: 3.5 hours
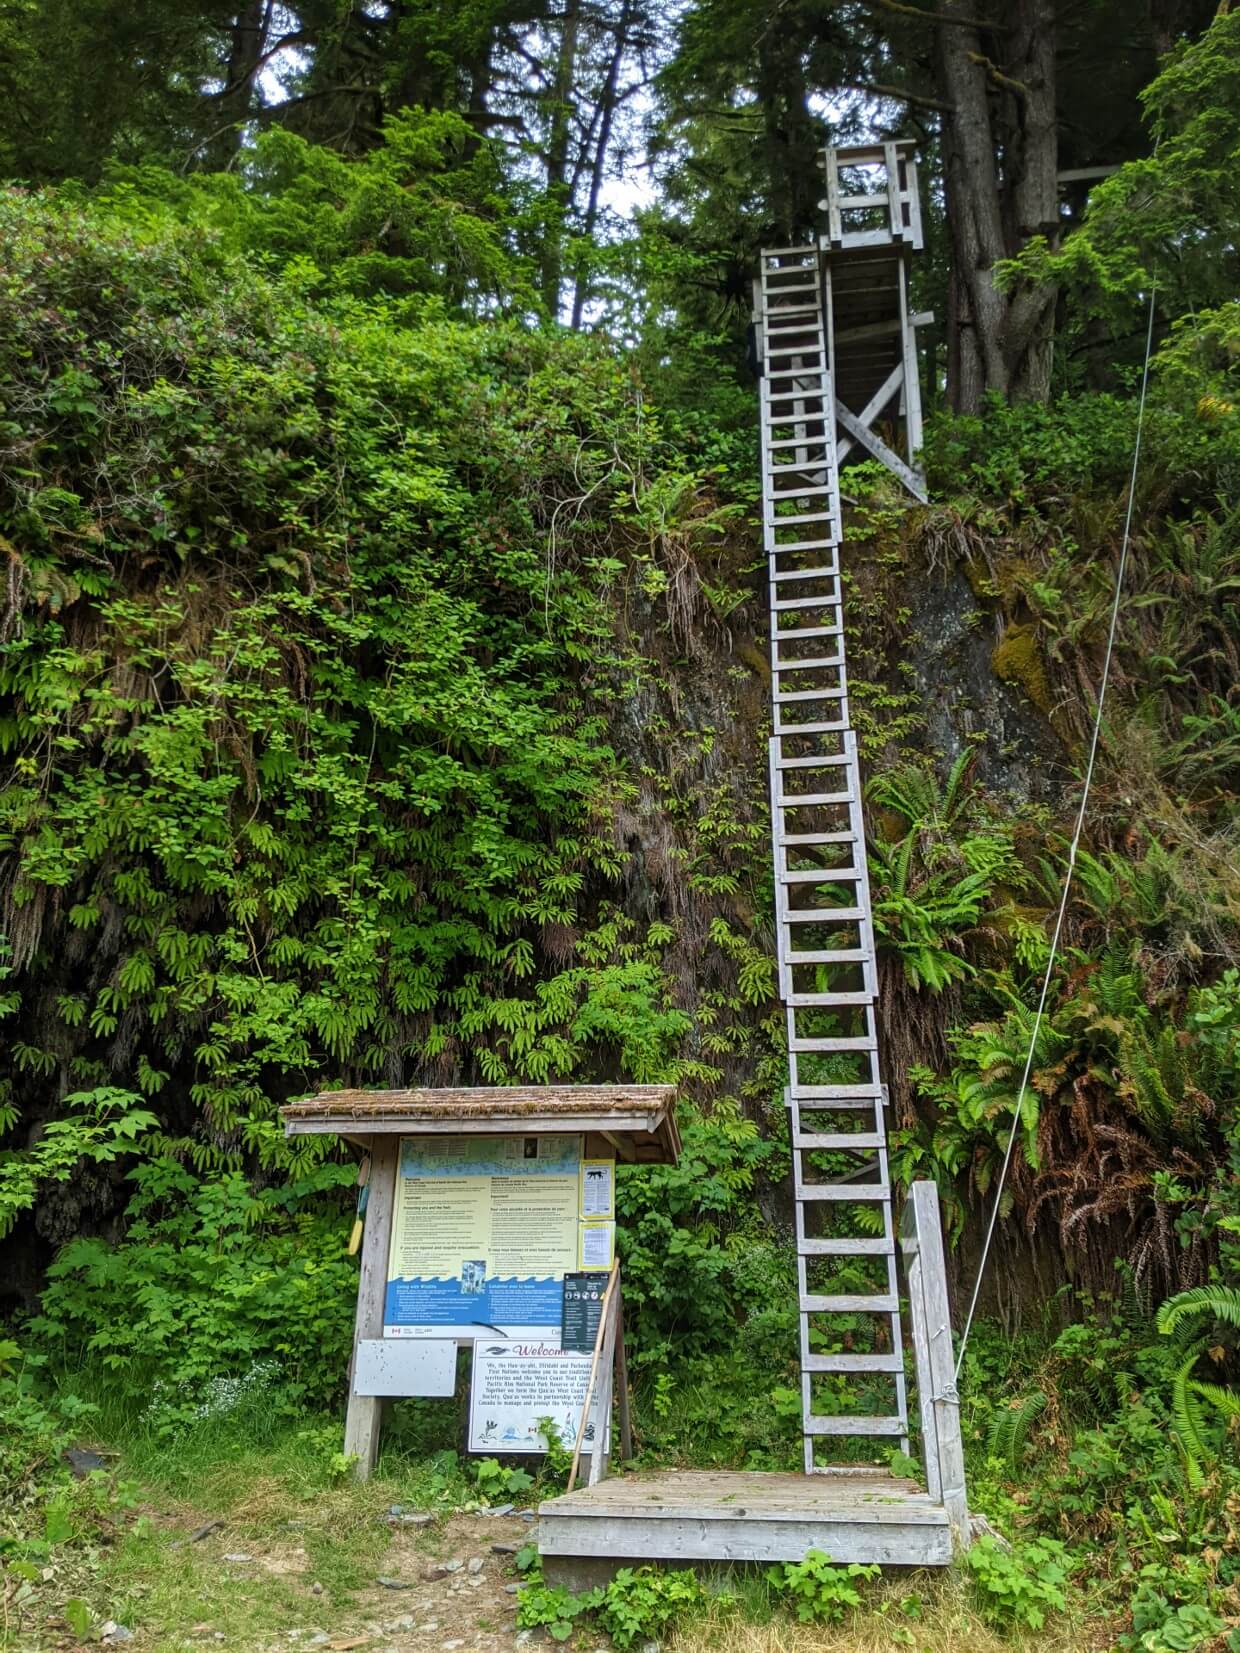
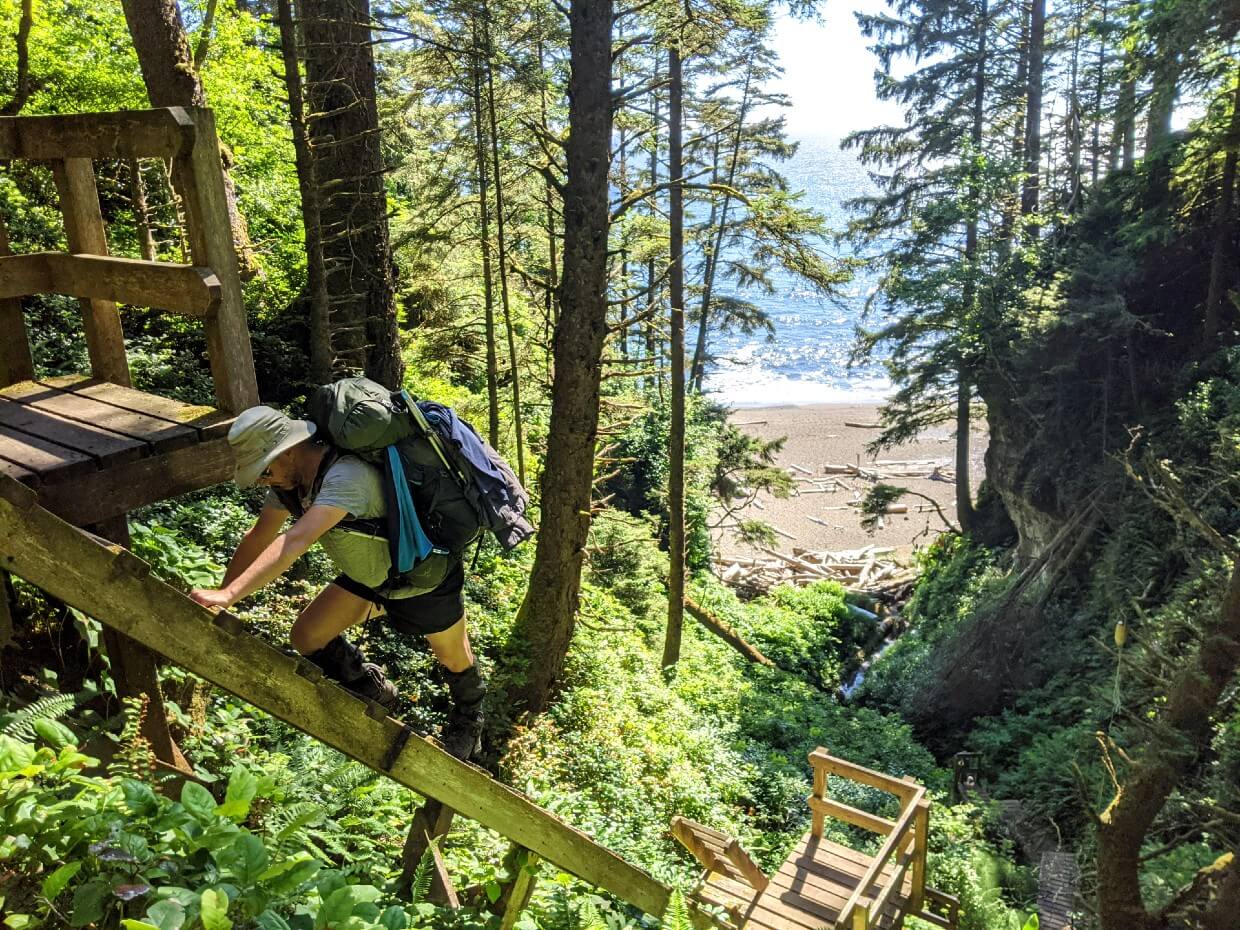
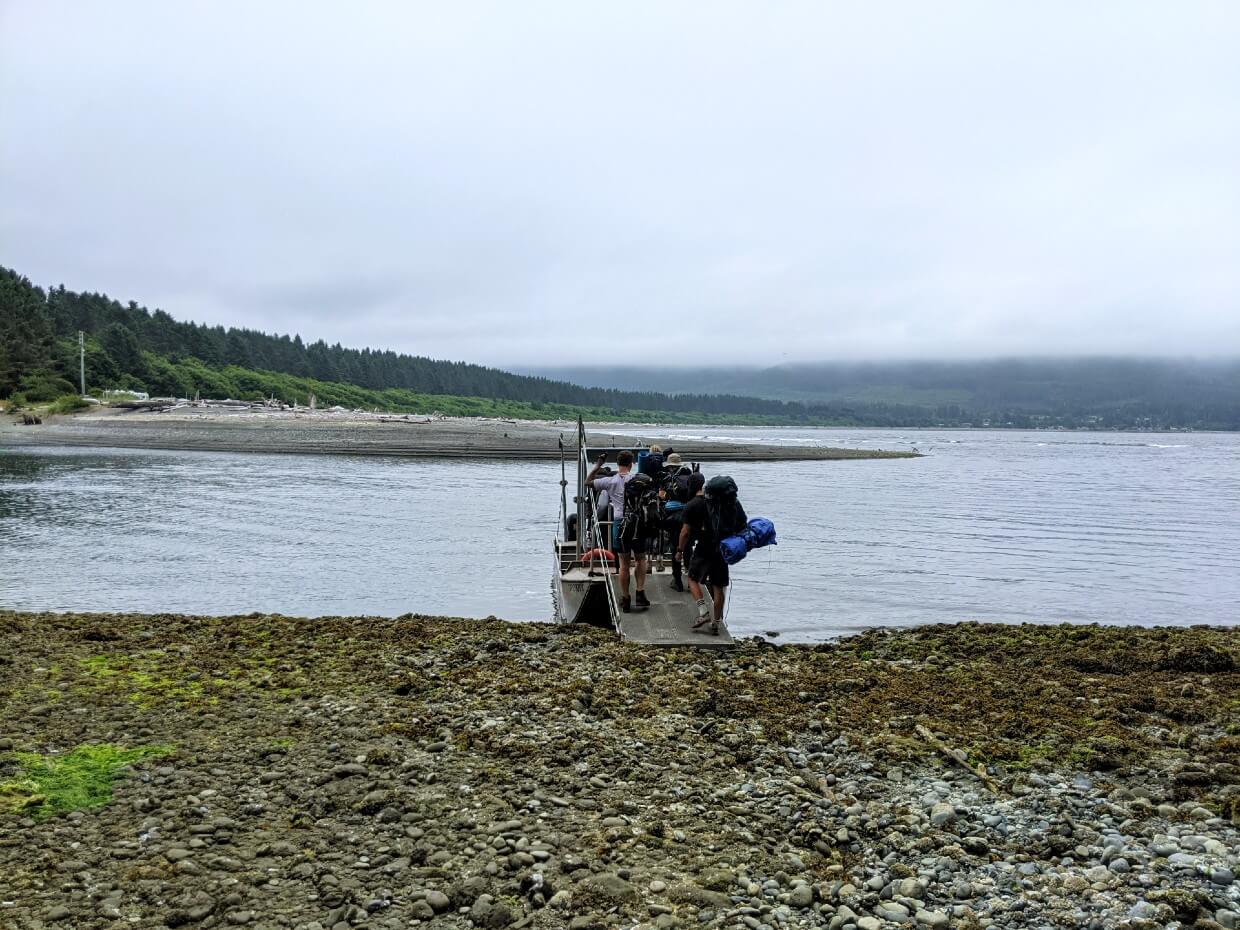
Our day started with a escort from the Parks Canada Office to the ferry dock. A short boat ride across the Gordon River later, we were staring up a very tall, almost vertical ladder at the WCT’s southern trailhead.
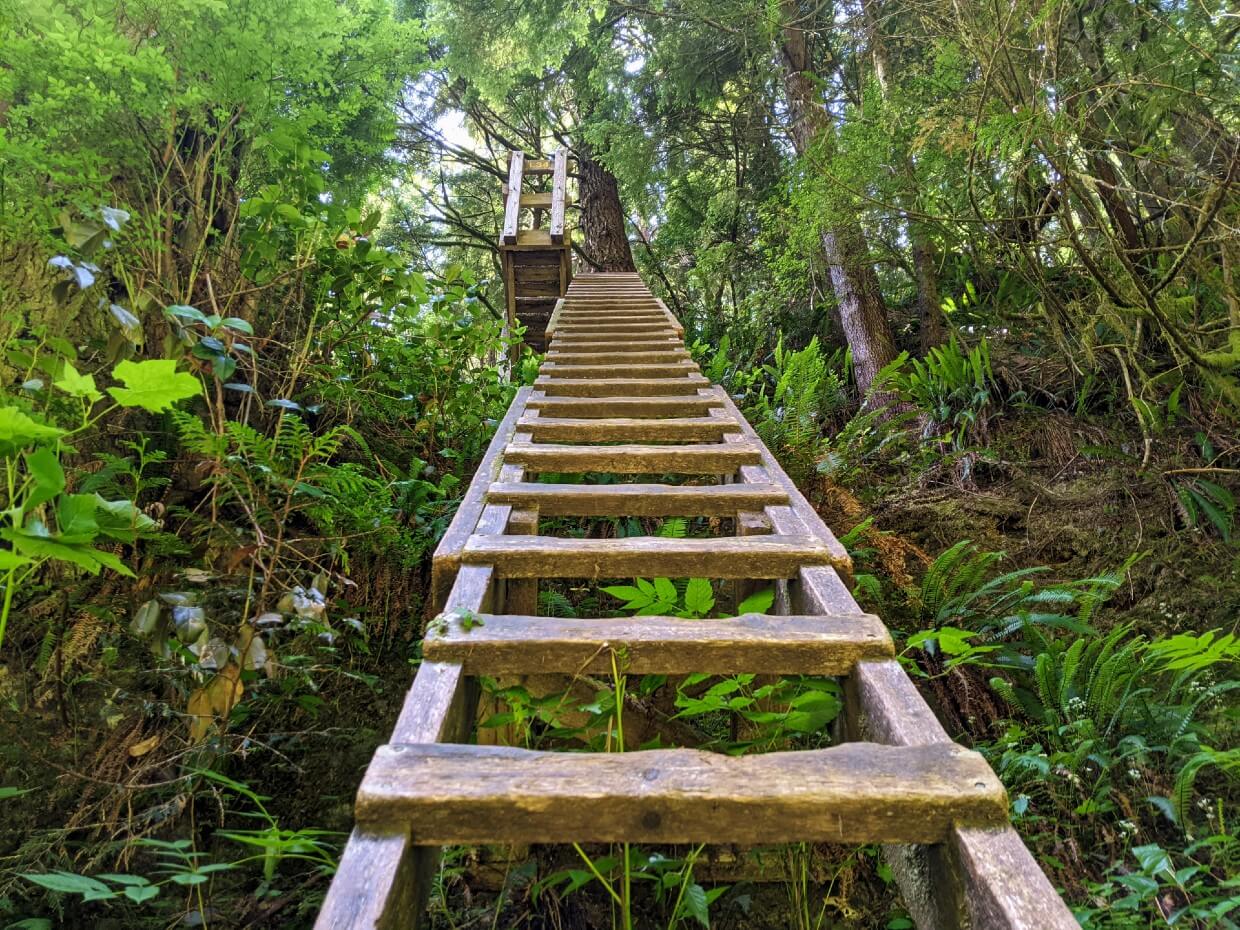
Yep, the first West Coast Trail ladder is one of the longest and steepest! It’s a psychological challenge, but a good one to get over and done with so early.
Parks Canada staff advise that hikers should expect to cover 1km/h for the first 6km of the trail, stating that it is the hardest section.
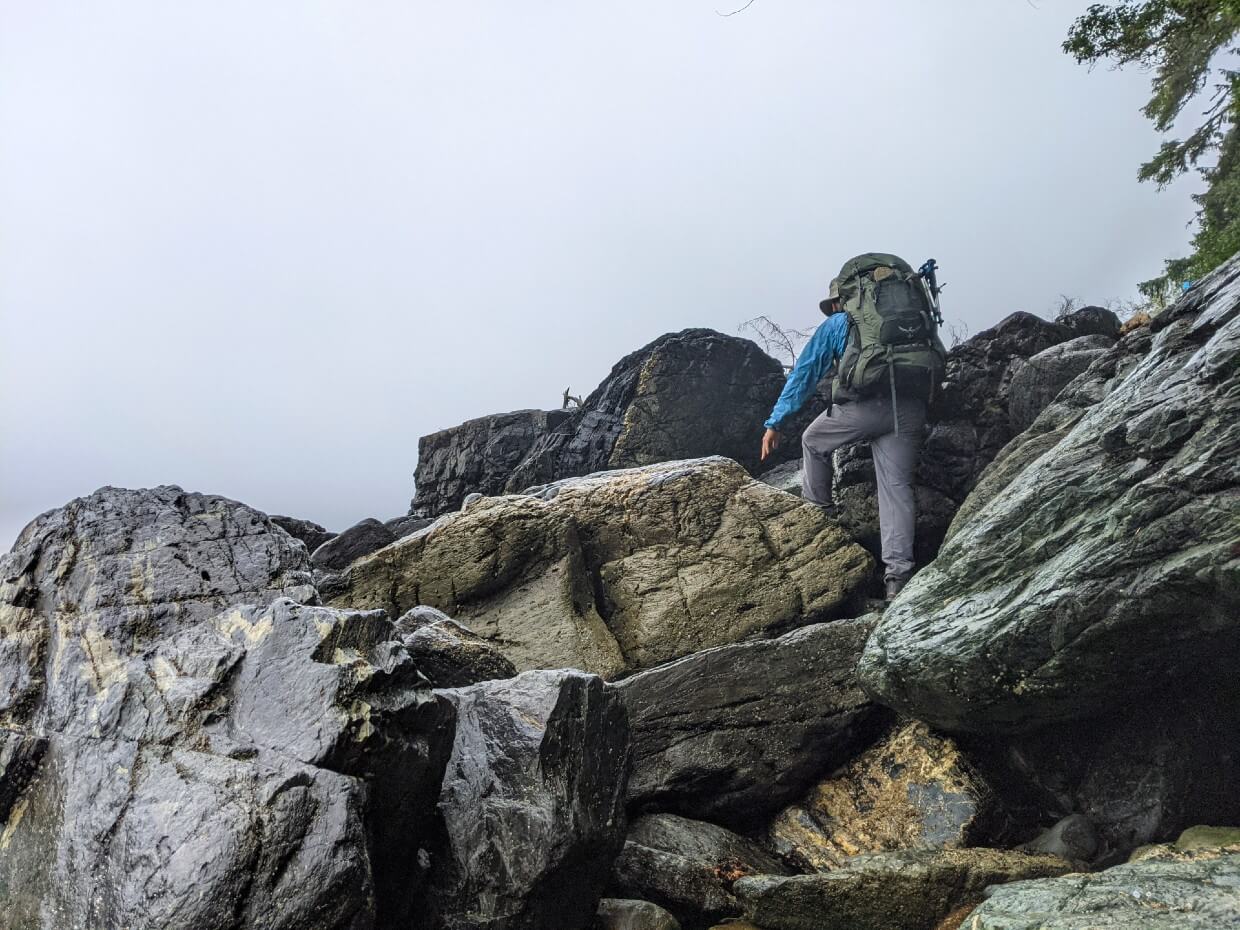
While I didn’t think it was easy, I wasn’t overly surprised by the type of terrain. A bit of mud, some rocks, lots of tree roots, the odd downed tree – classic Vancouver Island hiking plus half a dozen or so ladders.
This section was a good quad workout, with lots of stepping up, down and over things. Now that I’m able to compare this WCT section to others, I’d say that later stretches are more difficult.
The biggest challenges were a short sloped rock traverse, a detour around a collapsed bridge and the slow ascent up to the West Coast Trail’s highest point – 230m.

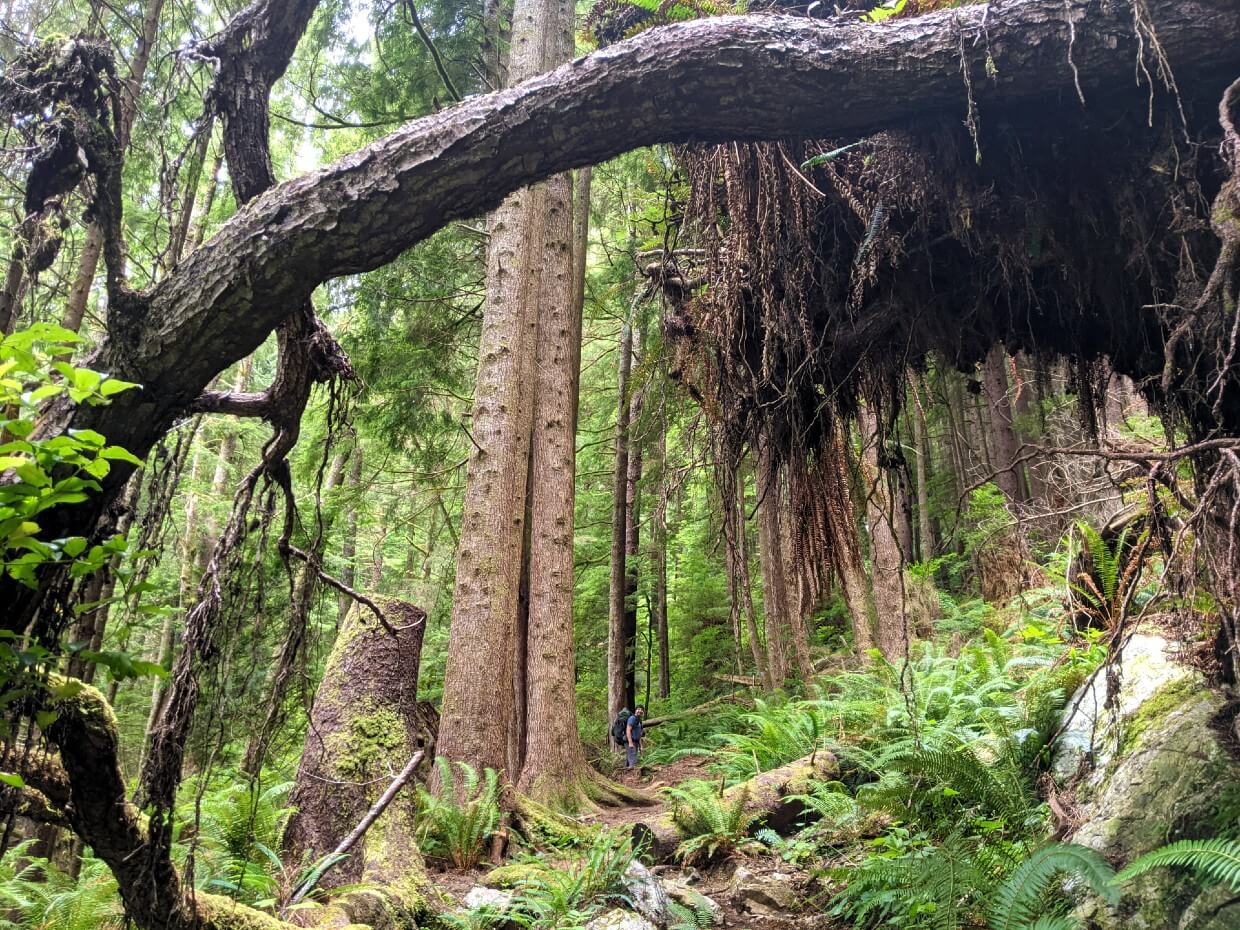
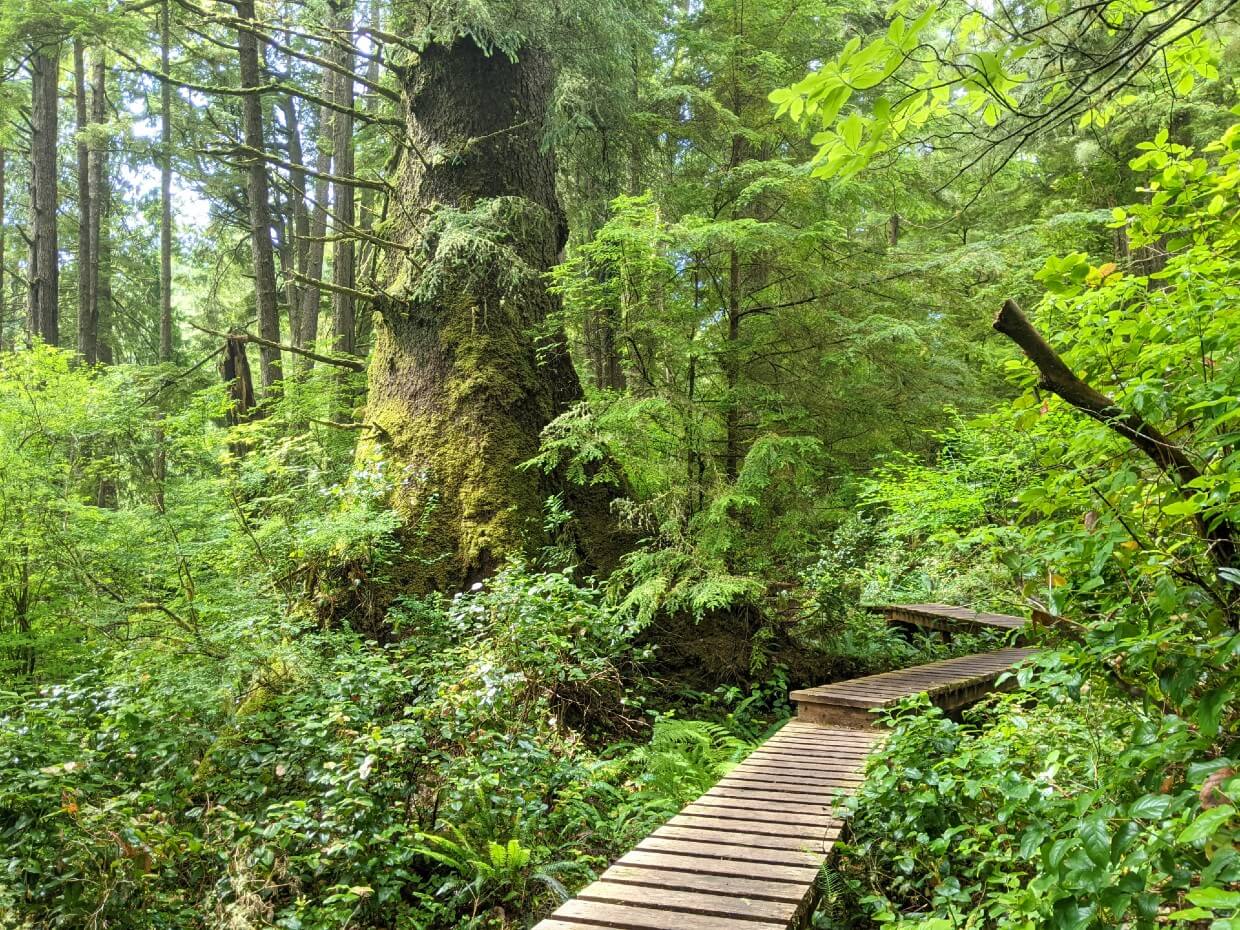
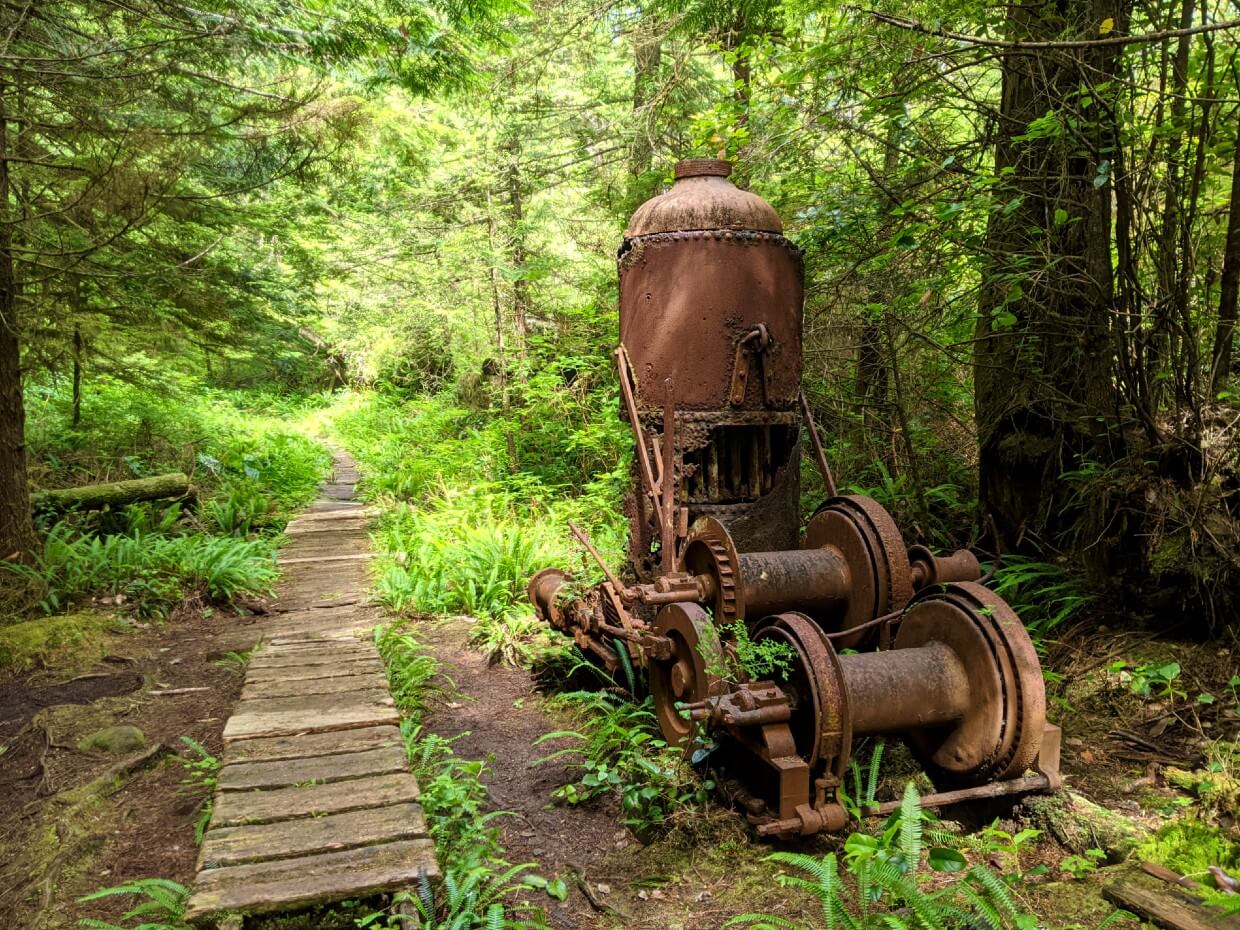
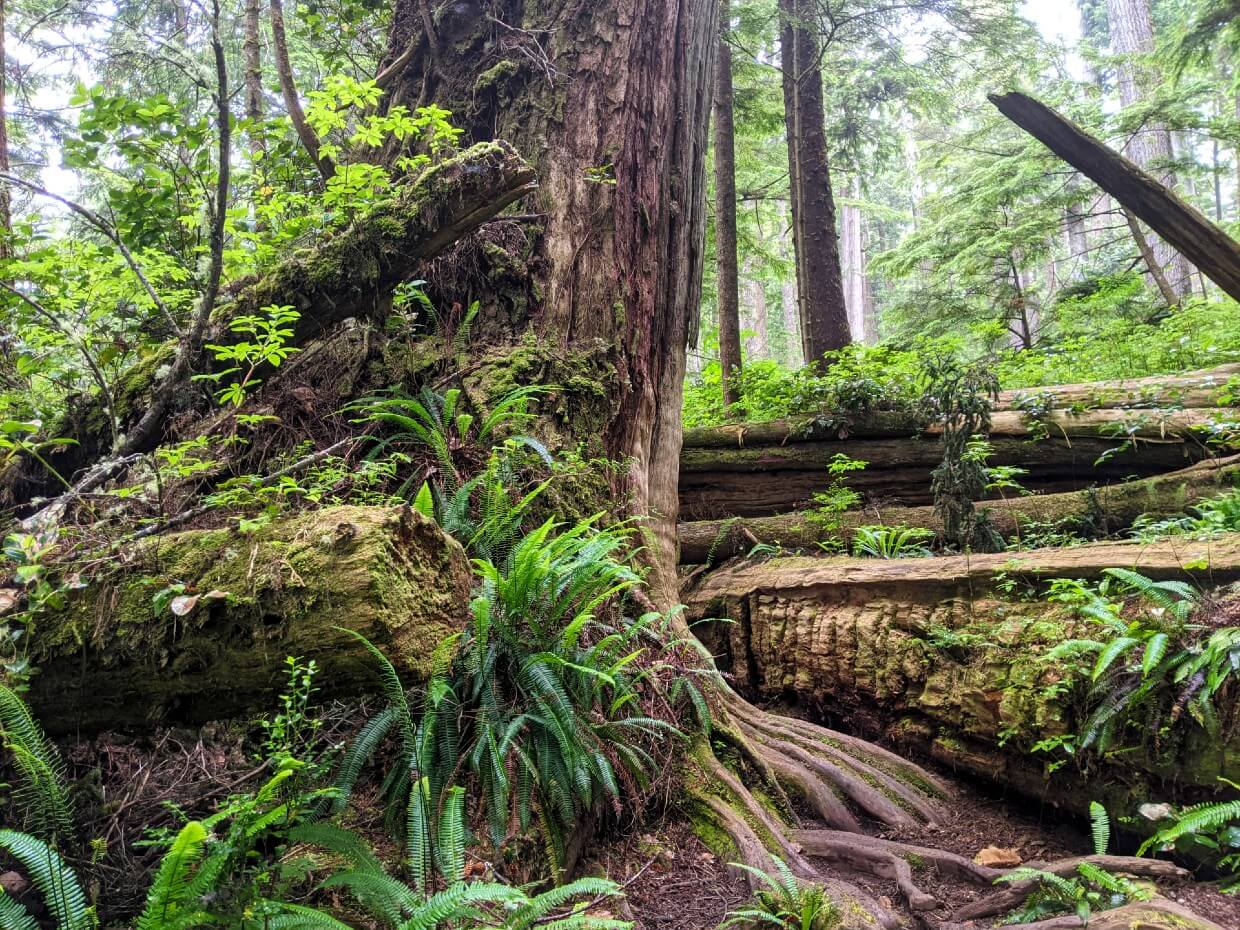
Highlights included the derelict donkey engine just past Kilometre 72 (the perfect place for a break) and some beautiful old-growth trees.
Descending down to Thrasher Cove was steep, made more difficult by the loose rock surface. A series of tall ladders announced our imminent arrival at the beach.
Despite it only being 3pm, Thrasher Cove was already busy with hikers. For the next week, we would crisscross many of these hikers along the trail.
Day 2 – Thrasher Cove to Camper Bay
Distance: 6.8km
Distance from Gordon River: 12.8km
Total Time: 7 hours
Moving time: 6 hours
Waking up with sore quads, I was a little apprehensive for the day ahead.
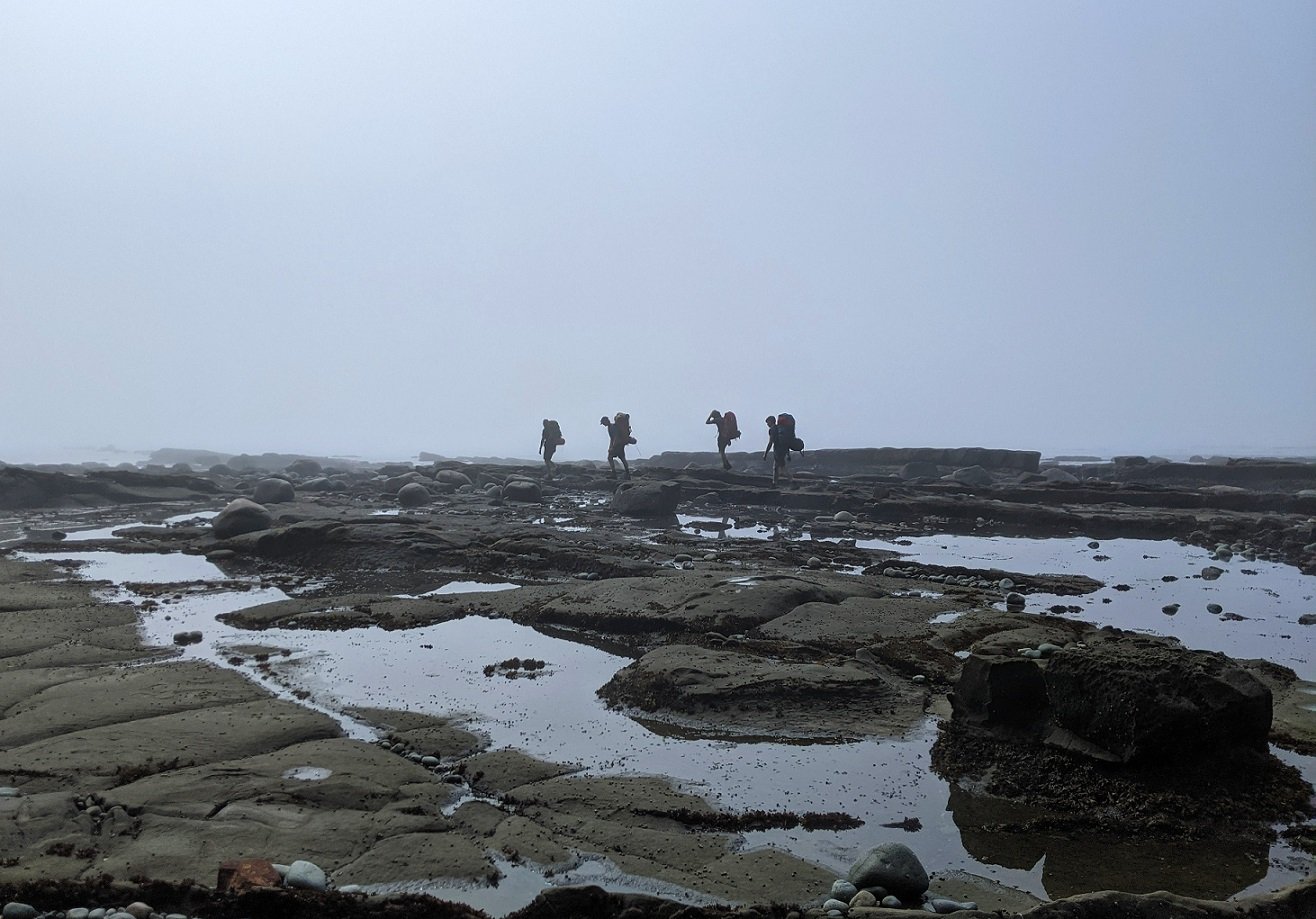
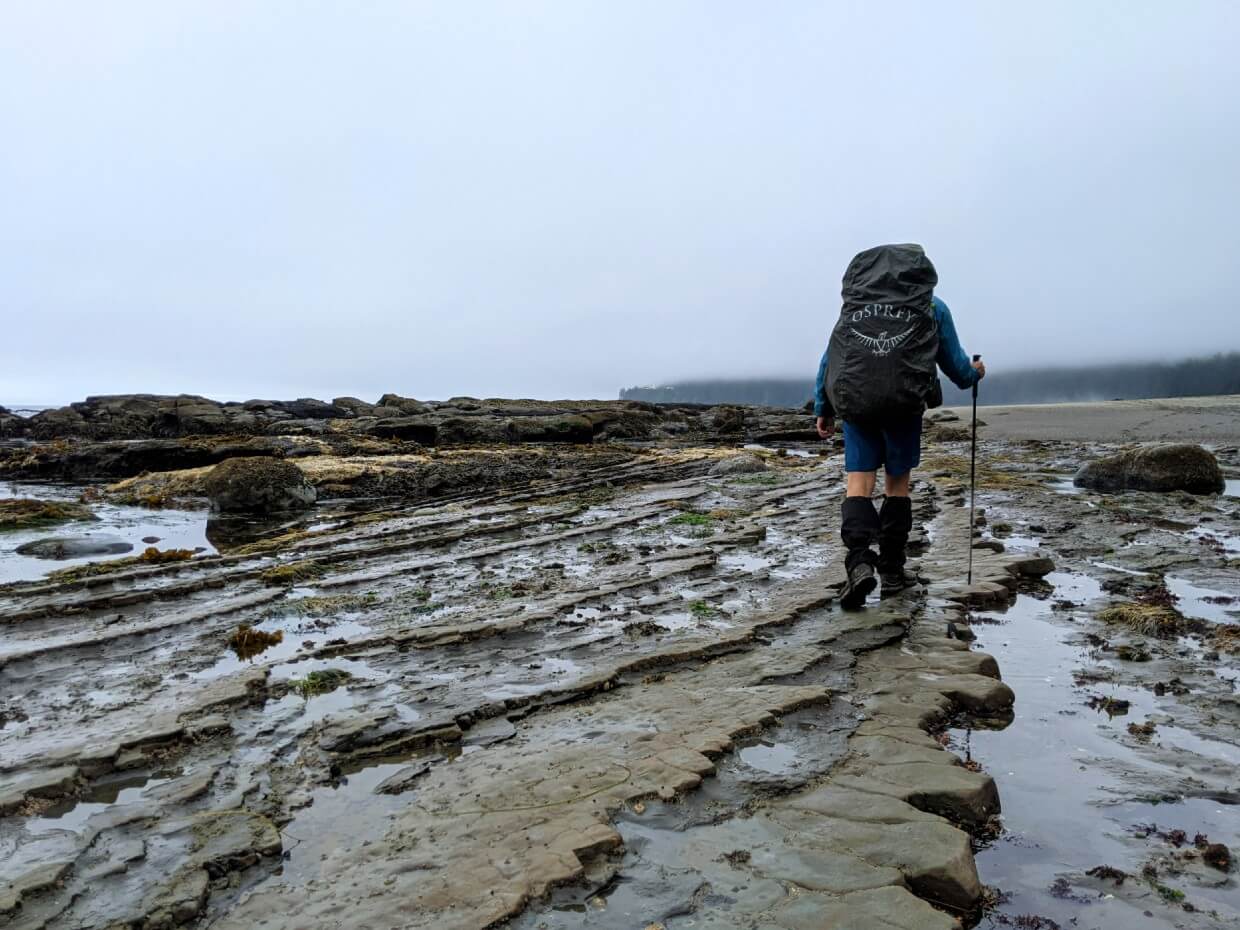
Though I really wanted to hike the coastal trail to Owen Point, the idea of traversing an almost 2km long stretch of boulders was pretty intimidating.
At least it would be over and done with at the start of the day! We had perfectly timed our second day for low tides around midday.
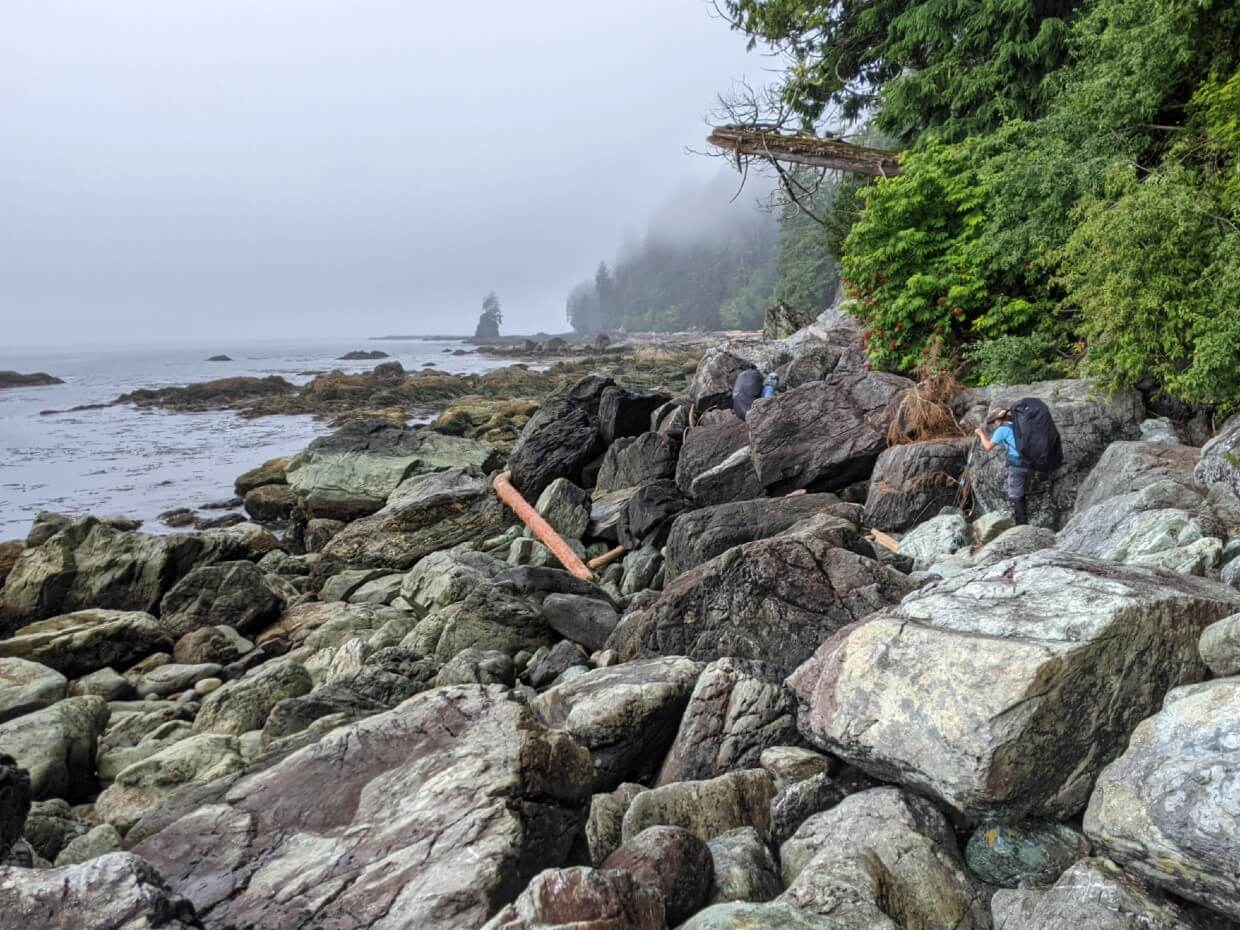
Averaging less than 1km/hr, I found this section as challenging as I’d feared, especially in the light rain.
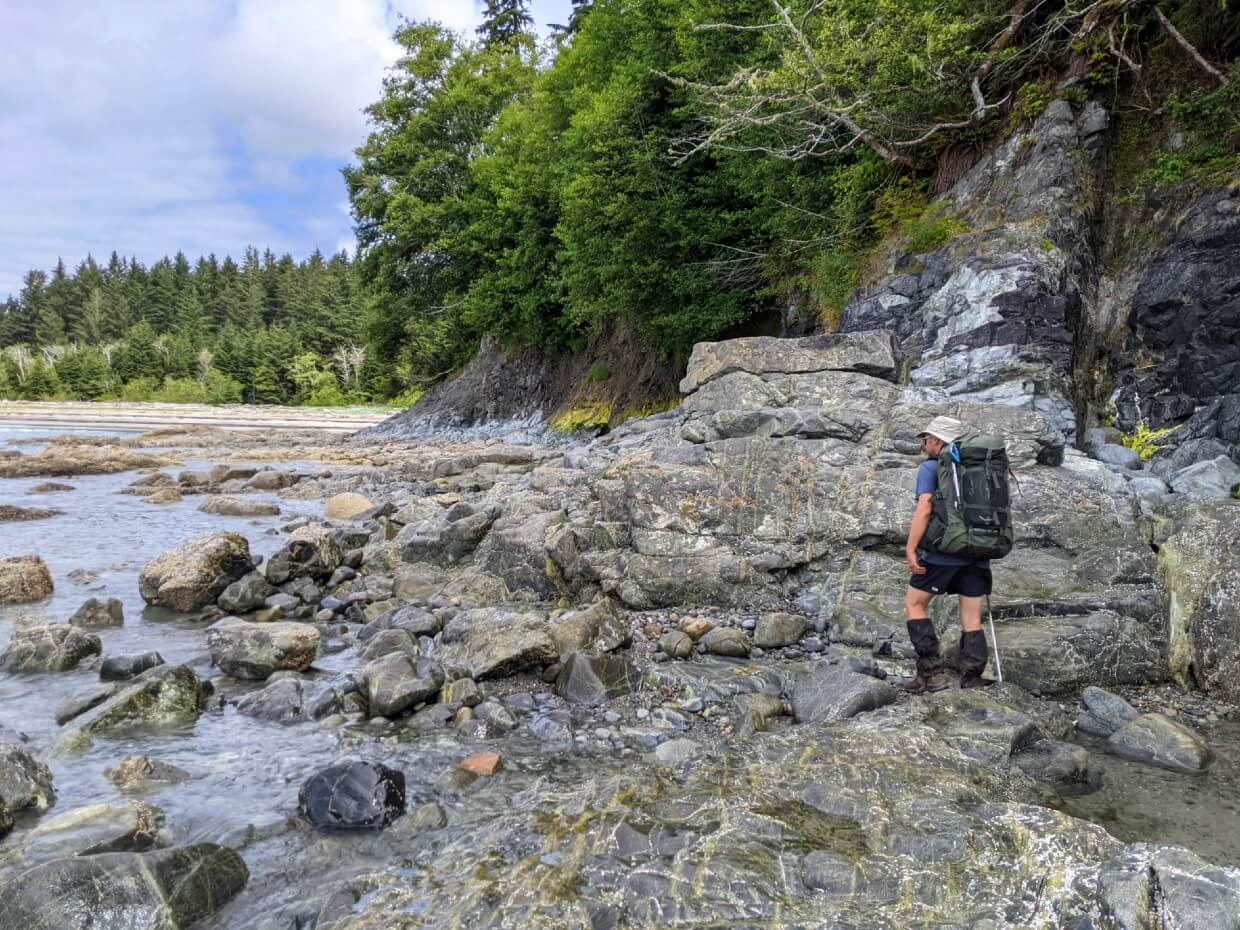
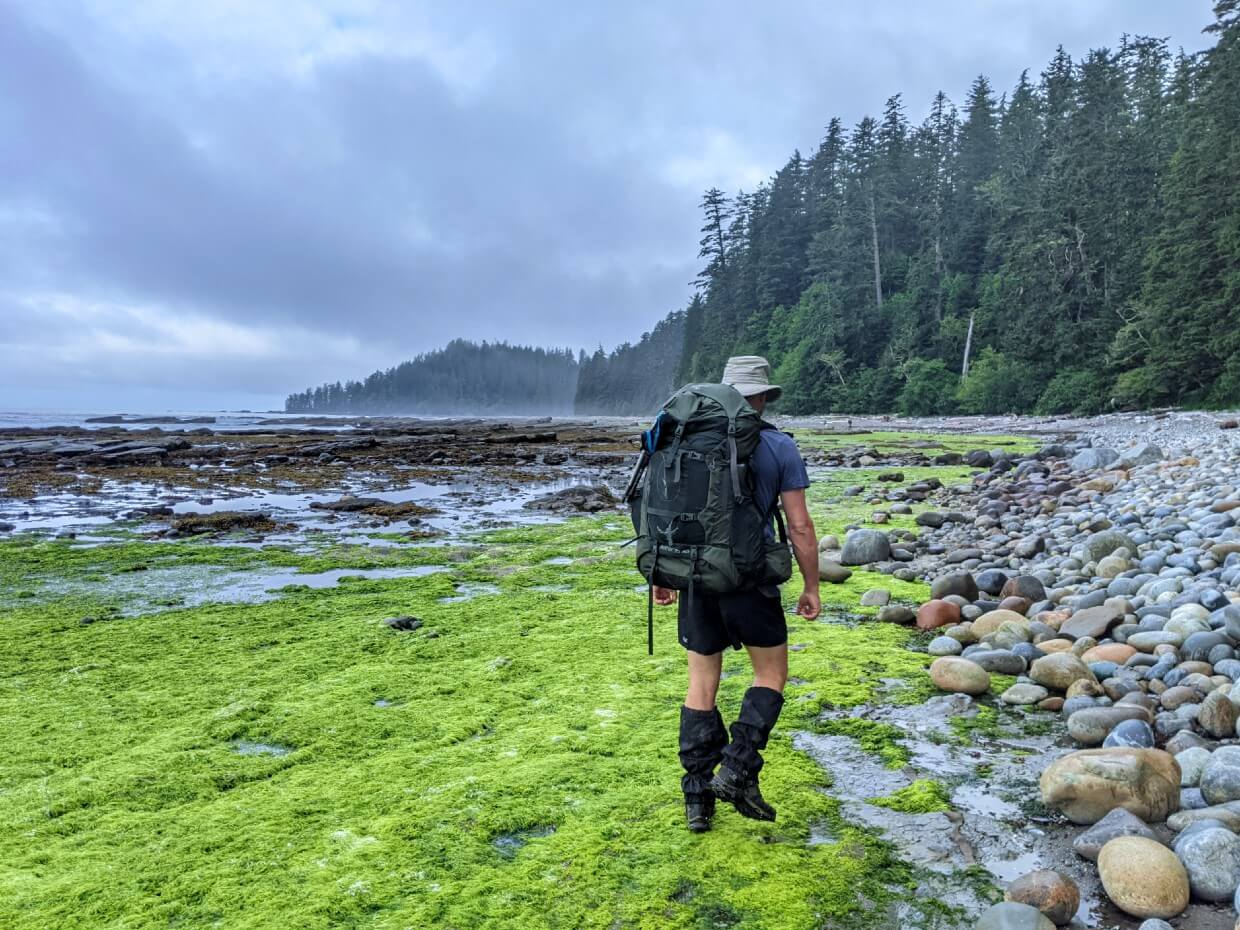
Slippery rocks to start, followed by huge boulders and piles of giant driftwood, covered in seaweed and barnacles.
I was glad I wore gardening gloves as I spent a lot of time crawling and climbing. Being more agile, JR scouted the route ahead and hopped between rocks.
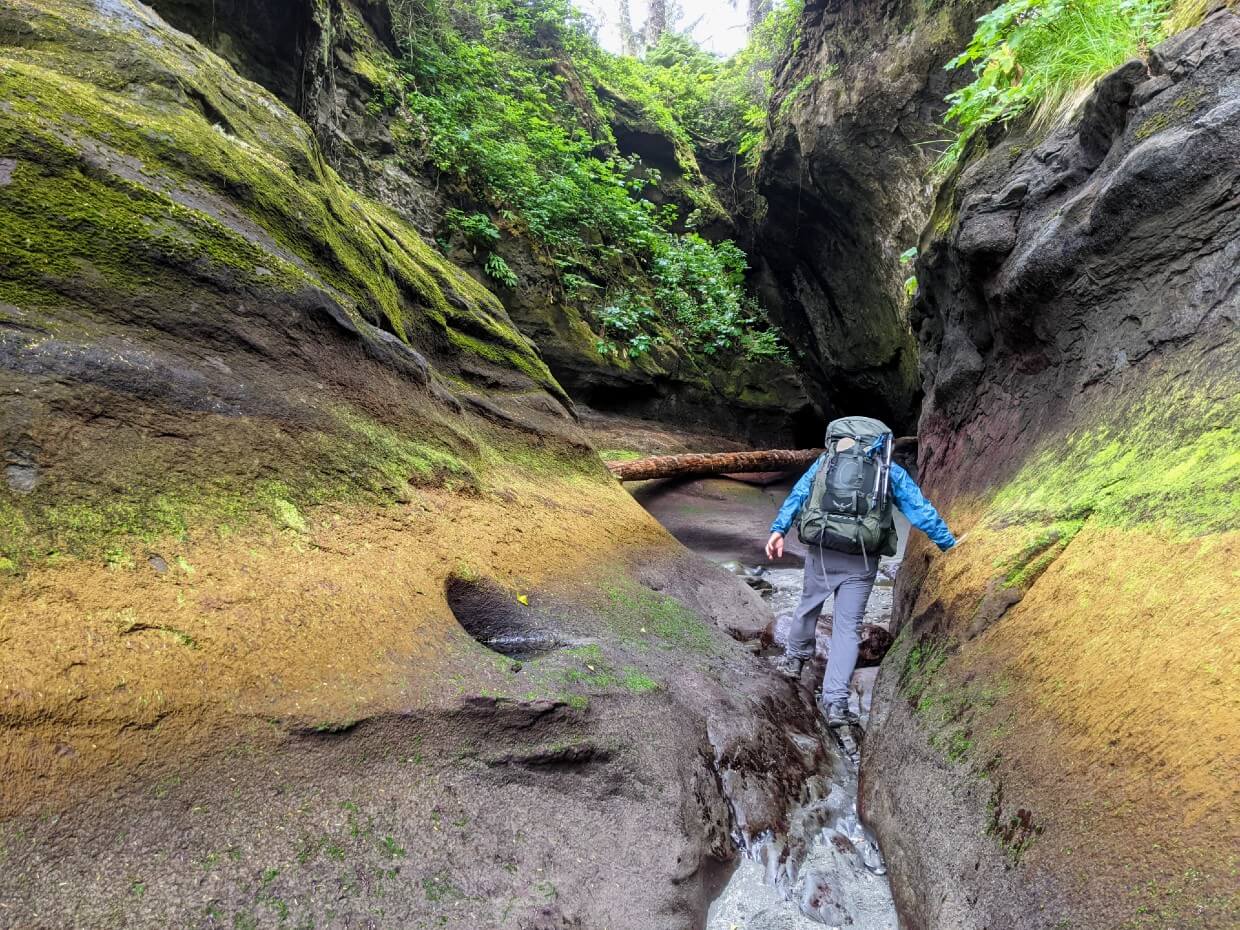
Owen Point was an excellent reward, with colourful, airy caves to explore. Slick rock shelves followed and then surge channels. Some hikers hopped right over the narrowest of these deep inlets, but I preferred to find the inland detour.

Leaving the beach at Access Point B, the transition back into the lush rainforest was sudden.
The forest obstacle course featured broken boardwalks, fallen trees, huge root systems and mud. Some beautiful old growth trees provided a good distraction.
One tricky hurdle was a partially destroyed elevated boardwalk, difficult to use but also impossible to avoid.
Camper Bay was waiting on the other side of yet another collection of ladders and our first cable car crossing.
Though I wasn’t a fan of the view-less campground, the camaraderie after such a challenging day was welcome.

Day 3 – Camper Bay to Walbran Creek
Distance: 9.2km
Distance from Gordon River: 22km
Total time: 9 hours
Moving time: 6.5 hours
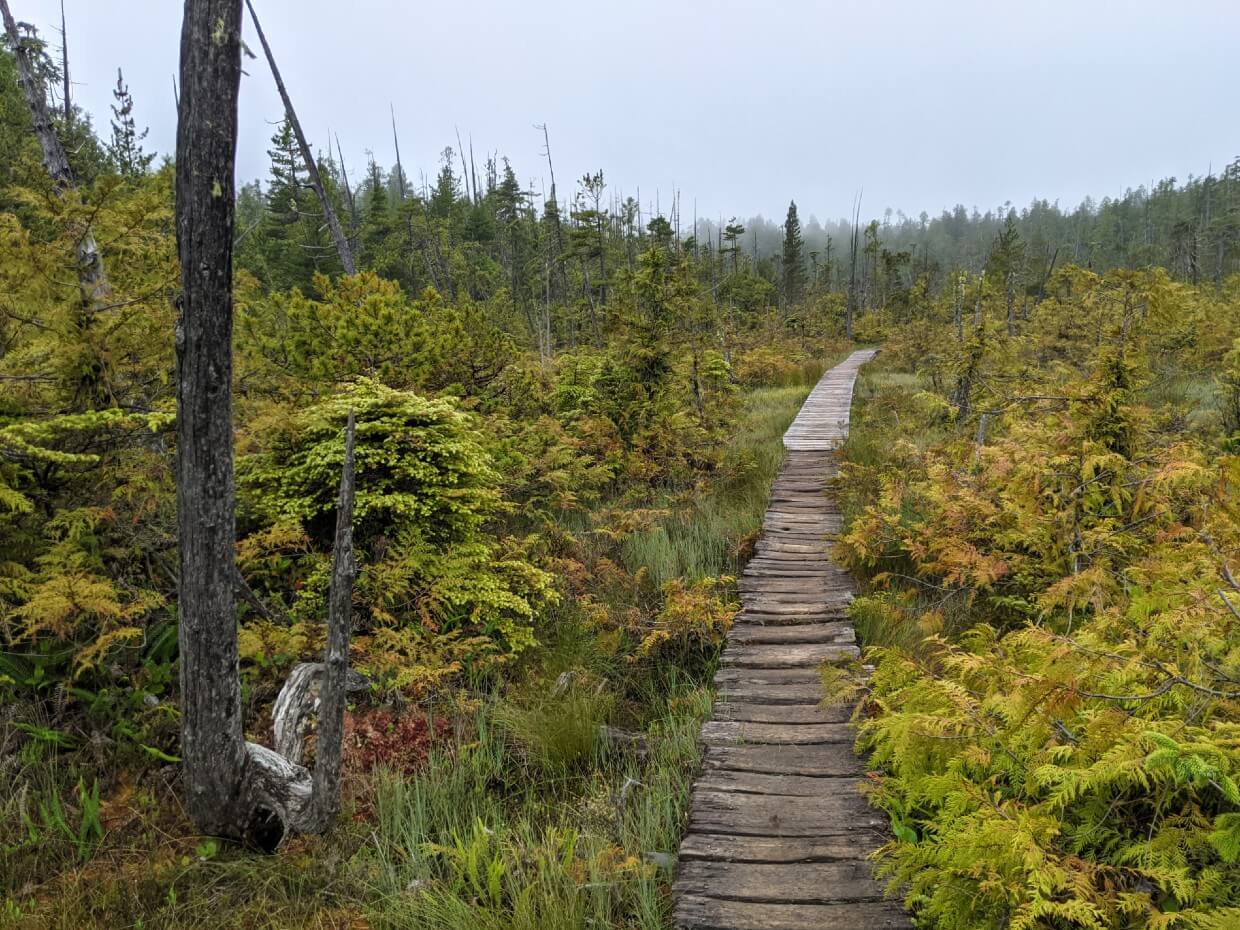
The easiest way to sum up our damp third day on the West Coast Trail? Ladders, boardwalk and bog.
From Camper Bay to Walbran Creek, the trail retreats into the forest, offering only the smallest glimpses of the coast.

The one exception is at Cullite Cove, which offers an ideal lunch stop destination. It’s also an excellent way to break up an exhausting stretch of 19 ladders (!!)
Despite being inevitably muddy, hiking through the shoreline bog was one of my favourite moments of the day.
I just loved the stark contrast between the thick old growth forest and the open landscape of the bog, with stunted bonsai-like trees lining the path alongside sticky carnivorous plants.

This section of the West Coast Trail has been made easier in recent years, with the construction of a brand new suspension bridge at Logan Creek.
The old bridge led to a very sketchy-looking set of ladders, which no longer exist.
Each side of the bridge features a comfortable seating area. We bumped into two sets of familiar hikers here and enjoyed a second lunch.
We finished our long hiking day with some of our new friends. JR then went for a refreshing swim in cold Walbran Creek, while I put up the tent in the forest.

Day 4 – Walbran Creek to Carmanah Creek
Distance: 6.9km
Distance from Gordon River: 28.9km
Total time: 3.5 hours
Moving time: 2.25 hours
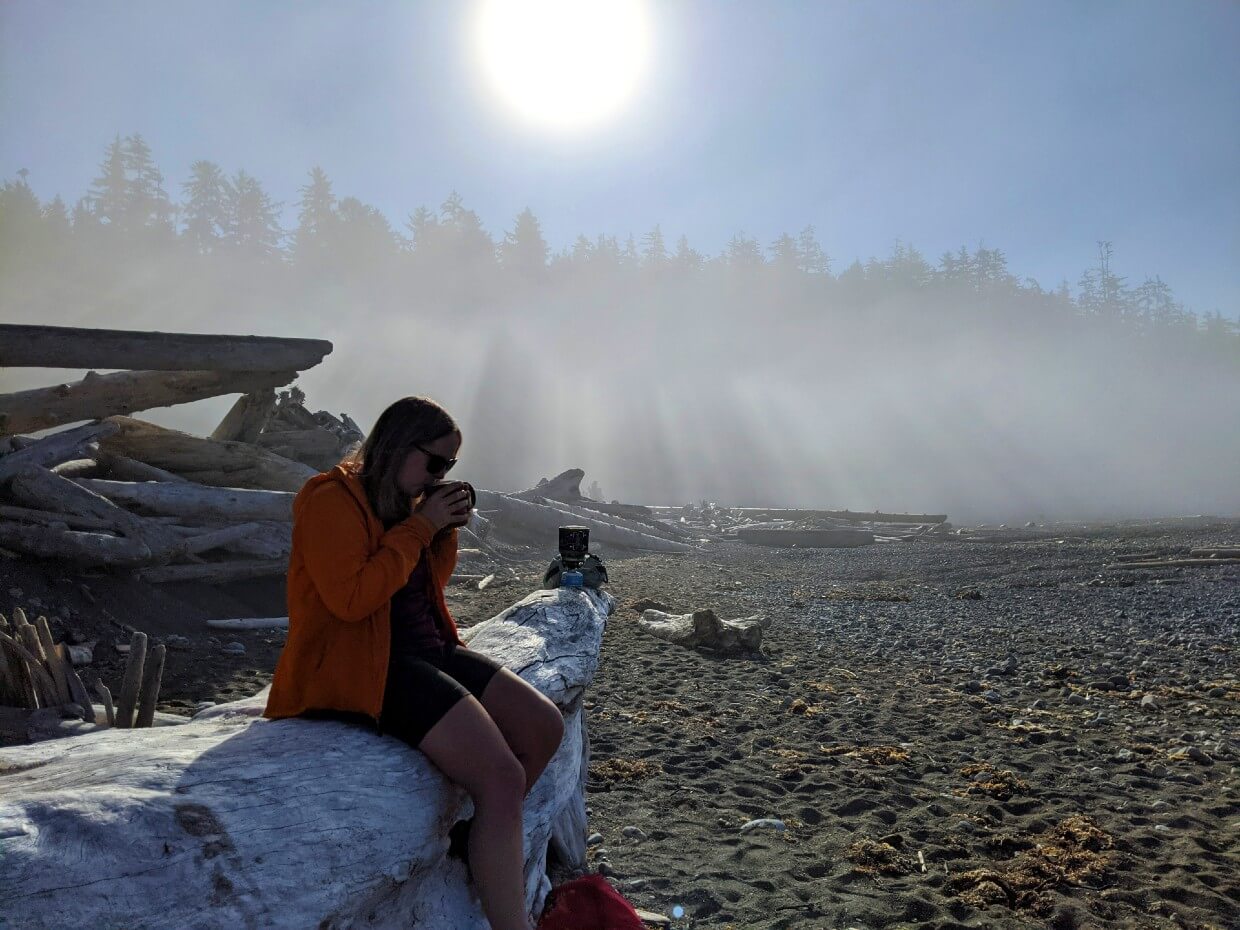
Another day of coastal fog awaited us as we packed up the tent at Walbran Creek, a little later than normal.
But we knew it would still be a great day – we had finished the most challenging sections of the West Coast Trail and were now able to veer away from the ‘standard’ itinerary followed by most northbound hikers.

Even better, we had planned a super short hiking day. Our destination was Carmanah Beach, said to be one of the best places to camp on the West Coast Trail.
Just 7km of beach walking lay in our path, starting with a long stretch of soft sand and then pea gravel.
Both act a bit like quicksand, sucking your feet down with every step. If you’re not wearing gaiters, you’ll likely be picking out rocks every few metres.
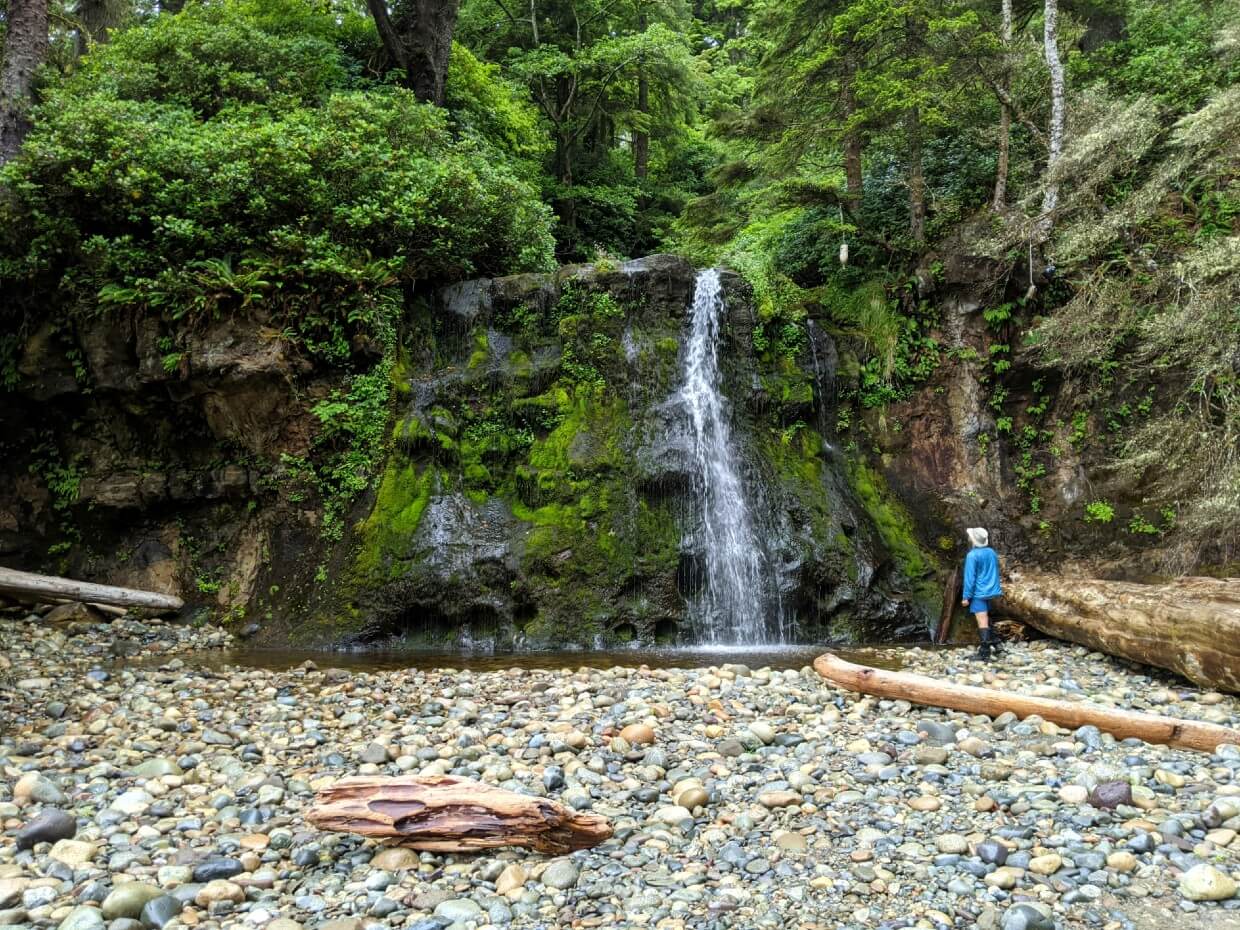
As we approached Bonilla Point, things started to get interesting. Think tidepools, cliffs, rock pillars topped with trees, massive mussel patches, scuttling crabs and even a waterfall.

JR also found numerous fossils, including shells and wood. Debris from Japan and China were scattered along the beach too. This section of beach really was a treasure trove!
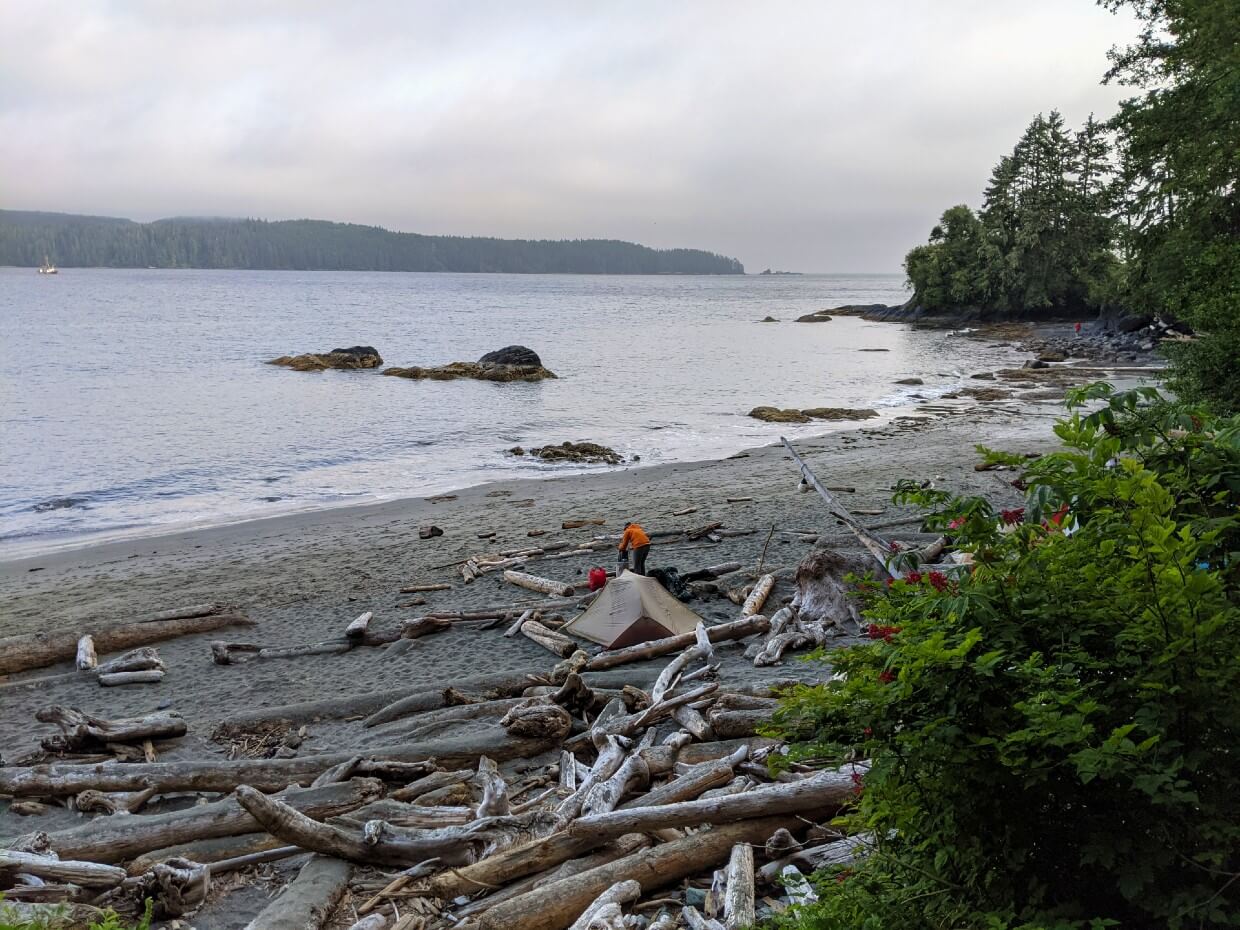
Carmanah Beach was the oasis I had been waiting for – a long, sandy stretch of sand with incredible views of the ocean and lighthouse. With the tide out, we were able to cross the creek without using the cable car.
We had the expansive campground all to ourselves until 8pm, when hikers arrived from Tsusiat Falls. They said it had taken them almost 12 hours.

Day 5 – Carmanah Creek to the Crab Shack
Distance: 13.8km
Distance from Gordon River: 42.7km
Total time: 5 hours
Moving time: 4 hours
As the only hikers from our campground heading north, we started our day in complete solitude. Just pass Carmanah Lighthouse, however, we were surprised by the sight of a very tall, very upright fin in the ocean. An orca!
It had been close to a rock covered with sea lions. With the tide coming in, we decided to sit and wait to see if anything would happen. Unfortunately, the fog soon eclipsed our view.

After passing Cribs Creek, we didn’t see a soul for hours. The feeling of remoteness heightened.
It increased still when we found a seal carcass at the edge of the forest, dragged there from the beach.
The pools of blood indicated that it had been moved pretty recently. Needless to say, we left the area quickly.
After crossing huge rock shelves and boulders, we climbed up to a high coastal trail and then almost immediately back down to another beach…and then again. The beach access points were tricky to spot.
Waiting on the other side of the last headland was the most spectacular beach on the entire WCT. It’s not possible to camp on Cheewhat Beach, so we just enjoyed hiking on the hard packed sand instead.
Though the final stretch was mostly boardwalk, some care was required. Arriving at the Crab Shack, we were happy to see some familiar faces again.
We were even happier to get our hands on some long awaited seafood – fresh crab, halibut and salmon, accompanied by a couple of fully loaded baked potatoes and cold cans of soda.
Having booked to stay at the Crab Shack’s covered tent deck for the night, we were done for the day.
The sun had finally come out, so we played some games, drank some cold beers and enjoyed more seafood for dinner.

Day 6 – The Crab Shack to Klanawa Creek
Distance: 9.5km
Distance from Gordon River: 52.2km
Total time: 6.5 hours
Moving time: 3.5 hours
For a backpacking trip, our day six morning was pretty surreal. Hot tea by a woodstove and fresh crab for breakfast. We ordered wraps to go before hopping on the Nitinaht Narrows ferry.
Back on the trail and reunited with the coastal fog, we spotted more old growth trees and enjoyed some gorgeous elevated views of the beach.
Here, the trail follows the edge of a very high, steep cliff. At one point, I tripped towards the drop-off. Luckily, JR was very quick to grab me.
Our tides were perfect to hike on the beach for most of the distance to Tsusiat Falls, including through the beautiful ‘Hole in the Rock.’ The fog had lifted and we were now getting hot.
Tall cliffs led us to Tsusiat Falls, where we quickly got ready to swim. Swimming under the cool, cascading water was glorious.

After almost three hours of swimming and sunbathing at Tsusiat Falls, we decided to head to a quieter campground for the night.
The hike to Klanawa River Camp took just over an hour and featured ladders, boardwalk and a cable car crossing. Though the campground was not empty, we did enjoy a beautiful sunset (our first!)

Day 7 – Klanawa Creek to Tscowis Creek
Distance: 6km
Distance from Gordon River: 58.2km
Total time: 3 hours
Total moving time: 2 hours
Waking up in time for sunrise, the day started clear and bright. This would be our shortest hiking day and it also happened to have the best weather.
The low tides were perfect for our departure from Klanawa, offering us the chance to peek into tidepools along the way. Hundreds of crabs scuttled away as we hiked across seaweed scattered rock shelves.
Ladders led us up back to a high trail above the coast. And what a trail this was! Wide and almost completely flat, we couldn’t believe our luck. Even the boardwalk sections were in good shape.
We stopped to check out the derelict donkey engine and grader and then again at the Valencia Bluffs lookout.
The SS Valencia ran aground on the rocks beneath the cliffs here in 1903, with huge loss of life. With the coastal fog clinging on, our view was limited.
Another collection of ladders and we were back on the beach…and also at our camping destination!
Arriving at 1pm, we were able to enjoy Tsocowis Creek Camp to the fullest.
The sun came out less than an hour later so we spent the day exploring the beach, sunbathing, reading, playing games and checking out the nearby waterfall. A handful of southbound hikers joined us later in the day.

Day 8 – Tscowis Creek to Pachena Bay
Distance: 16.8km
Total time: 5 hours
Total moving time: 4 hours
Though we could have finished the West Coast Trail on day seven, the weather was too good not to spend an extra night. And besides, I was starting to feel quite a connection to the trail.
We got up just after sunrise, keen to start our long hike out. The first part of the day was spent entirely on the beach, mostly on sand. A few rocky sections slowed us down, as did the lure of some tidepools.
It was sad to leave the beach at Michigan Creek. The final 12km stretch was entirely in the forest.
Wonderfully wide and flat, this section was easy to hike although a little tedious. Highlights include some more old growth trees and an abandoned motorcycle.
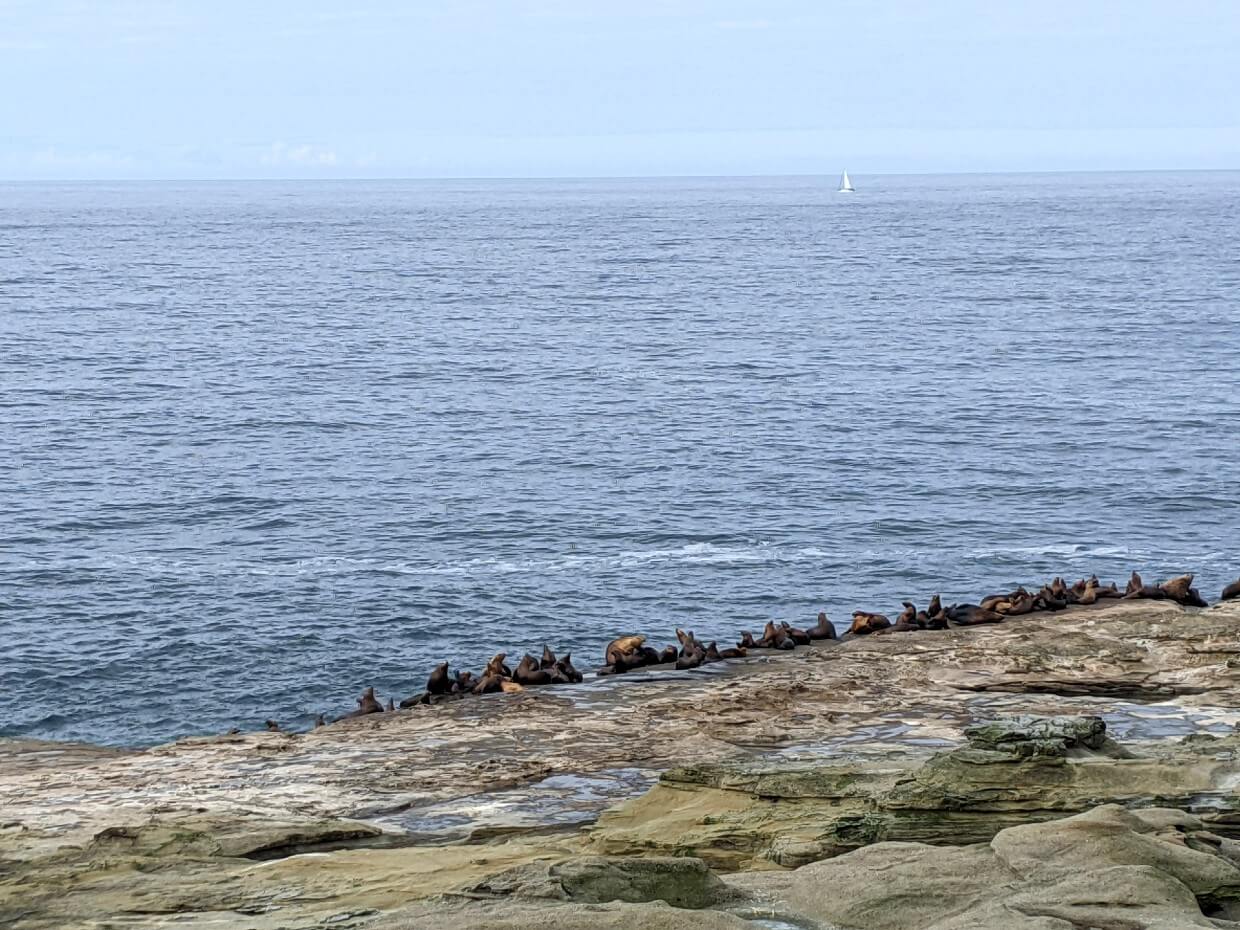
We broke up the journey with a side trip to ‘Sea Lion Rock’, where a few dozen sea lions sit atop a rock outcropping, barking and fighting as the tides go in and out.
You can hear them before even reaching the turnoff! I thought it was definitely worth the short detour (700m return).
The final 500m of the West Coast Trail offered a choice between a forest or beach route. In my mind, the beach was the most dramatic way to finish. It also avoided some additional ladders!
A short traverse around a rocky headland was the last beach challenge, before the gorgeous sands of Pachena Bay appeared. We arrived just before 1pm, ideal timing if we had needed to get the bus.
As it was, our van was waiting for us in the parking lot. We had already taken the bus down to Gordon River before starting the trail. A quick clean up and we were on our way to a hotel in Campbell River!

Thoughts on the West Coast Trail
As someone who prefers to enjoy nature in solitude, I didn’t expect to love the West Coast Trail. Happily, I was proved wrong.
I did find it a trail of two very different halves, however. For the first three days, I didn’t quite get why people raved about the WCT.
While I was enjoying some aspects of the trail (old growth trees, ocean scenery), I was finding it to be a bit of a slog overall.
Being trapped in coastal fog wasn’t helping either, nor the impossibly busy nature of the campgrounds.

On day four, things began to change. Finally off the ‘standard’ West Coast Trail route, we found ourselves alone on the trail for longer stretches. The campgrounds were also quieter.
This is when it all started to make sense. This was reinforced when the sun came out on day five.
Finally, I could see why people loved this trail – the challenge, the isolation, the immersion, the ever changing coastline.

By day eight, I didn’t want to leave. I would class that as a major turnaround.
Would I hike the West Coast Trail again? Actually, I think I would.
If the WCT wasn’t such an expensive hike (we spent around $1k for the two of us), I’d consider hiking it again soon. But I’d consider just hiking the northern section.
A few months after hiking the West Coast Trail, we ventured out on the Nootka Trail. Check out our Nootka Trail guide to see how I compared the two trails! We have since also hiked the Juan de Fuca Trail and the more challenging North Coast Trail.

West Coast Trail Hiking Guide
In this section, you’ll discover everything you need to know about hiking the West Coast Trail.
The text ahead includes some affiliate links. If you make a purchase via one of these links, I may receive a percentage of the sale at no extra cost to you.
Where is the WCT?
The West Coast Trail is located on Vancouver Island, the largest island on the west coast of North America.
Part of the province of British Columbia, Vancouver Island is about half the size of Ireland.
To get to Vancouver Island, you can either fly (by regular plane or seaplane) or take a ferry from the BC mainland/Washington State.
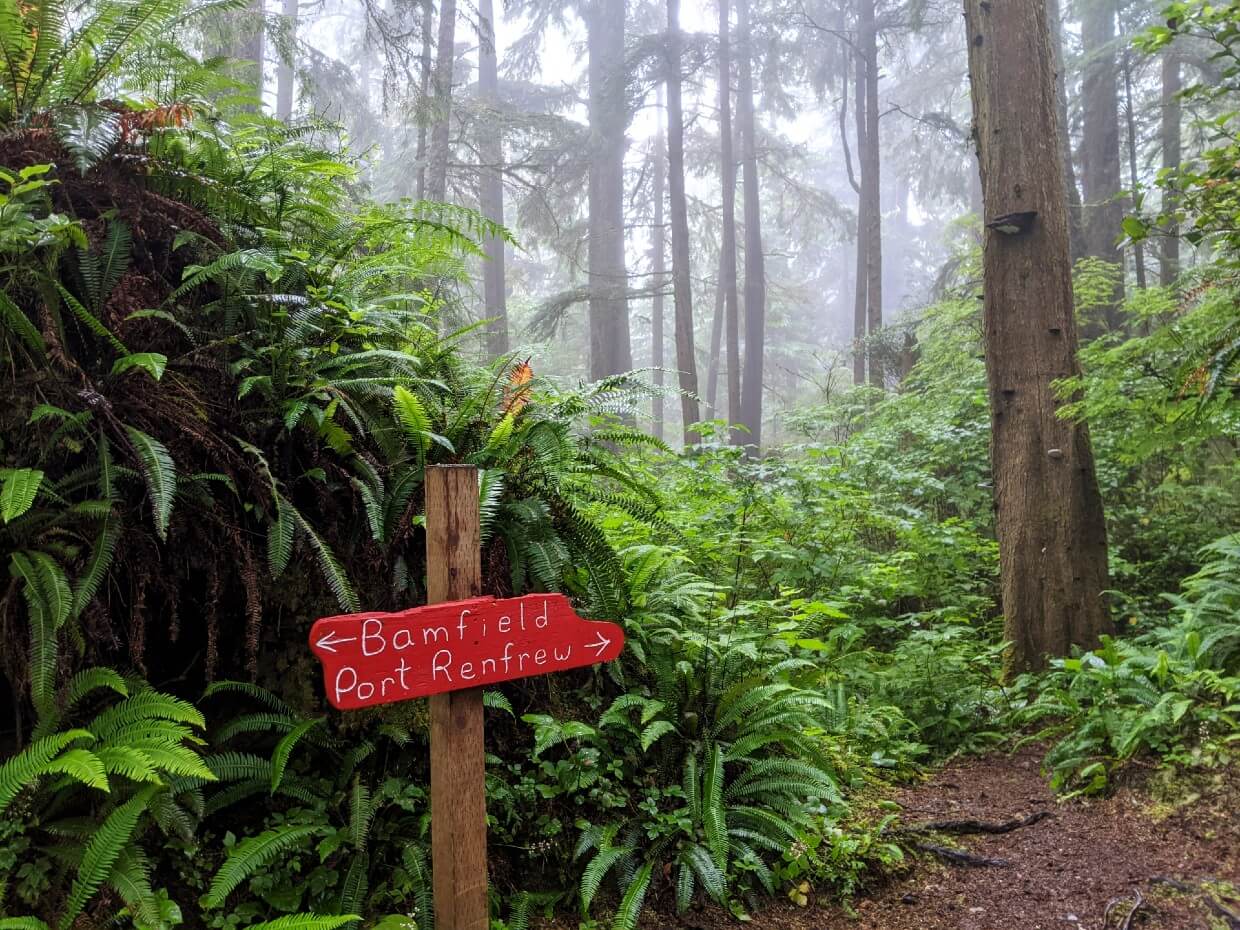
The West Coast Trail is found on the most southern third of the island, between the remote communities of Bamfield and Port Renfrew. Part of the trail overlooks Washington State in the USA.
How long is the West Coast Trail?
Officially, the West Coast Trail is 75km long. That is the distance given by Parks Canada.
In practice, however, the West Coast Trail is probably a bit longer than that.
Estimates vary, but most people who have tried to measure it say that the trail is probably around 10km longer.
There are kilometre markers along most of the route, but they do come and go. These markers count upwards from the Pachena Bay (northern) trailhead. Kilometre 75 is therefore at Gordon River (southern trailhead).

For the purpose of this post (and to keep things simple), I will refer to official Parks Canada distances as noted on the official West Coast Trail map. The map counts kilometres from Pachena Bay.
Where possible, I’ve tried to list both kilometre distances – the first from Pachena Bay (northern trailhead) and then the second from Gordon River (southern trailhead). If I’ve listed only one kilometre distance, then it is from Pachena Bay.
It is not necessary to traverse the entire 75km route to hike the West Coast Trail. Hikers also have the option to start at the mid-trail point, at Nitinaht Narrows.

How difficult is the WCT?
I would class the WCT as a challenging hiking trail. While not the hardest backpacking trail in British Columbia, the West Coast Trail is definitely not one to take lightly.
80 to 100 people are evacuated from the West Coast Trail each season. That means that there is a rescue at least every two days. And in my experience, this statistic is absolutely true.
Some of the rescues are related to fitness but most are the result of accidents – specifically slips, trips and falls on the slippery terrain.
In 2022, a hiker suffered eye and brain damage after falling on a branch in the forest. This hiker was both fit and experienced. Accidental injury on the WCT can happen to anyone.
It should also be noted that it took 5.5 hours for this hiker to be evacuated from the trail. Rescue is not necessarily quick or easy in this area.

Varying terrain
The route is long (75km), features a variety of terrain and is also located in an isolated area subject to challenging weather conditions such as torrential rain, high winds and fog. Some sections of the trail are always muddy.
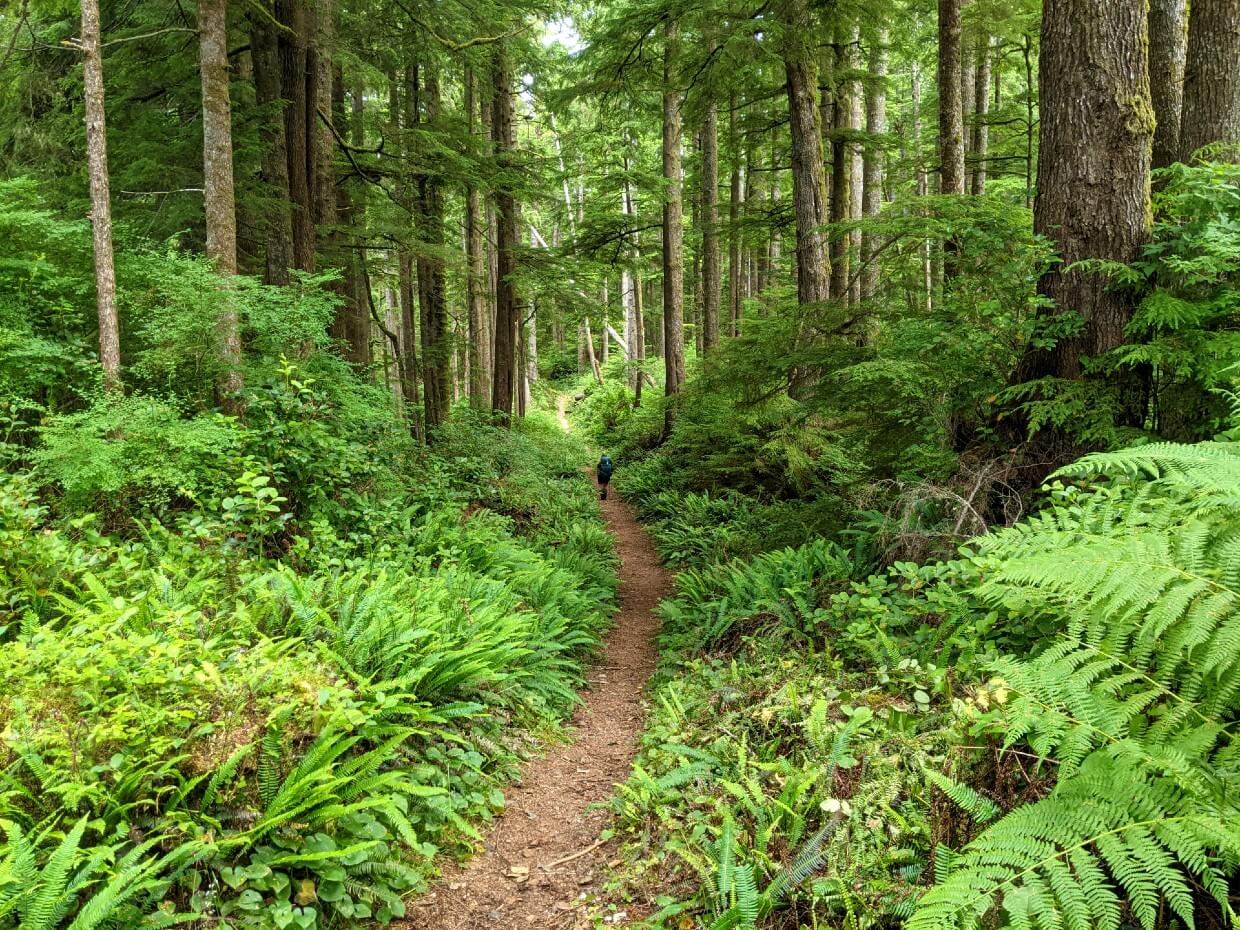
The West Coast Trail has both beach and forest sections. In the northern half, the forest is traversed with a mostly level hiking path, with only little elevation gain or loss (besides the ladders).
In the south, the forest sections are more like an obstacle course. Expect rocky and uneven surfaces, fallen trees, huge tree roots, thick bog, rocky surfaces and slippery boardwalks of varying condition.
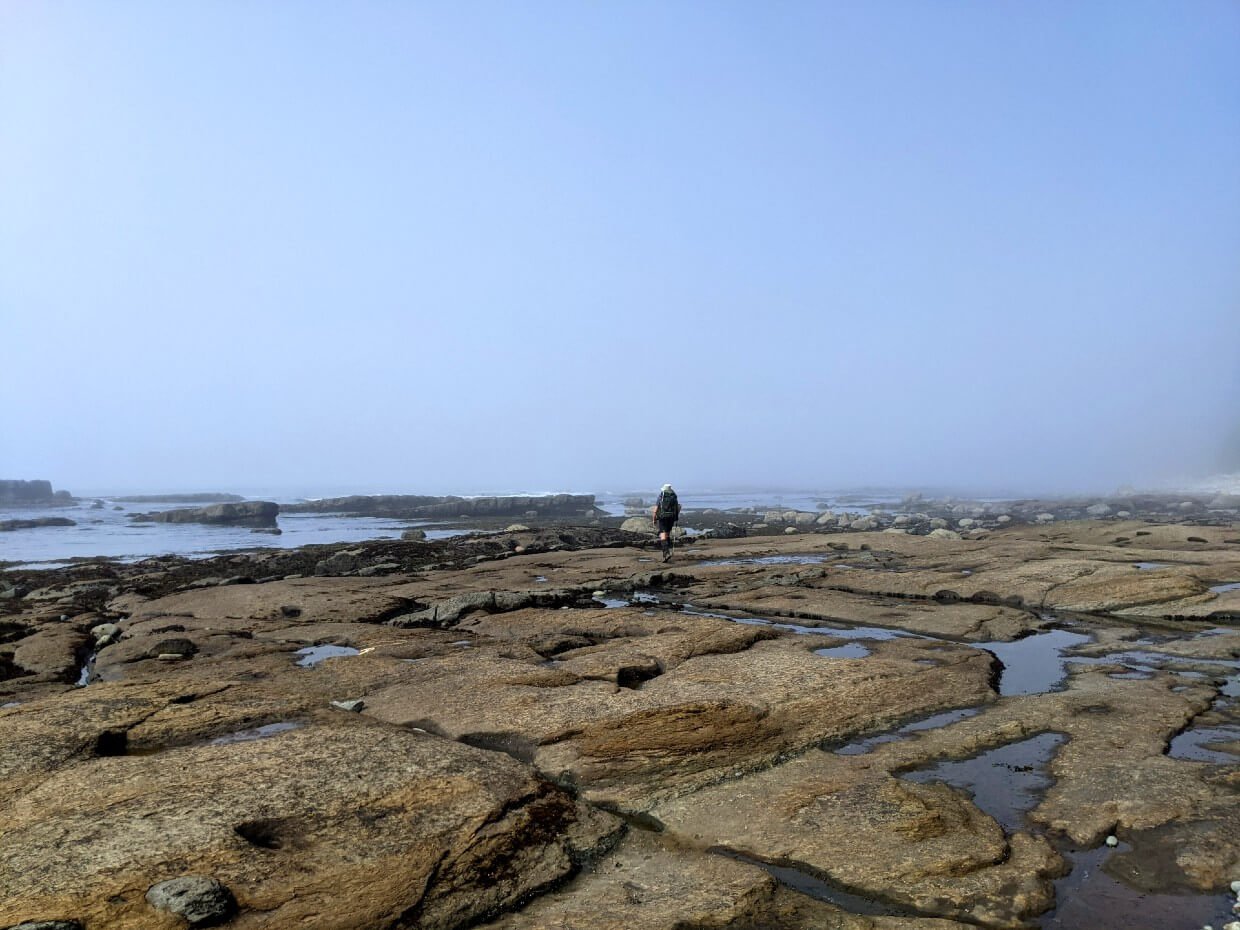
The beach sections vary hugely in difficulty too. The northern half features some lovely long stretches of sand (compact when wet) while the south also offers boulder fields, surge channels and quicksand-like beaches.
Weather
The difficulty of the WCT significantly increases according to the season and condition of the trail, as well as the weather experienced.
Rain is common in May, June and September, resulting in more mud, potential flooding and even slipperier boardwalks.
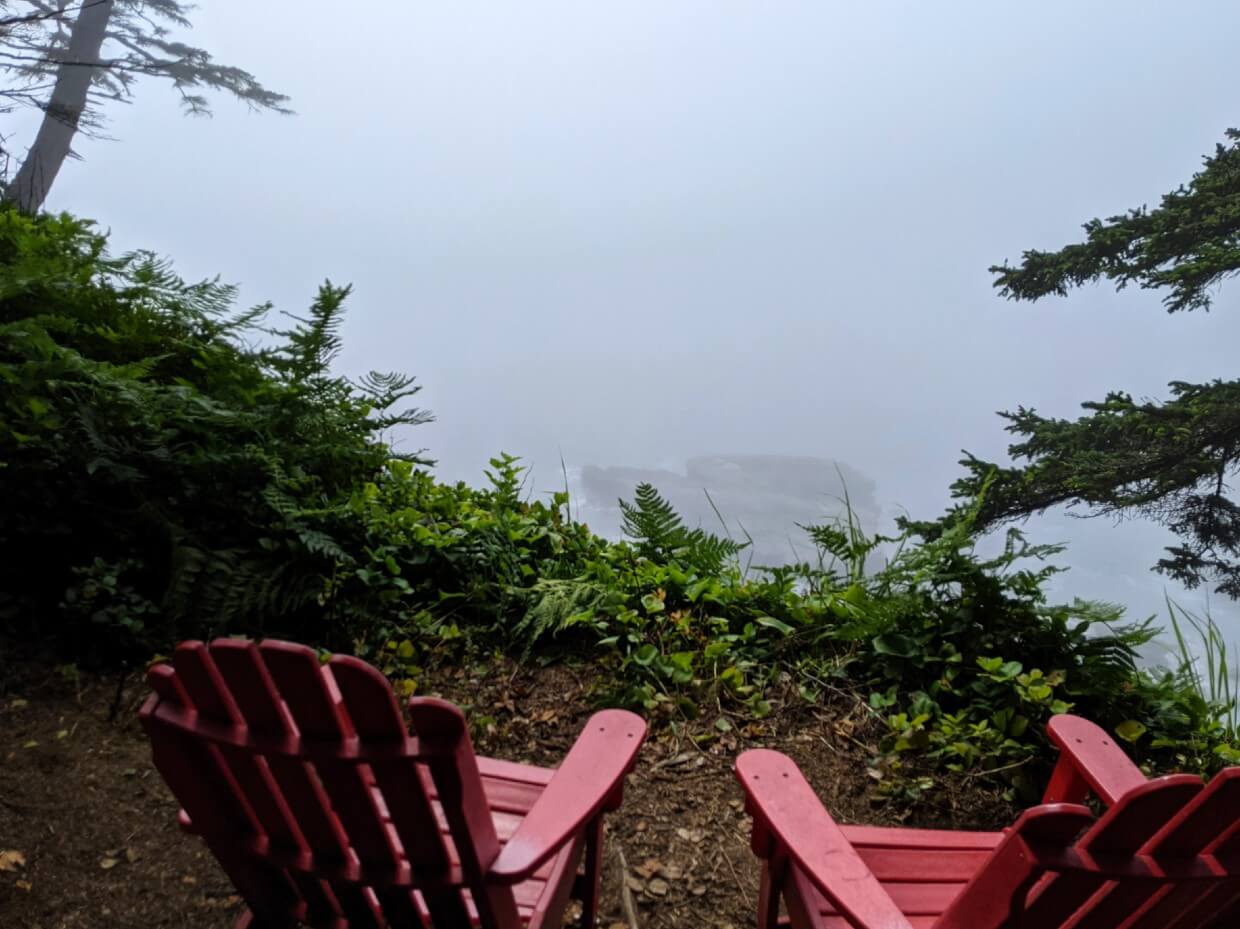
Coastal fog can be present at any time but is more common in July and August.
‘But our weather forecast looks great, with sun everyday!’ – yes, ours did too. Yet we were trapped in coastal fog for four straight days.
The average daytime temperature during our July trip was 12°C. Just 200m beyond the shoreline, the rest of Vancouver Island was enjoying blue skies and 23°C temps.
Length of trip
The length of your intended trip can also exacerbate the difficulty of the WCT.
An eight day thru-hike of the WCT will be inherently easier than a five day one.
Most people thru-hike the West Coast Trail in seven days, which allows for more time hiking the most challenging sections of the route.
Tides
Coastal hiking has some unique challenges, with ocean tides (the rise and fall of sea levels) being the most significant.
When hiking the West Coast Trail, you need to understand how to read a tide table and be prepared to hike according to it.
Skip to the tides section of this guide to learn more.

River and creek crossings
There are four significant river and creek crossings on the West Coast Trail. All have cable cars to help assist hikers with the crossings, but they may not always be operational.
After torrential rain, these rivers and creeks (and potentially other creeks as well) may flood.
Skip to the river crossings section of this guide to learn more.
Section by section breakdown
As mentioned above, some sections of the trail are easier than others.
Here are my ratings. Please note that distances are from Pachena Bay and the difficulty rating is given in relation to other sections of the WCT only.
| Section of trail | Difficulty | Description |
| Pachena Bay Trailhead to Michigan Creek Campground (0-12km) | Easy | Well established, mostly flat forested path, handful of ladders |
| Michigan Creek Campground to Tsocowis Creek Campground (12-16.8km) | Easy | Choice of forest or beach (mostly packed sand, rock shelves, pebbles, Darling River crossing) |
| Tsocowis Creek Campground to Klanawa River Campground (16.8km to 22.8km) | Mostly easy | Starts with multiple ladders up to flat, forested trail above coast. Some additional ladders. Return to beach at 20km, mostly rock shelves and pebbles (moderate section) |
| Klanawa River Campground to Nitinaht Narrows (22.8km to 32.3km) | Easy | Cable car crossing followed by forested trail with boardwalks above coast. Ladders down to Tsusiat Falls and optional pebble beach section. Forest features narrow but well established path, mostly flat. Some mud, small ladders |
| Nitinaht Narrows to Cheewaht River (32.3km to 36km) | Easy to moderate | Downhill towards Cheewaht River. Long stretches of forested boardwalk, varying quality. Tree root obstacles |
| Cheewaht River to Cribs Creek Campground (36km to 42.5km) | Moderate | Starts with long sandy beach traverse, before forest/beach trails divide. Forest trail is high above coast, narrow but established and mostly level. Beach features rock shelves, boulders, ladders to bypass headlands |
| Cribs Creek Campground to Carmanah Beach (42.5km to 44.2km) | Mostly easy | Sand and pebble beaches until Carmanah Lighthouse, then short, forested section with ladders and boardwalk |
| Carmanah Beach to Walbran Creek Campground (44.2km to 53km) | Easy | Sand and pebble beaches. Some rock shelves. Biggest challenge is fatigue from pea gravel close to Walbran Creek. Depending on conditions, may need to wade or use cable car to cross creek |
| Walbran Creek Campground to Cullite Creek (53km to 57.9km) | Difficult | Ladder access to forest trail which features boardwalks of varying condition, root obstacles, log bridges, two shoreline bog sections, mud, more ladders and the Logan Creek suspension bridge. 8 ladders down to Cullite Creek. Wade creek or use cable car |
| Cullite Creek to Camper Creek Campground (57.9km to 62.2km) | Difficult | 11 ladders up to forested trail which features boardwalks of varying condition, root obstacles, log bridges, a wooden bridge, fallen trees, mud and more ladders |
| Camper Creek Campground to Beach Access A (62.2km to 65km) | Difficult | Wade creek or use cable car. Ladders up to forested trail which features boardwalks of varying condition (some elevated), root obstacles, log bridges, mud and a wooden bridge |
| Beach Access A to Thrasher Cove Junction (62.2km to 70km) – Beach route | Difficult | Coastal option with rock shelves, surge channels to traverse around, smaller ones to jump across, rock pools, seaweed and 2km giant boulder/log section. Steep uphill terrain, four ladders and additional 1km from Thrasher Cove Campground to inland junction |
| Beach Access A to Thrasher Cove Junction (65km to 70km) – Inland route | Difficult | Inland forested option featuring many log bridges, tree root obstacles and a lot of mud. Lots of trip/slip hazards, slow going terrain. |
| Thrasher Cove Junction to Gordon River Trailhead (70km to 75km) | Difficult | Forested trail with rocky and rooty surface and 200m elevation gain/loss. Mud, root obstacles, ladders, fallen trees, Occasional steep terrain, short boardwalk sections. Trail ends with long vertical ladder down to beach |
Hiking the WCT as a novice backpacker
Parks Canada states that the WCT is for hikers who are:
- experienced in overnight backpacking AND
- able to hike long distances through rough terrain carrying a heavy backpack AND
- prepared to have a wilderness experience.
- able to wait if conditions warrant delays
I absolutely agree with this assessment.
For these reasons, I would not recommend thru-hiking the WCT as a first time backpacking trip. If you’re new to backpacking, I’d suggest a couple of overnight (or longer, if you can) hiking trips first.
Not only will this experience help dial down your gear and food preferences, but it will also get you used to carrying heavy loads over a sustained distance.
Fundamentally, you’ll also discover whether you actually like backpacking or not!
After starting the WCT, it is both difficult and expensive to leave without finishing.

When to hike the WCT
West Coast Trail’s operating season runs from the start of May to the start of October (1st May to 7th October in 2025).
The trail is closed the rest of the year ‘due to prolonged periods of heavy rain, strong winds, high tides, large waves, and short daylight hours’ (source: Parks Canada).
With a temperate rainforest climate, the West Coast Trail receives mild, year round weather with periods of heavy rainfall from September to June. The average summer temperature is 14° Celsius (57° Fahrenheit).
In my opinion, July and August are the best months to hike the West Coast Trail. These months have the least amount of rainfall. Due to this, the trail will also be the driest.
On the negative side, fog is more common in July and August. This can really bring average daytime temperatures down. Campfires are often banned during these months as well.
Hiking the West Coast Trail in May, June and September is inherently more challenging. Periods of heavy rain are more common and the trail is likely to be wet and muddy. Flooding is also possible.
If you’re planning to hike the West Coast Trail in these shoulder season months, I would recommend having more flexibility with your schedule OR a slower itinerary (7 days minimum).
Wet conditions can slow hiking speed. In the case of flooding, it may not be possible to cross rivers or creeks immediately.
The best direction to hike the West Coast Trail
The West Coast Trail can be hiked northbound or southbound from each of the three trailheads.
The choice of which direction to hike is yours to make, however it is necessary to finalise this decision at the time of making a reservation.
West Coast Trail hikers starting at Gordon River are northbound, while Pachena Bay hikers are southbound.
Those starting at Nitinaht Narrows can choose whether to hike north or south. For an extra fee, Nitinaht Narrows hikers can actually hike both directions. I talk about this more in our dedicated West Coast Trail itinerary post.
So which direction should you hike? There is no perfect answer, but I can give you some pointers.
More difficult/easier terrain to start
As explained earlier in this guide, the southern end of the WCT (between Gordon River and Walbran Creek) feels more like an obstacle course than a hiking trail.
Personally, I like getting harder terrain over and done with. After we had passed Walbran Creek, the rest of the WCT felt like a breeze in comparison.
Some hikers like the idea of building up to more difficult terrain. For me, that would only cause anxiety.
I was much happier hiking the rest of the trail knowing that nothing would be more difficult than the section I had already passed, rather than worrying about what was ahead.
Heavier/lighter backpacks
Hikers starting at Gordon River must carry the full weight of their backpacks over the most challenging West Coast Trail terrain.
Southbound hikers, on the other hand, usually have lighter backpacks by the time they reach the Walbran Creek area.
I carried the majority of our food, so the weight of my backpack was reduced as we ate through our supplies. My backpack weighed 8lb (3.1kg) less at Pachena Bay than it did when I started in Gordon River.
Ferry timing
The Gordon River ferry runs from 8.45am to 3.30pm only. This isn’t a problem for northbound hikers, who take the ferry to start the trail.
Those heading southbound, however, need to plan ahead to ensure correct timing. With the southern end of the trail being so challenging, it is vital not to underestimate how long it will take to hike this section.
Hikers who miss the ferry are forced to camp on the tiny Gordon River beach for the night or backtrack to Thrasher Cove. The Gordon River beach has no outhouse, food storage or water source.
Transportation
Usually traversed in one direction only, WCT hikers start at one trailhead and then finish at another. For this reason, it is absolutely necessary to think about transportation logistics (so much so that I wrote a guide about it!)
All three trailheads are reasonably remote, and depending on where you are travelling from, you may need to travel for more than one day to reach them.
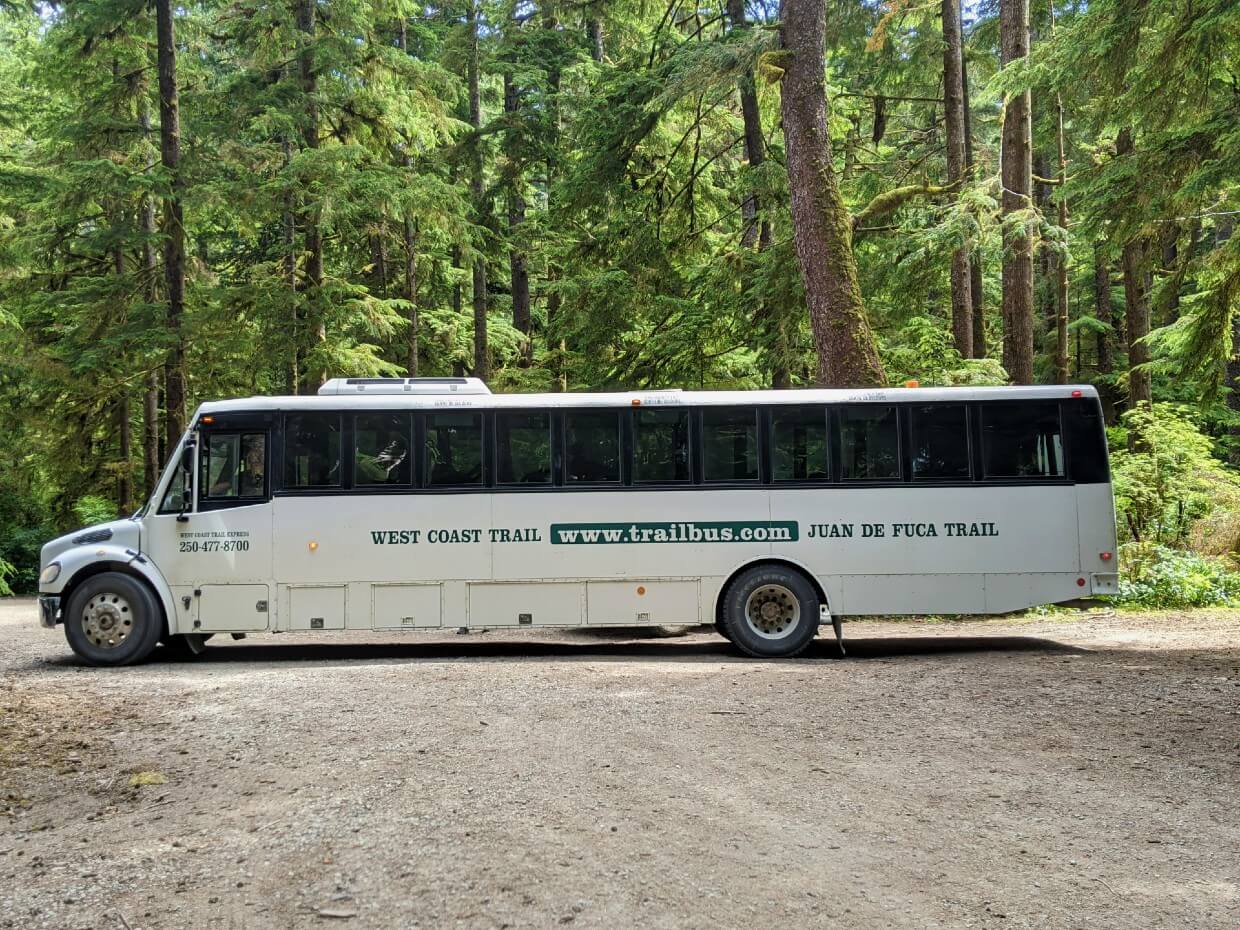
The West Coast Trail Express bus offers a shuttle service between the trailheads, but only arrives to each trailhead once during suitable hiking hours (12.30pm at Pachena Bay, 9.15am at Gordon River).
This may be a deciding factor of your decision-making process regarding which way to hike the West Coast Trail.

Trailhead accessibility
For some hikers, trailhead accessibility is the deciding factor for hiking direction.
With all thru-hikes (not just the WCT), my preference is to park a vehicle at the finishing trailhead.
This offers complete flexibility regarding finishing time. It also means that we can continue onto our next destination without hassle.
If this is also your preference, the type of vehicle you have may determine which trailhead you should start at.
Only accessible via unpaved industrial roads, Pachena Bay is a bumpy, long journey from anywhere on Vancouver Island. A high clearance vehicle is definitely advantageous.
Gordon River, on the other hand, is located on a paved road, and is only two hours drive from the city of Victoria.
Where does the West Coast Trail start and end?
The West Coast Trail has three trailheads. Entry or exit at any other point is not allowed, unless during emergency evacuation.
- Pachena Bay (northern trailhead), near Bamfield
- Nitinaht Narrows (mid-point trailhead), near Nitinaht Village
- Gordon River (southern trailhead), near Port Renfrew
All three trailheads are reasonably remote, with limited services and no cellular signal.
Gordon River has the biggest choice of services and accommodation, followed by Pachena Bay. Nitinaht Village (the access point of Nitinaht Narrows) is only accessible via unpaved roads.
I highly recommend this Backroad Mapbook for navigating Vancouver Island’s complex logging road network.
Check out our dedicated West Coast Trail transportation guide for all the info you need regarding pre and post hike logistics. It really can be quite confusing to get your head around it!
Where to park
Vehicle parking is available at each of the West Coast Trail’s three trailheads. Again, the details can be found in our dedicated West Coast Trail transportation guide.
West Coast Trail orientation
All West Coast Trail hikers must attend an orientation at one of the trailheads. This can be completed either the morning before starting the hike or the prior afternoon.
At the orientation, hikers receive important safety information, a trail map and their West Coast Trail Overnight Use Permit.
The orientation has changed a few times since 2021, with a two-part orientation (online and offline) given during the pandemic.

Hikers are required to attend an in-person orientation session. These are held at 10am and 2pm at the Pachena Bay and Gordon River WCT Offices, and 7am at the Nitinaht Visitor Centre.
As mentioned above, hikers can attend either the orientation session on their departure date OR the afternoon orientation the day before. Hikers who attend the day before must still return to a WCT office to pick up their permit on their departure day.
How to reserve the West Coast Trail
Only 75 hikers can start the West Coast Trail every day – 25 from Gordon River, 25 from Pachena Bay and 20 from Nitinaht Narrows.
Hikers must have a WCT Overnight Use Permit to backpack the trail. 100% of WCT Overnight Use Permits are reservable.
The West Coast Trail reservation system usually opens in January each year, with the date usually being announced in December of the preceding year.
Look for updates on Parks Canada’s ‘Plan Your Visit’ page. The actual West Coast Trail page is not updated as often.
In 2026, the WCT reservation launch date was originally 19th January at 8am PT and then later rescheduled to 5th February 2026 at 8am PT after technical issues.
To reserve your spot, you’ll need to know:
- The date you’d like to start – between May 1 and September 30
- The entry point/trailhead you’d like to start at – Gordon River (south), Pachena Bay (north) or Nitinaht Narrows (mid-point)
- Your exit point – Gordon Bay, Pachena Bay or Nitinaht
- How many nights you’d like to spend on the trail – this can be revised at orientation and it is for safety purposes only
- Number and names of people in your hiking group – total number including yourself (names can be changed later)
- Contact phone number – the most convenient number for Parks Canada to contact you
- Emergency name and phone number – in case of an emergency situation on the trail
Reservations can be made online or by phone (1-877-737-3783). I will be focusing on the online process here.
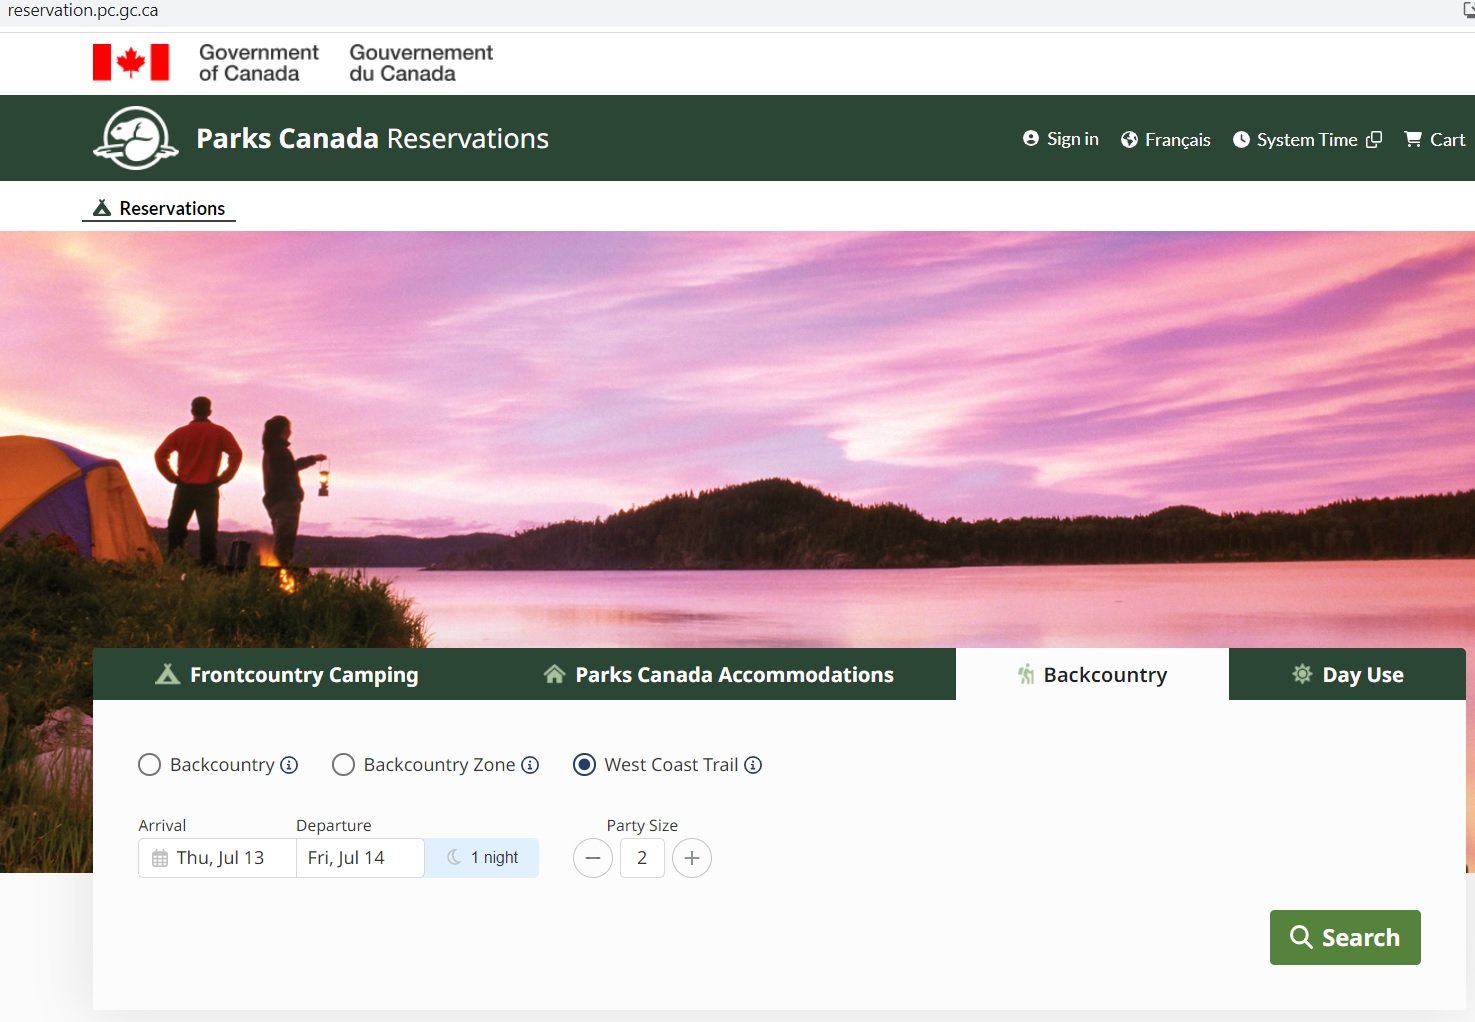
Reserving the West Coast Trail online
The WCT is very popular and the most in demand dates will usually be booked within an hour or so of the reservation launch. July and August dates usually disappear first.
If you have a specific date, week or trailhead in mind, I’d highly recommend being ready for the reservation launch to secure your spot.
If not, you will likely have to rely on cancellations closer to your desired trip date.
Before the reservation launch, I would highly recommend getting very familiar with Parks Canada’s reservation platform. Practice making a reservation, so you know exactly what to do on the day. Speed matters.
In 2026, there will be a waiting room/queue system in operation. This was previously removed for the 2025 season but brought back after technical issues.
Using the Parks Canada Reservation Service (with queue system)
- On reservation launch day, navigate to the Parks Canada Reservation Service homepage prior to the opening time (10 minutes before is fine).
- On launch day, starting 30 minutes before reservations open, all website users are placed in a waiting room page
- At the exact opening time, the page will automatically refresh and all users randomly assigned a place in the queue. Do not refresh!
- Anyone who arrives after the launch time will be placed at the back of the queue
- When it is your turn, a pop-up will appear. Wait and then the page will automatically refresh to allow access onto the site
- Set up your preferred reservation as per the following instructions.
- Click the ‘Backcountry‘ tab and then ‘West Coast Trail‘
- Choose your arrival and departure dates and party size, then click ‘Search’
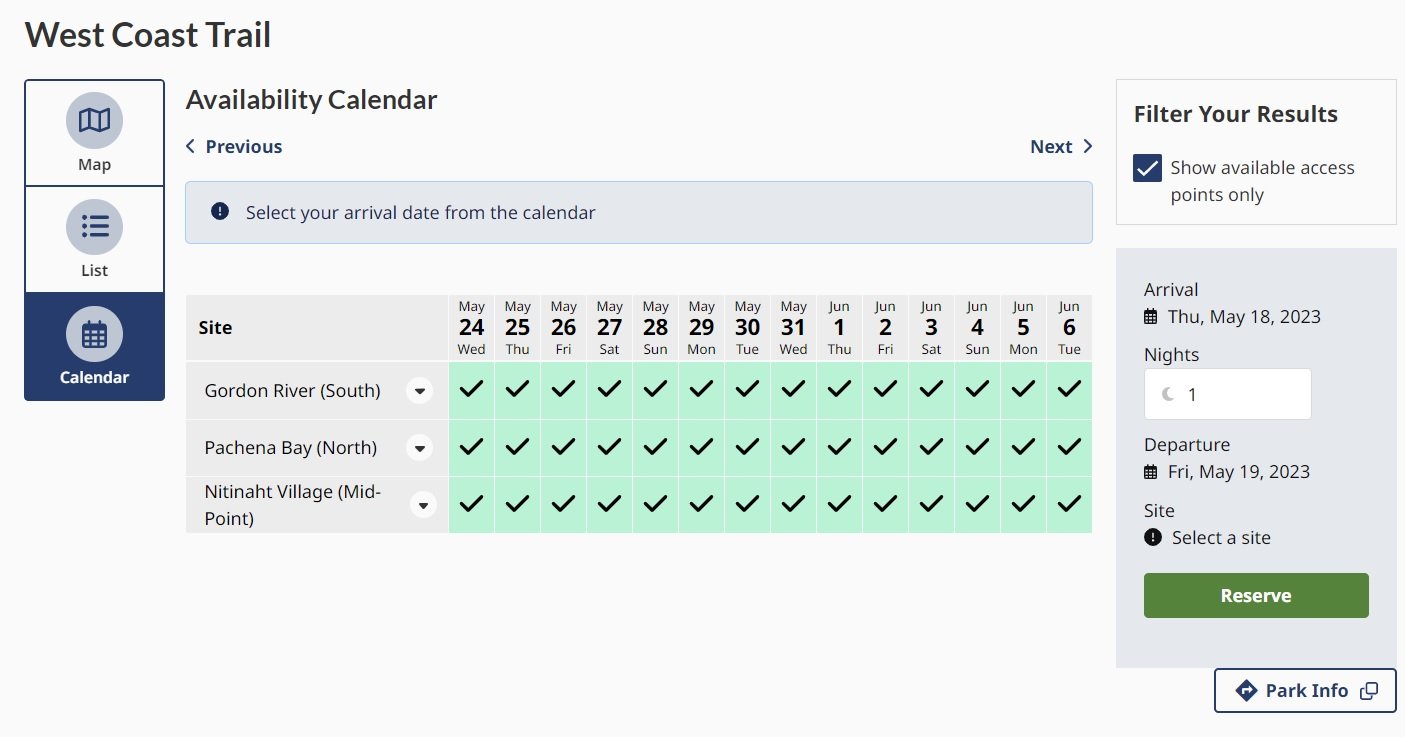
- A map will appear below. Click the ‘West Coast Trail‘ (bottom right)
- Scroll up a little and select your Access Point and Exit Point from the drop down menus
- If everything was completed correctly and there is still availability, the next page will display your reservation details, along with Parks Canada rules.
- Tick the two boxes and select ‘Confirm reservation details’
- At this point, your reservation is temporarily secured. You now have 20 minutes to log in and pay
If there is no availability, click ‘Calendar‘ (to the left of the map). The green ticks signify available arrival dates from each access point. Click a date and then increase the number of nights on the right before clicking ‘Reserve.’
West Coast Trail reservation tips
- Open a Parks Canada account. If you don’t already have an account with Parks Canada, be sure to open one ahead of time. It will save a LOT of stress
- It’s important to be flexible – have a few different dates in mind and be ready to adapt your plans
- Practice, practice, practice! The faster you are, the more likely you are to be able to secure the spots you want. This is the single most important thing you can do to improve your chances
- Make sure you select your exit point. If not, the payment will not go through properly
- Nitinaht Narrows is the least popular starting trailhead. If your original thru-hike plan doesn’t work out, consider whether you’d be content with a shorter backpacking experience
- If you don’t secure a reservation on launch day, don’t panic. Plans change and many people cancel before and during the hiking season. Use a service like CampNab to secure a cancellatiom
- Not sure who will be hiking with you? Don’t worry too much about names of the other guests on the reservation – they can be changed later
- Not sure how many days you will be on the WCT? No problem – Parks Canada will ask for a confirmation at the in person orientation
- Didn’t get a reservation? Check for cancellations often. You can also join this West Coast Trail Facebook group and look out for members looking to transfer their reservation
- It is not possible to ‘officially’ buy a reservation from someone else but the permit holder’s name can be changed by contacting Parks Canada. You can then organise payment directly with the other person

How much does the West Coast Trail cost to hike?
In quick summary, the West Coast Trail is not a cheap hiking experience.
Budget around $340-380 for the fees (breakdown below) plus $100-200 for local transportation costs (gas, bus, parking).
The below table lists mandatory WCT fees. A few things to note:
- The first four fees are paid at the time of reservation
- The National Park admission fee must be paid at orientation, before starting the hike.
- The Nitinaht Village ferry, for hikers starting at the West Coast Trail’s midpoint) must be paid in Nitinaht Village, prior to boarding the water taxi. Cash is preferred
| Type of fee | WCT thru-hike (Pachena Bay to Gordon River or vice versa) | Nitinaht Village to Gordon River (mid-point to southern trailhead) | Nitinaht Village to Pachena Bay (mid-point to northern trailhead) |
| West Coast Trail Overnight Use Permit | 184.75 | 184.75 | 184.75 |
| Reservation fee | 37.25 | 37.25 | 37.25 |
| Gordon River ferry fee | 28.00 | 28.00 | N/A |
| Nitinaht Narrows ferry fee | 28.00 | N/A | N/A |
| Nitinaht Village to Nitinaht Narrows water taxi | N/A | $70.00 | $70.00 |
| National Park daily admission fee | Varies on intended length of hike. See below | Varies on intended length of hike. See below | Varies on intended length of hike. See below |
The West Coast Trail is part of Pacific Rim National Park. Like other national parks in Canada, there is a daily admission fee.
In 2026, the daily fee was $12.25/adult.
Most hikers traversing the length of the WCT will find it better value to purchase an annual pass.
If you plan to explore beyond Pacific Rim National Park, Parks Canada’s Discovery Pass offers the best value.
A Discovery Pass offers unlimited free entry to more than 80 national parks and national historic sites across Canada for one year. It costs $83.50/adult or $167.50/group.
There is a cheaper annual pass that just covers Pacific Rim. It costs $60.50/adult and $120.75 for a group.
Discovery Passes and Pacific Rim Passes can usually be purchased at the trailheads. If you can get one beforehand, I’d recommend it as they occasionally run out.
IMPORTANT – From 19th June to 7th September 2026, there are no admission fees for national parks and also national historic sites operated by Parks Canada (Canada Strong program).
Example fees – 7 day, 6 night Pachena Bay to Gordon River hike (or vice versa)
For WCT hikers traversing the full length of the trail over six days, the following mandatory fees apply:
| Type of fee | $CAD amount per person |
| West Coast Trail Overnight Use Permit | 184.75 |
| Reservation fee | 37.25 |
| Gordon River ferry fee | 28.00 |
| Nitinaht Narrows ferry fee | 28.00 |
| Pacific Rim annual pass | 60.50 |
| WCT thru-hike total | 338.50 |
Example fees – 5 day, 4 night Nitinaht Narrows to Gordon River hike
For WCT hikers traversing from the mid-point to the southern trailhead, the following mandatory fees apply:
| Type of fee | $CAD amount per person |
| West Coast Trail Overnight Use Permit | 184.75 |
| Reservation fee | 37.25 |
| Gordon River ferry fee | 28.00 |
| Nitinaht Village to Nitinaht Narrows ferry fee | 70.00 |
| Pacific Rim annual pass | 60.50 |
| WCT total, Nitinaht to Gordon River | 380.50 |
Example fees – 4 day, 3 night Nitinaht Narrows to Pachena Bay hike
For WCT hikers traversing from the mid-point to the northern trailhead, the following mandatory fees apply:
| Type of fee | $CAD amount per person |
| West Coast Trail Overnight Use Permit | 184.75 |
| Reservation fee | 37.25 |
| Nitinaht Narrows ferry fee | 28.00 |
| Nitinaht Village to Nitinaht Narrows ferry fee | 70.00 |
| National Park daily admission fee ($12.25 x 4 days) | 49.00 |
| WCT total, Nitinaht to Gordon River | 369.00 |
Other fees to consider
The cost of hiking the West Coast Trail does not end with the mandatory fees charged by Parks Canada.
Transportation
The vast majority of WCT hikers will find themselves finishing the trail at a different place than they started. It is therefore important to factor in transportation costs as well as the mandatory fees.
Bus is the most popular way to travel between the WCT’s trailheads. Here are the fees for the West Coast Trail Express (2025 prices, TBC for 2026):
| Bus journey | $CAD amount per person |
| Gordon River to Pachena Bay and vice versa (WCT Express) | 95.00 |
| Gordon River to Nitinaht Junction (WCT Express) | 80.00 |
| Pachena Bay to Nitinaht Junction (WCT Express) | 70.00 |
| Nitinaht Junction to Nitinaht Village (Nitinaht Lake Express) | 20.00 |
Additional services to Port Renfrew, Victoria, Nanaimo and Sooke are also available.
Vehicle parking
Vehicle parking is free at the Pachena Bay and Nitinaht Village trailheads. At Gordon River, a $7/night fee is charged per vehicle.
Accommodation
Something else to keep in mind is pre and post-WCT hike accommodation. We stayed at the Pacheedaht campground in Gordon River before starting the West Coast Trail.
Food
The cost of food is always a consideration when planning a multi-day hike such as this. The West Coast Trail, however, is special in that there is a place to eat (sometimes two) along the route as well.
We love food, especially seafood, so we stayed overnight at the Crab Shack. Eating both dinner and breakfast there (washed down with a couple of beers), we easily spent over $200 between us.
Some hikers, on the other hand, choose not to buy any food along the trail.
Skip to Trail Restaurants section for more info.

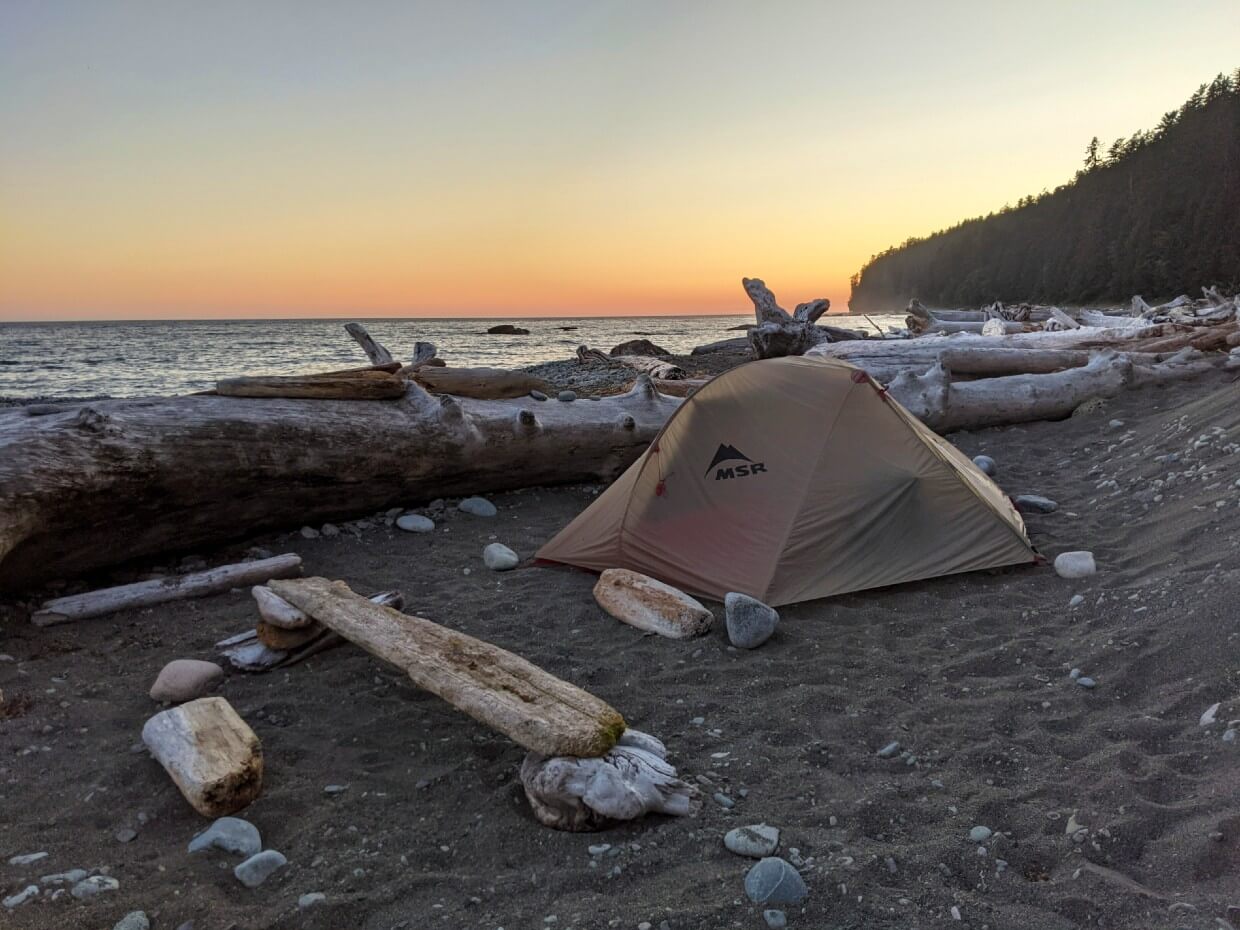
West Coast Trail campgrounds
Technically, you can camp almost anywhere on the West Coast Trail.
In practice, most West Coast Trail hikers stay at the designated Parks Canada campgrounds located at regular intervals along the route.
There are thirteen of these in total, with all but one offering outhouse and food storage facilities. There is no advance booking required for specific campgrounds.
I had so much to say about camping on the West Coast Trail that I wrote a dedicated post about it!
Click to read my West Coast Trail campground guide, which offers the lowdown about every campground, plus unofficial camping locations, paid accommodation options and essential camping tips.
West Coast Trail accommodation
The West Coast Trail is located on the traditional territory of the Huuay-aht, Ditidaht, and Pacheedaht First Nations. The trail travels through reserve lands at numerous points.
If you’re looking to add a little bit of luxury to your West Coast Trail hike (or just a dry night), consider booking a night of paid accommodation.
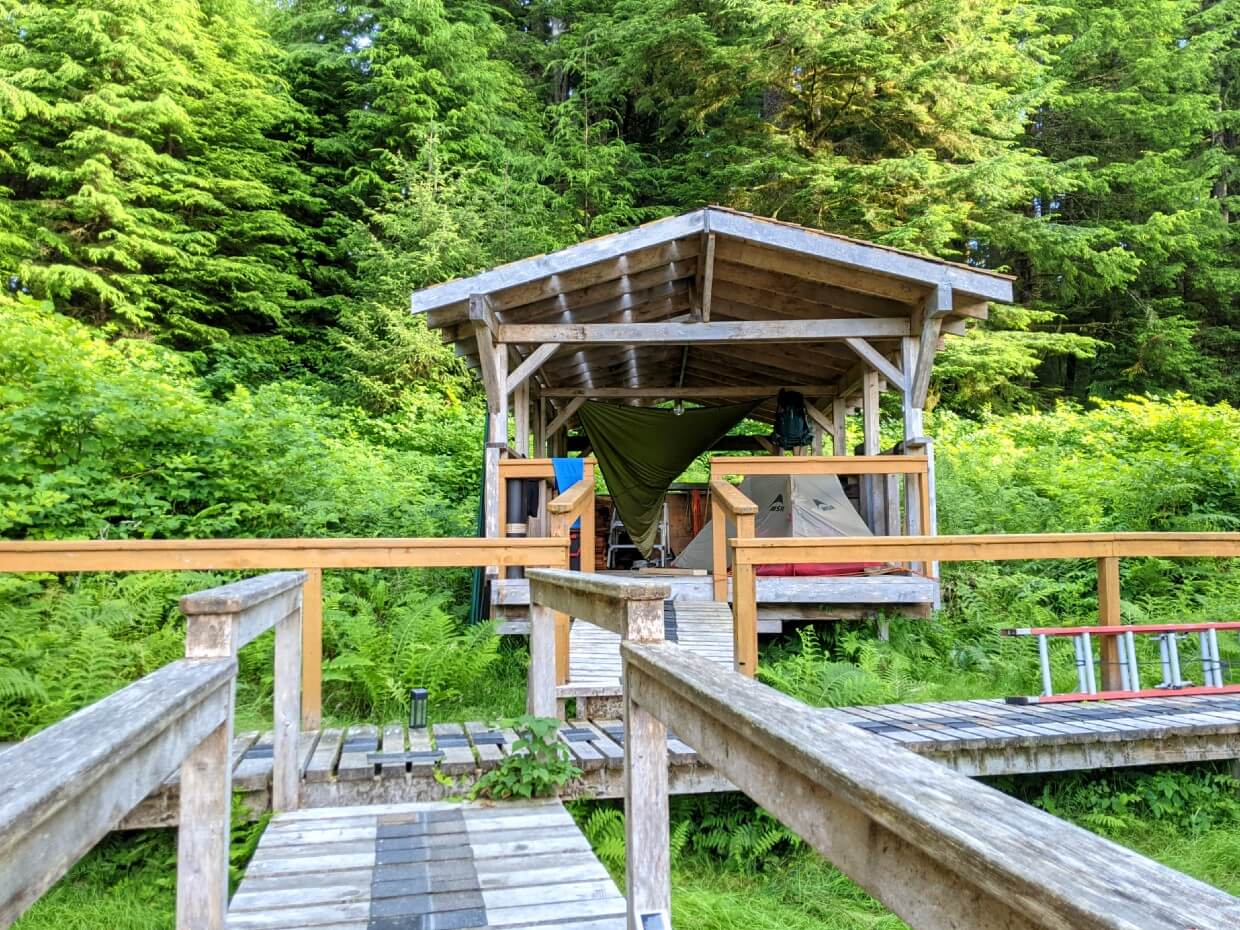
There are four cabins and a covered tent deck situated at Nitinaht Narrows (32.3km / 42.7km), just a few steps away from the Crab Shack.
For all the details, head over to my West Coast Trail accommodation guide.
Until recently, the Ditidaht Nation used to rent canvas walled tents and cabins at Tsuquadra Point (29.8km / 45.2km). Unfortunately, this service is no longer available.
How to navigate the WCT
For the most part, the West Coast Trail is relatively straightforward to navigate. With up to 75 hikers starting the trail each day during the operating season, it is a reasonably well-travelled route.
One of the best aspects of the West Coast Trail is that you will almost always be travelling with the ocean on your left or right side, depending on which trailhead you start at.
Direction is less obvious in the forest but since the vast majority of the path is well established, it is difficult to go too wrong. If you ever find yourself without an obvious route ahead, look up and around for a green Parks Canada hiker sign (below).
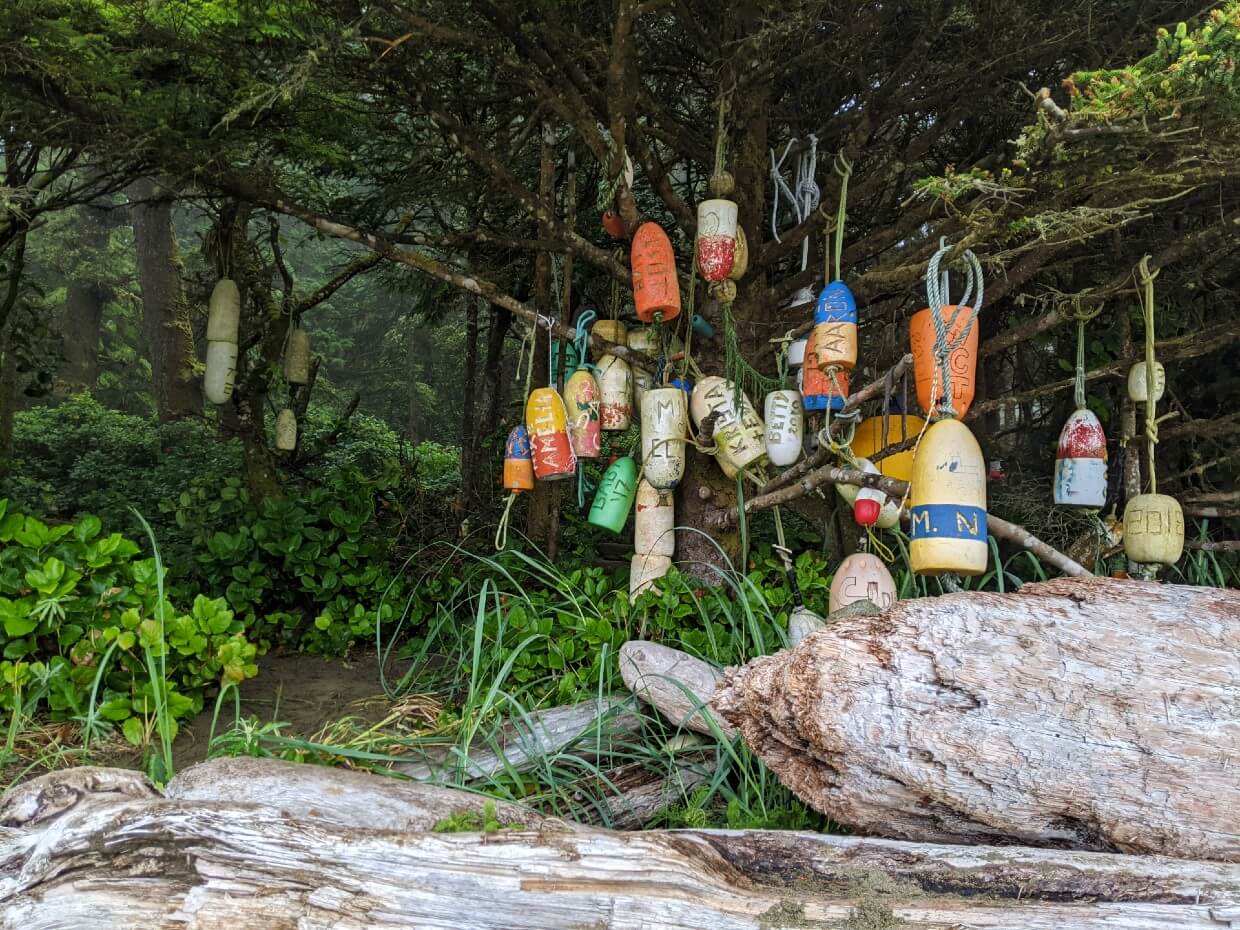
The trickiest part of navigating the West Coast Trail is knowing when to leave and exit the beach sections. Access points are usually adorned with colourful buoys and ocean debris in the surrounding trees.
The Parks Canada West Coast Trail map is the most helpful resource for navigation. You’ll be given a copy at orientation. Keep the map handy when hiking so you can pull it out and double-check your approximate location.
The West Coast Trail is featured on our favourite hiking app, Maps.me. Downloaded maps can be used offline.
If I was ever unsure about where we were on the map, I would bring out my phone and Maps.me would show our location right on the trail route.

West Coast Trail tides
The West Coast Trail features multiple mandatory and optional beach sections.
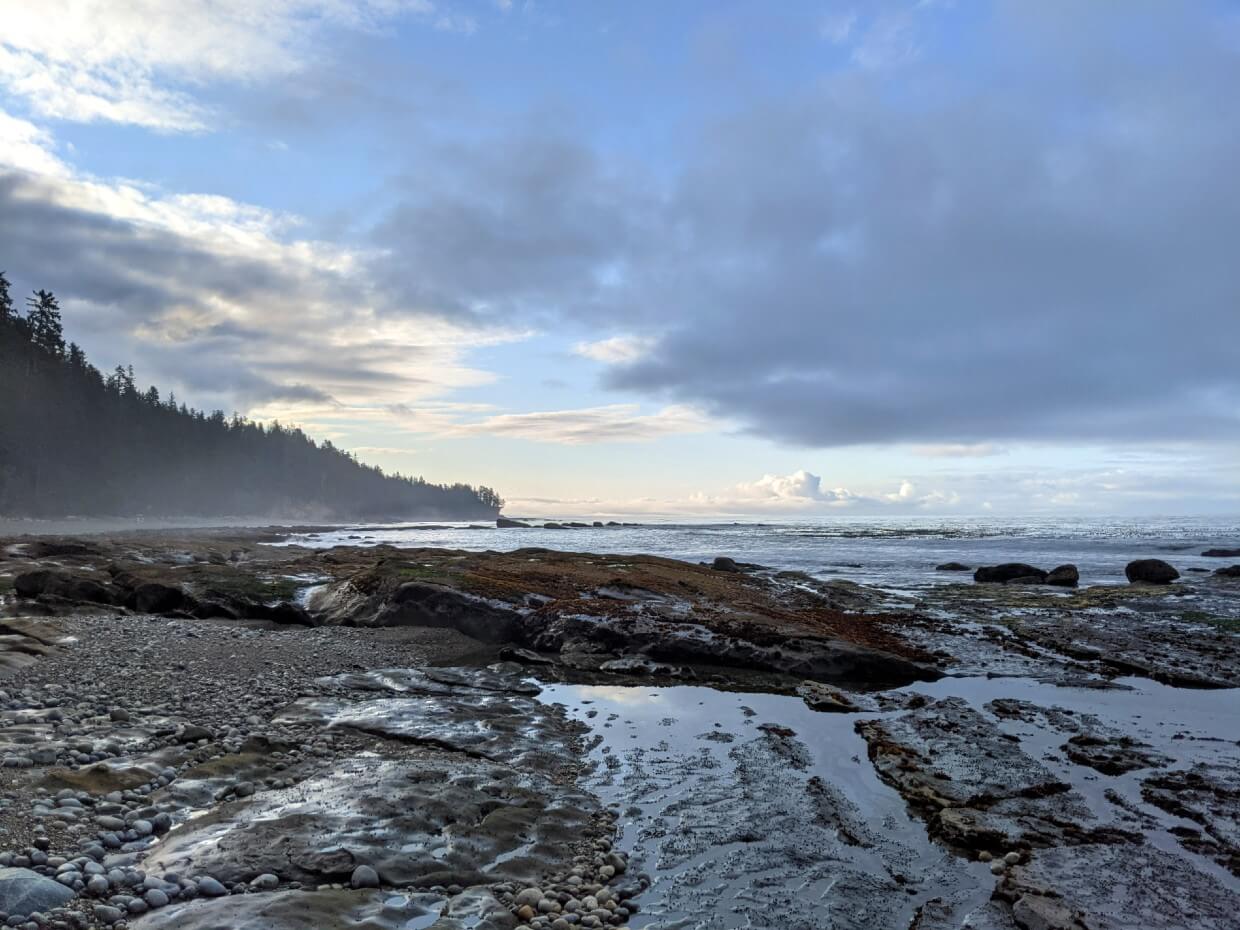
While I loved the gnarled nature of the old-growth forest sections, hiking on the beach was a lot more interesting and, as a general rule, easier too.
Coastal hiking, however, does require some knowledge of tides and how to read a tide table.
Coastal hiking safety
The West Coast Trail features both coastal and forest sections. In some places, hikers can choose to hike on the coast or in the forest.
Depending on the tides, it may prove necessary to take the inland, forest route as the coastal version would be unsafe (i.e. underwater) to hike.
For a couple of short trail sections, the beach is the only option and it may not be passable at higher tides (west of Klanawa, around Bonilla Point).
To know whether a beach section is safe to hike, you need to consult the Parks Canada West Coast Trail map (issued at orientation) and the relevant tide table.
Tide basics
Ocean tides are influenced by the gravitational pull of the moon on the Earth. The moon’s orbit is predictable and therefore tides are too. It’s actually possible to predict tides years in advance.
The time and height of tides varies between geographic locations.
On Vancouver Island’s west coast, there are two high and two low tides every 24 hours or so. The timing of these high and low tides changes every day.
Keep in mind that weather can affect high and low tides. High pressure systems (fair weather) can cause lower tides, while lower pressure systems (unsettled weather) can cause higher tides.
Wind can also influence the movement of water. During storms, water levels usually rise.
Tide tables
Tide tables display predicted tide heights throughout the day in one particular coastal area.
The best tide tables to use for the West Coast Trail are those produced for Tofino. If you know your Vancouver Island geography, you may be thinking that this seems like a strange thing to do.
Parks Canada recommends the Tofino tide tables as the coastline is more similar to that of the West Coast Trail.
Both Bamfield and Port Renfrew feature relatively deep inlets which cause the tide tables from these areas to be less accurate.
All tide references on the Parks Canada West Coast Trail map are therefore based on Tofino tide predictions.
At orientation, your Parks Canada map will be issued to you with a small Tofino tide tables for your relevant hiking dates. It is, however, pretty limited.
If you can, I would recommend downloading and printing an hourly Tofino tide table in advance of your trip (see below for example). I found this to be a lot easier to use, with less chance for error.

Using a tide table to predict tides on the West Coast Trail
Being able to read and understand a tide table is an essential skill for hiking the West Coast Trail. Luckily, it’s very easy and the mandatory orientation does cover the basics.
The West Coast Trail map produced by Parks Canada clearly notes the relevant maximum tide height for each coastal trail section. If there is no tide height listed, the beach is always passable (with the exception of huge storms).
For example, there is a note close to kilometre marker 16km that states ‘trail from Darling River east to this point passable at tides below 9ft/2.7m.’
Look at the tide table screenshot above (from July 2021). On 17th July at 1800 (6pm), the tide is predicted to be 3.0m.
This would therefore not be a good time to hike this particular beach section and the forest route would be need to be taken. Prior to that time, it would have been safe to hike all day.
Tidal problems on the West Coast Trail
The most significant tidal problem on the West Coast Trail is from Beach Access A to Thrasher Cove (65km to 69km). Here, tides below 2.4m tides are required to pass safely, with 1.8m required at Owen Point (67km).
This is not an area you want to be caught out by the tides. This section features surge channels and huge boulders, obstacles that require extra time and attention to cross.
For reference, we spent almost two hours hiking the short 2km section between Thrasher Cove and Owen Point. Backpacking a regular trail, we average 3-4km/hour.
If you have complete flexibility regarding your West Coast Trail dates, I would recommend checking the tide tables before reserving.
We really wanted to hike the coastal section around Owen Point and chose dates in July with low tides at optimal times for our northbound hike (midday).
Even if you don’t have this kind of flexibility, I’d still suggest studying the Parks Canada map and tide tables in advance of your trip. It’ll help pinpoint the sections in which you may need to take the forest route.

River and creek crossings on the West Coast Trail
There are four significant river and creek crossings on the West Coast Trail:
- Klanawa River – 22.8km / 52.2km
- Walbran Creek – 53km / 22km
- Cullite Cove – 57.9km / 17.1km
- Camper Creek – 62.2km / 12.8km
All of these significant crossings have cable cars to assist hikers (more information below).
In addition to these, there are further minor river crossings at:
- Michigan Creek – 12km / 63km
- Darling River – 14km / 61km
In dry weather, it’s usually possible to keep your feet dry while crossing from rock to rock. When the creeks are flooding, these crossings may prove to be more of a challenge.
Hiking during dry weather in mid July 2021, we did not have any issues crossing creeks and rivers. The cable cars were all operational and all other creeks were passable with a bit of a rock hopping.
In other times of year, however, it can prove to be more of an problem. In mid September 2021, two cable cars were temporarily broken. The rivers were also running high due to torrential rainfall.
This created a dangerous situation – some hikers were voluntarily evacuated, while Parks Canada advised others to stay put until the cable cars were fixed (which happened within 48 hours).
If a creek or river is flooding, prepare to wait 24 hours or more to cross. When it is safe, undo your pack hip-belt and wear sandals/water shoes to protect your feet.

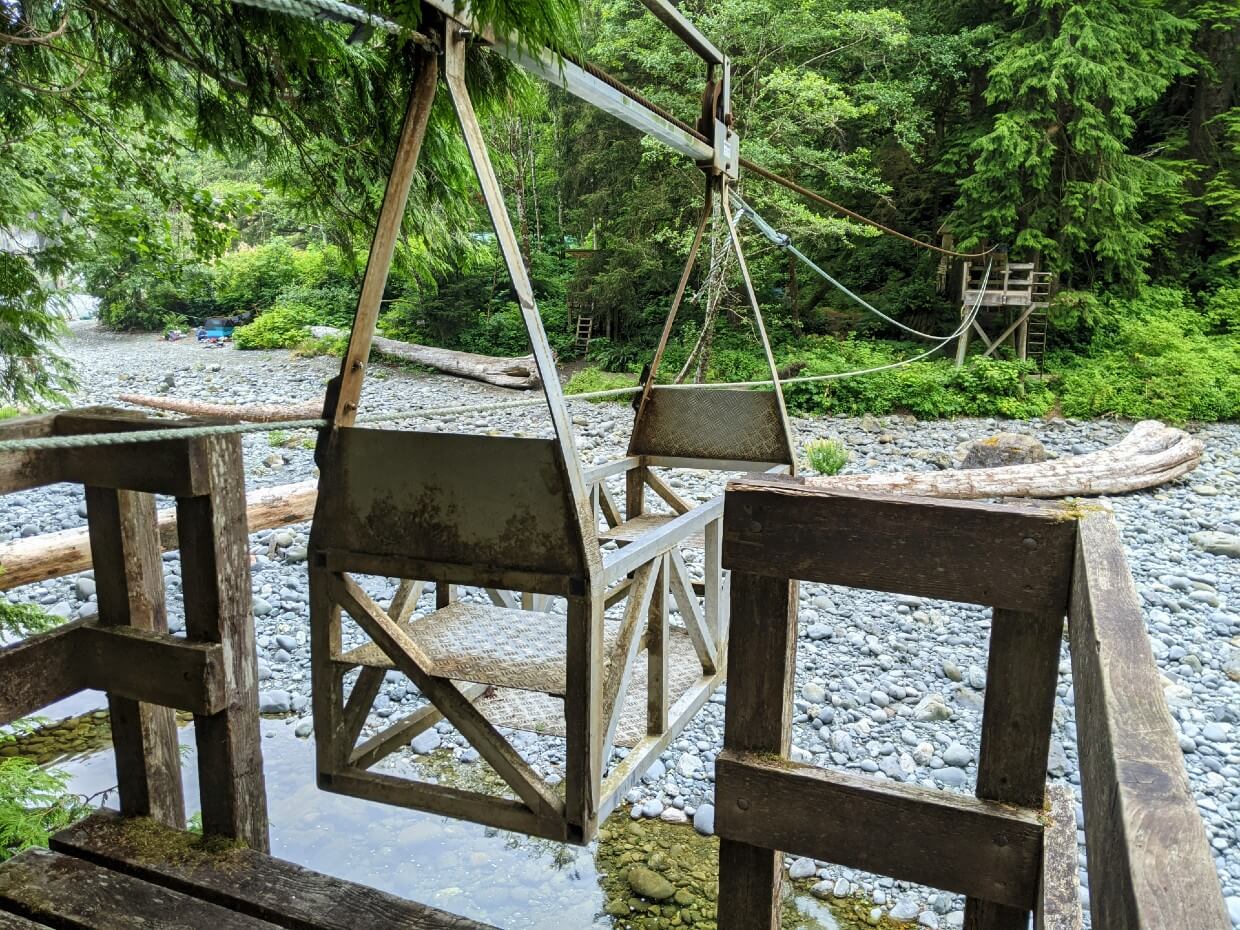
Cable cars
There are four cable car crossings on the West Coast Trail. If you’ve never used one, you may be a little intimidated.
While one person holds the cable car steady, the other puts the backpacks into the car. One person then gets in, holds the cable and then the other also gets in.
After letting go of the cable, gravity will bring the cable car to the midway point. You’ll then need to pull the car along the cable to the other side.
Needless to say, it’s easier with more people helping at either end! The cable car experience is inherently more difficult for solo hikers.
Please note that, very occasionally, the cable cars are not operational. They are usually fixed very quickly.
We met some hikers who really hated using the cable cars and preferred to wade the creeks instead. The ability to do this safely really depends on the time of year and recent weather. The Klanawa River, however, is very deep, even during dry periods.
West Coast Trail itinerary suggestions
The majority of West Coast Trail hikers complete the full north to south route in 6-8 days. The most common itinerary is a seven day, six night trip.
For trip planning help, head over to our dedicated West Coast Trail itinerary post.
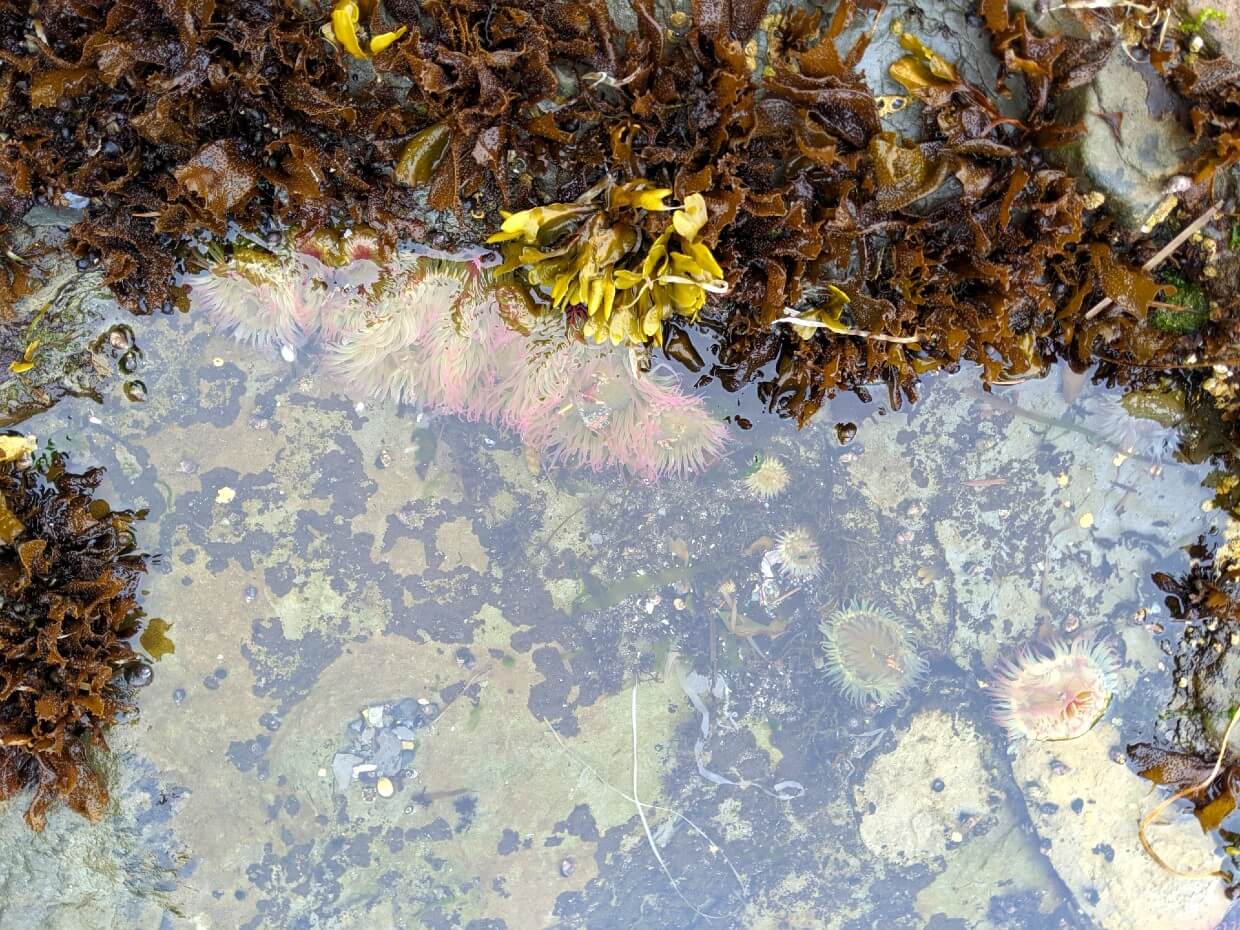
Wildlife
Pacific Rim National Park is home to a variety of mammals and more than 300 different bird species.
Black bear, cougars and wolves all utilise the beaches and forest paths of the West Coast Trail. Offshore, sealions rest on rocks and seals swim in the surf.
Some West Coast Trail hikers may even see whales from shore. We were lucky to see a lone orca fin and a minke whale.
Negative wildlife encounters are rare on the West Coast Trail. Parks Canada promotes coexistence and there are a few things hikers can do to help:
- Make noise while hiking. This alerts wildlife to your presence and gives them a chance to avoid you. As a general rule, animals don’t want to be close to humans
- Store food properly. Feeding animals is illegal. Accidentally feeding animals counts too. Use the provided food caches and bear hangs
- Leave No Trace. After eating, make sure you haven’t left any food or wrappers
- Give them space. If you do see any animals, keep your distance – ideally 100m or more. This offers them an escape route
- Scare, not stare. Help reinforce the natural, healthy wariness of humans by standing tall and making noise
- Know what to do if a wolf, cougar or bear approaches you. Different techniques are required, depending on the type of animal and its behaviour
- Carry bear spray. An aerosol deterrent made with chilli pepper oil, bear spray is a ‘last resort’ tool, used only when other methods have failed
For more information about avoiding negative wildlife encounters, have a read of Parks Canada’s ‘You Are In Black Bear Country’ and ‘You Are In Wolf and Cougar Country’ brochures (find them here). I also have a bear safety guide.
At the orientation, Parks Canada staff will inform you of any recent negative encounters.
On our trip, we were warned about a juvenile cougar in the Cheewhat Beach/Dare Beach area. It had been displaying curiosity towards park staff and hikers.
We found a fresh seal carcass one day while hiking. It had been dragged off the beach by a black bear. We reported it to Parks Canada staff as soon as possible. If you see an animal carcass, it is recommended to leave the area immediately.

Important safety information
The West Coast Trail is a challenging hike, with a range of different hazards. 80 to 100 people are evacuated from the trail each season. That means that there is a rescue at least every two days.
And I can vouch for that. During our hike, we heard about three people being airlifted off the trail. I have no doubt there were more.
Hikers are evacuated from the West Coast Trail for a number of reasons.
Injury is an obvious one. There are so many slippery surfaces on the WCT; even the most experienced hiker can fall.
Another reason is exhaustion. This is more likely to happen to inexperienced or unfit hikers.
The weather can also play a role. Torrential rain is possible even in the height of summer.
Even if it’s not raining, coastal fog can keep conditions very cool and very wet. For the unprepared, hypothermia is a real risk.
The most effective way to avoid most issues is appropriate preparation (training, clothing, equipment etc.). The second is to slow down.
Take plenty of rest breaks and hike at the speed of the slowest hiker in your group. Accidents are more likely to happen when rushing.
Common West Coast Trail hazards
- Ladders. The West Coast Trail has around 70 wooden ladders. Wet conditions can make them and their platforms slippery. Some of the ladders are missing rungs. They can be a bit vertigo inducing too!
- Cable cars. These metal contraptions can be both fun and tiring to use. The latter is particularly true for solo hikers. Keep your fingers and hair away from the cable and pulleys. More info here
- Beach terrain. Rock shelves, seaweed and boulders can be very slippery. Barnacles are sharp. Surge channels are dangerous to cross (go around). Soft sand and pea gravel can be tiring to hike on
- Boardwalks. The West Coast Trail’s boardwalks vary in condition, with some broken. Assume all are slippery
- Tides. When hiking the West Coast Trail, you need to understand how to read a tide table and be prepared to hike according to it. More info here
- Mud. All hikers should expect to see some at least some mud on the WCT, particularly in the shoreline bog areas. It’ll be more prevalent and deeper in May, June and September
- Creek and river crossings. There are bridges and cable cars for the most significant crossings, but these may not always be operational. After torrential rain, be prepared for flooding. Wait for safe water levels
- Trees. The WCR passes through some incredible old growth forests. But this does mean that there are some pretty gnarly root and fallen tree obstacles, which are often exceptionally slippery
- Log bridges. In some places, there are narrow log bridges to help hikers cross uneven terrain. I did find an established detour around all of the ones I encountered, however
- Tsunamis. Though a very rare occurrence, hikers need to be aware of the possibility of a tsunami while on the WCT. Move to higher ground if you feel the ground shake or the ocean recede quickly

Where to find water on the WCT
For the most part, it is not difficult to find freshwater on the West Coast Trail.
There are water sources at each and every designated campground as well as multiple other creeks and streams en route.
The Parks Canada map notes all significant creeks and also comments if water is not accessible (as in the case of Logan Creek).
Some creeks will become dry towards the end of summer, so it’s best to rely on the larger, named sources.
The longest stretches without water are found on the coast, between the designated campgrounds.
When hiking in dry weather, I would be more careful to carry a significant amount of water with you.
Water sources at campgrounds
There is a running water source (river, creek) located close to each of the designated West Coast Trail campgrounds. In times of dry weather the water source may be lower or harder to find, but it is there.
It’s also sometimes necessary to walk quite far up the creek or river to find less salty water.
For the most part, the creeks and rivers are quite cold. A couple of them have a brownish colour, due to the higher concentrations of tannins (the byproduct of vegetation fermentation).
When washing dishes, be sure to head to the ocean or the mouth of the river/creek. It’s not very nice for people gathering drinking water if you wash dishes just upstream!
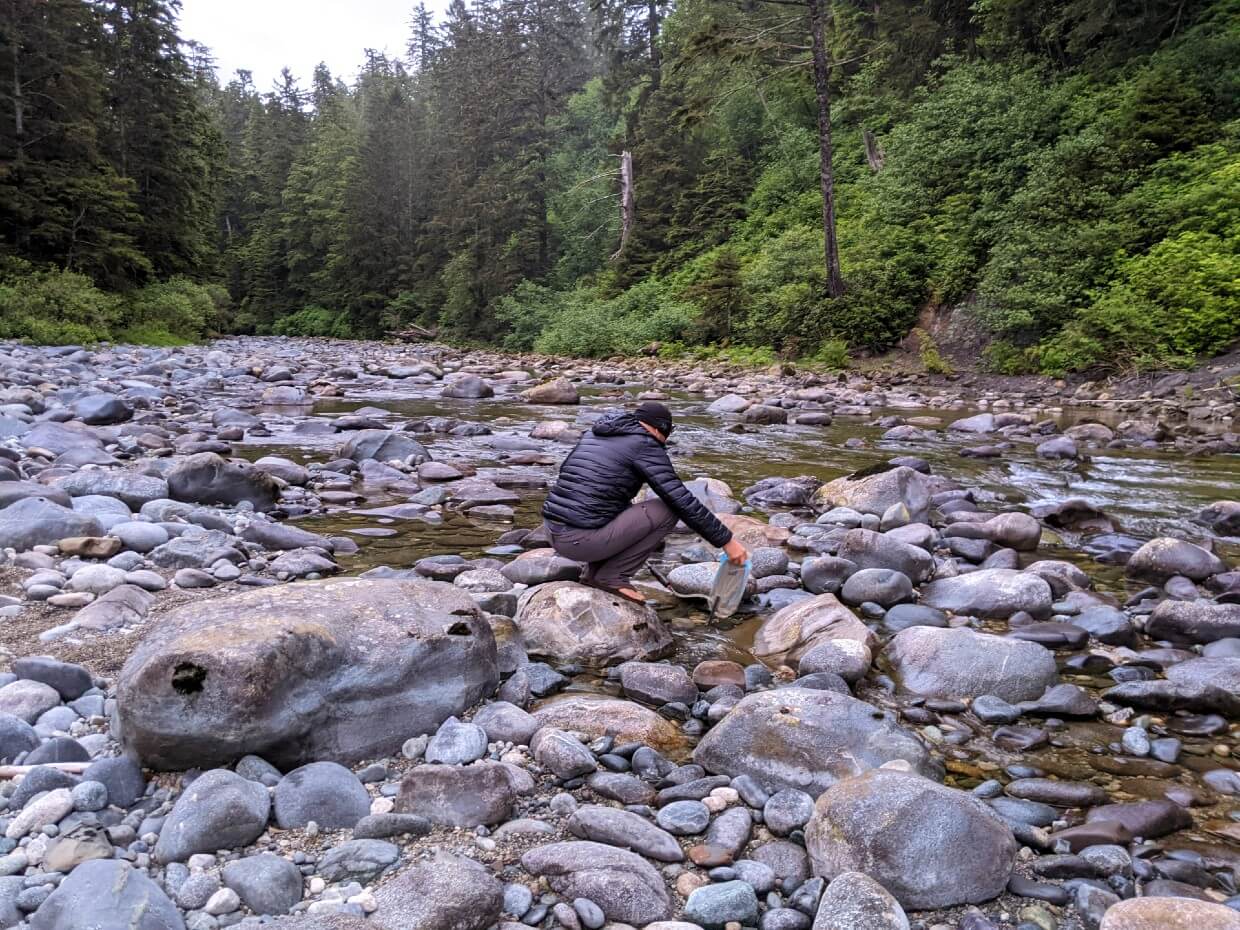
Water purification
To avoid illness, water should be purified before drinking. This can be done in a variety of ways. Personally, I prefer to use a filter as it also removes larger particles in the water.
We decided to test MSR’s Thru-Link In-Line Microfilter while hiking the West Coast Trail. It connects directly to a water bladder, so you can simply filter as you hike.
While I loved how lightweight it was (70g!), we did find the Thru-Link a bit tricky to use on some of the shallower creeks.
We tested MSR’s Trail Shot Filter on our next backpacking trip on the HBC Trail and it worked a lot better. The intake hose can pick up water in very small creeks.
If I was to purchase the Trailshot again, however, I would buy it as part of the MSR Base Water Filter Kit. This offers a gravity fed filter system, ideal for use in camp.
On previous trips, we have used Katadyn’s BeFree Filter. It’s both easy and fast to use.
West Coast Trail restaurants
The West Coast Trail is unique in that it has two restaurants located en-route.
Yes, two places you can actually buy and be served hot food while backpacking a wilderness trail! It’s a pretty special experience to say the least.
Here are the details on the West Coast Trail’s two off-grid restaurants.
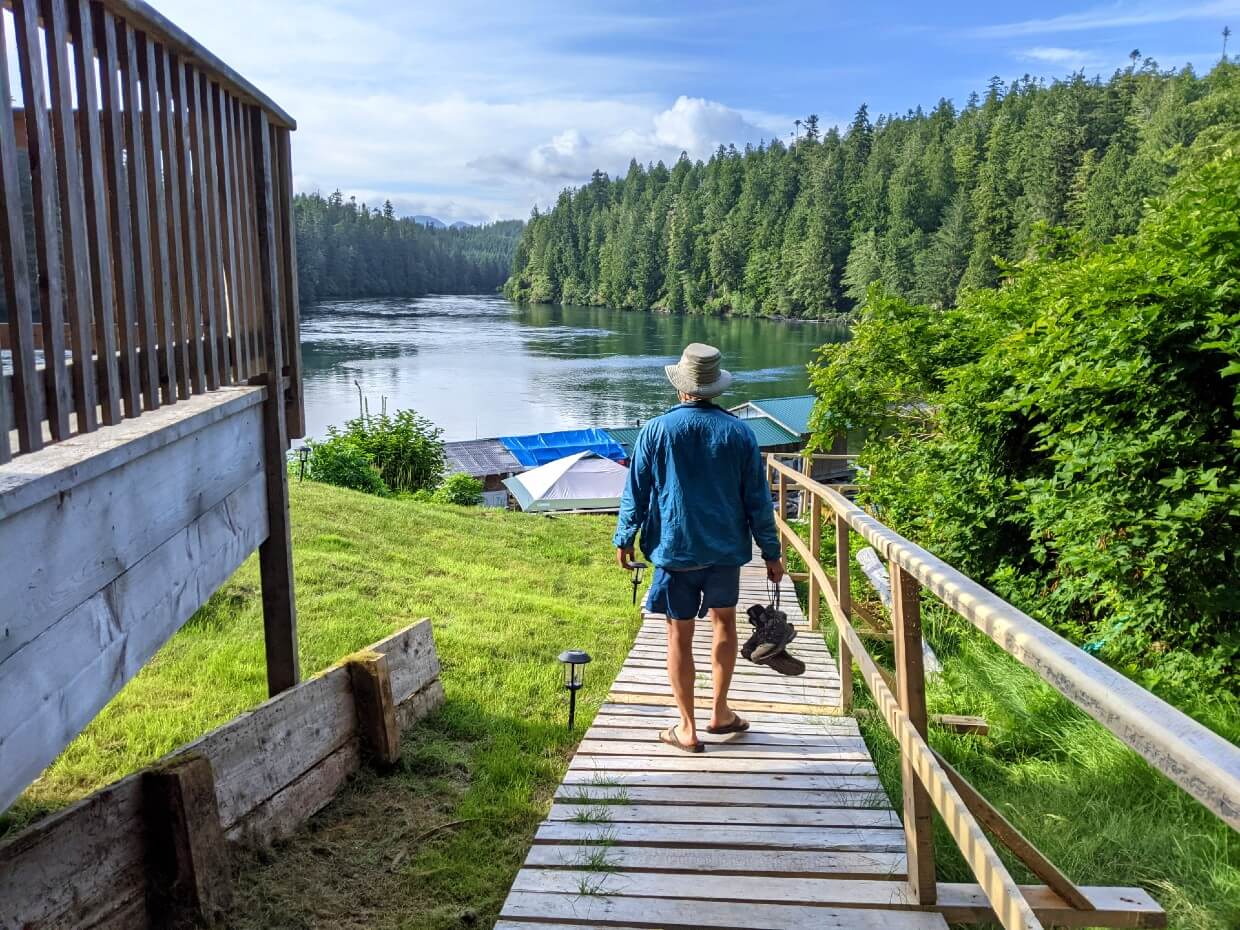
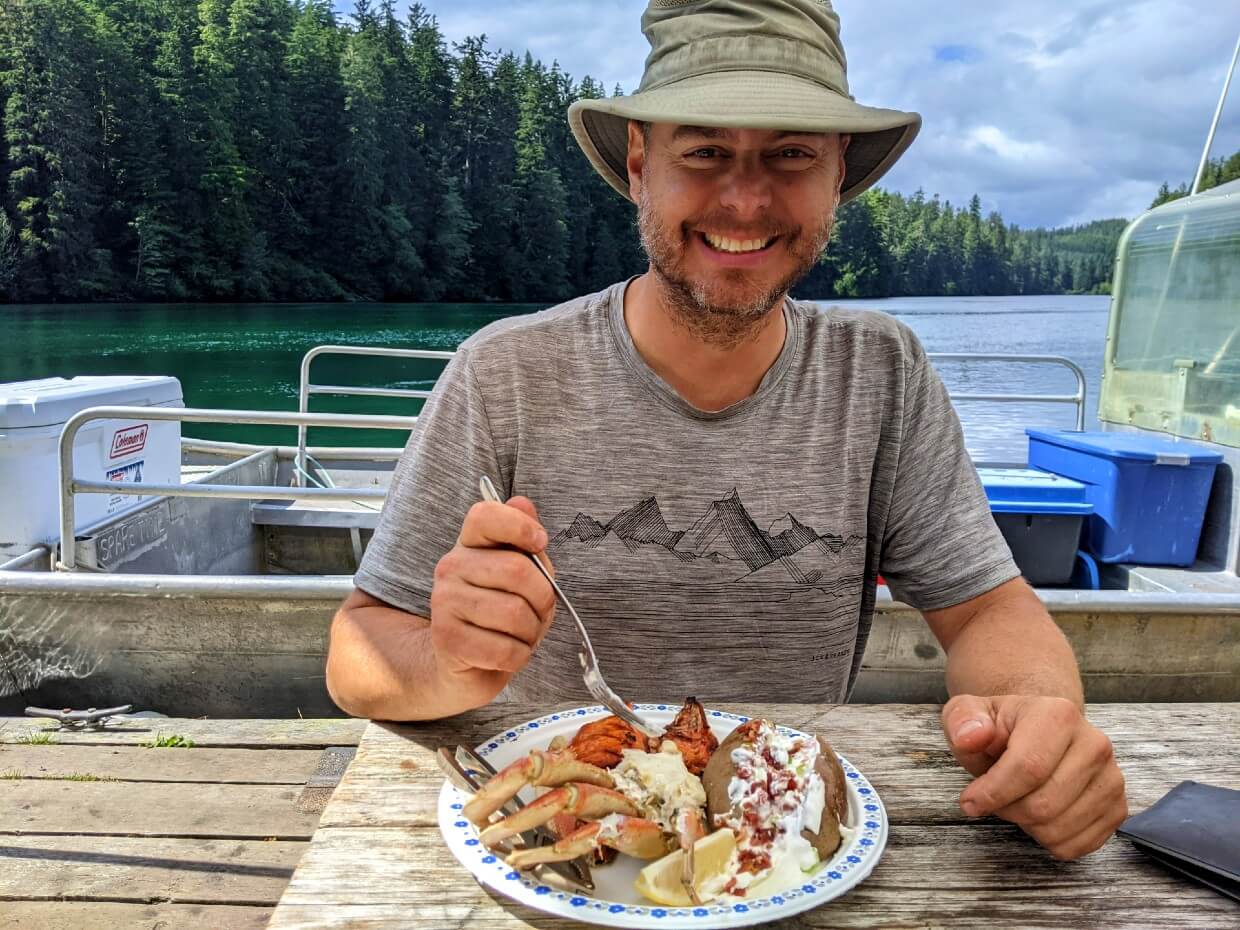
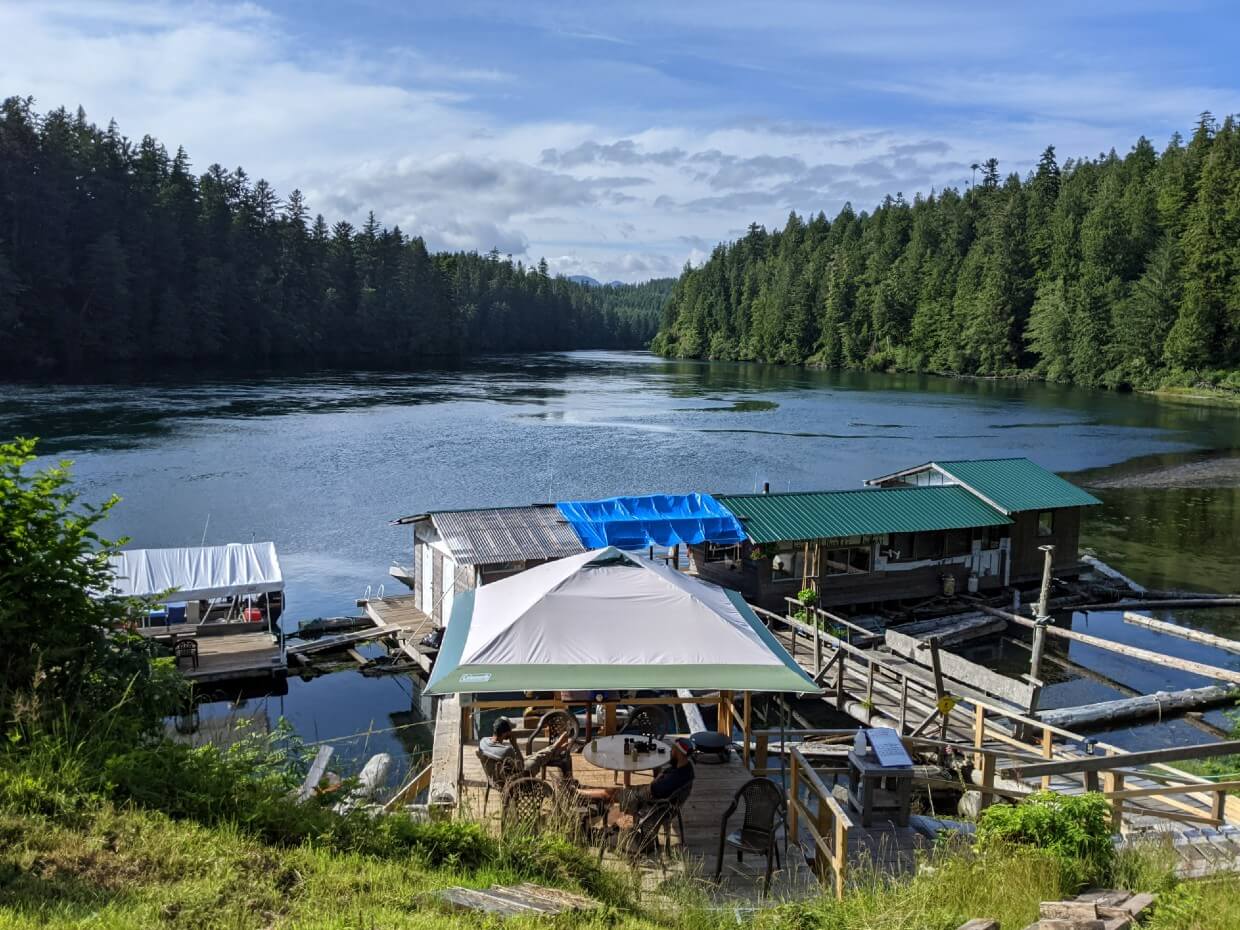
The Crab Shack
The Crab Shack, located at Nitinaht Narrows (32.2km / 42.7km), serves fresh seafood, baked potatoes, chips, chocolate, beers, hot drinks and soda.
Run by the Edgar family, Crab Shack opening hours are 9am to 5pm (ish, see below for more details). Breakfast dishes are available from opening to 10.45am sharp.
The 2025 menu looked a bit like this (prices subject to change in 2026):
| Item | Price ($CAD) |
| Steamed crab (no potato) | 40 |
| Salmon with baked potato, margarine, lemon | 40 |
| Salmon with fully loaded baked potato | 47 |
| Halibut with baked potato, margarine, lemon | 40 |
| Halibut with fully loaded baked potato | 47 |
| Ling cod with baked potato, margarine, lemon | 40 |
| Ling Cod with fully loaded baked potato | 47 |
| Baked potato with margarine | 5 |
| Fully loaded baked potato with sour cream, chives, bacon and margarine | 10 |
| Grilled Cheese | 8 |
| Nitinaht Ultimate including half steamed crab, halibut or salmon, loaded baked potato | 60 |
| Nitinaht Ultimate Jacked including whole steamed crab, loaded baked potato and halibut | 75 |
| Breakfast plate with two eggs, hash browns, bacon OR sausage (served until 10.45am) | 18 |
| Breakfast wrap with two eggs, hash browns, cheese, sour cream, salsa, bacon OR sausage | 20 |
| Pop cans | 3 |
| Gatorade | 4 |
| Beer/cider cans | 9 |
| Water | 3 |
| Tea | 3 |
| Coffee | 3 |
| Hot chocolate | 3 |
| Chips | 2 |
| Chocolate bars | 3 |
All Crab Shack orders are made from scratch, so be prepared to wait up to an hour or more for your food.
The Crab Shack is busiest between 11am and 2pm, so plan to avoid those times if you really want food but don’t want to wait as long!
We stayed overnight at the Crab Shack and ate dinner at around 6pm.
There is no set closing time, though keep in mind that the ferry service across the Nitinaht Narrows only runs from 9.30am to 4.30pm.
If there are no hikers staying overnight in the cabins and tent deck at the Narrows, the Edgar family usually leaves before 5.30pm.
Nytom (former location of Chez Monique’s)
For 25 years, Chez Monique’s was an oasis for West Coast Trail hikers.
Located at the northern end of Carmanah Beach (44.6km / 30.4km), the burgers from this off-grid restaurant were said to be some of the best in the world.
Sadly, Monique and her husband, Peter, both passed away in 2018.
In 2021, Peter’s grand-niece, Katrina Knighton, reopened the location. The new name, Nytom, is a nod to her pre-anglicised name.
Operating times/days are varied since Katrina was hiking all supplies into the location. Sadly, we were unable to personally try the food at Nytom as we passed by on a resupply day.
In 2022, Nytom did not operate but was back in action for part of the 2023-2025 seasons.
Bring some extra cash, just in case, but prepare for the possibility that it will not be open on your visit.
The 2025 menu looked a bit like this:
| Item | Price ($CAD) |
| Hamburger with coleslaw | 40 |
| Chocolate | 5 |
| Soda can | 5 |
| Candy | 5 |

Essential items to bring to the WCT
Besides all of your camping gear, clothing and 10 Essentials, I’d recommend bringing the following items for your West Coast Trail adventure:
WCT Overnight Use Permit
Okay, so you don’t need to bring this one with you but I wanted to be sure to mention it. After checking in at one of the WCT Offices, you’ll receive your WCT Overnight Use Permit.
This permit is not waterproof, so I’d suggest bringing a Ziplock bag to store it in. It’s so important to keep the permit safe as you’ll need to show it to board the ferries. No permit, no ferry ride.
Tide table
As mentioned in the tides section, you’ll need to consult a tide table reasonably regularly while hiking the West Coast Trail. You will be given a cut out of a tiny Tofino tide table at orientation, but it’s not that great.
I’d highly recommend printing out an hourly Tofino tide chart before your hike. The hourly version is so much easier to read and leaves less room for error. Again, it won’t be waterproof, so put it in the same Ziplock as your permit.
Cash
It’s a good idea to bring cash on the West Coast Trail for a couple of reasons. First of all, cash is the only payment method accepted at the trail restaurants (see previous section for menus and prices).
Secondly, having cash is also helpful in case of non-emergency evacuation. In the event that you want or need to leave the trail at the midpoint, you’ll need cash to pay for the ferry from Nitinaht Narrows to Nitinaht Village ($70.00/person).
To leave Nitinaht Village without your own vehicle, you’ll need to take the local shuttle bus to Nitinaht Junction ($20/person).
Nitinaht Junction has a pick-up location for the West Coast Trail Express bus. The journey to Pachena Bay or Gordon River costs $60/person.
Some suggest taking at least $200/per person to cover these potential costs. Personally, we chose to only bring cash for the Crab Shack and a small amount extra.
Bear spray
Black bears, wolves and cougars all live and roam along the West Coast Trail.
Bear spray is helpful to have as a last resort, in the unlikely event you have a negative encounter. Keep it in a convenient place, close enough to access quickly. I’d recommend using a holster like this.
Negative wildlife encounters are rare on the West Coast Trail. We met many hikers who didn’t bother to bring bear spray.
I know I was very happy to have bear spray, however, when we discovered a seal carcass (recently killed by a black bear) on one of the beaches!
Hiking poles
I found my hiking poles to be invaluable on the West Coast Trail. With so many slippery obstacles, I felt a lot more comfortable having a hiking pole for balance. I also found them useful on long beach stretches.
JR and I usually share a pair of Black Diamond’s Carbon Z poles. They are incredibly lightweight (less than 300g) and strong.
The West Coast Trail’s ladders do make using poles more difficult. The Carbon Z poles fold down really quickly, however. When approaching a ladder, I’d simply fold them up and then attach to my backpack strap (Osprey backpacks have a built-in attachment for this purpose).
Gaiters
Gaiters strap over hiking boots and provide protection against sharp roots and rocks. They can also prevent mud, pebbles and sand falling into shoes.
Both JR and I wore gaiters while hiking the majority of the West Coast Trail. I like the extra protection to keep my feet dry. Without them, I believe I would have been picking pebbles out of my shoes all day while hiking on the beach!
The gaiters we use are from MEC, originally purchased in 2014. When I purchase a new pair, I will avoid buying a brand that uses zips for the closure. The zips on our gaiters often become clogged with mud and sand.
National Parks Discovery Pass
If you already have a valid National Park Discovery Pass (or Pacific Rim Annual Pass), don’t forget to bring it with you to the West Coast Trail!
Otherwise, you’ll need to pay for a new one or pay the day admission rate ($10.50/adult).

Sandals
A pair of water shoes is a must-have for the West Coast Trail. Yes, there are cable cars for the biggest water crossings but they are not always operational. Bare feet are a risky prospect.
It’s a bonus if your water shoes can double up as comfortable shoes to wear around camp. I purchased these Teva Hurricane Drift sandals primarily for the WCT and fell in love. They have a supportive sole, are super lightweight (only 170g) and dry very quickly.
After the WCT, I also used them on the Nootka Trail, where I needed to cross dozens of streams and rivers. They did an amazing job.
Power bank
I like to take photos on my phone and also use the Maps.me app to check trail distances.
The West Coast Trail is pretty long for a backpacking trip and my phone would have run out of charge on day two if I hadn’t carried a couple of power banks with me (like this one).
Satellite communication device
There is very limited cell phone signal on the West Coast Trail. If you do manage to find signal, it will likely be from the USA.
To avoid accidental roaming charges, put your phone on airplane mode after starting the trail. This also helps to conserve the battery.
For emergency purposes, we carried an InReach device. We were also able to use it to send pre-set messages with a map of our location every night to family members.
Though the WCT is a well travelled trail, I felt more comfortable having a way to call for help quickly.
And not just for myself either – the WCT has a very high evacuation rate with at least one person needing to leave the trail every day. I liked the idea of being able to help someone else if needed.
For more item recommendations, check out our West Coast Trail Packing List guide

Where to stay before and after hiking the WCT
With the West Coast Trail trailheads being reasonably remote, most hikers at least one night in the area before or after their hike.
Here are my recommendations for accommodation and camping in Pachena Bay, Gordon River and Nitinaht Village (Nitinaht Narrows trailhead).
Pachena Bay
Pachena Bay Campground – This Huu-ay-aht First Nations campground is located right by the Pachena Bay Trailhead. It has both forest and beach tent sites, with potable water, coin operated showers and washrooms available. Despite its large size, Pachena Bay Campground does get busy so I’d suggest reserving your site early. Reserve via Book Your Site.
Eileen Scott Centennial Park – Located in the heart of Bamfield, this municipal campground has just 14 sites. Campers have access to a cookhouse as well as washrooms and showers (by donation). Book via the Bamfield Parks website.
Upnit Lodge – Situated right on the waterfront, this upmarket inn has a choice of six rooms. Most have inlet views and one even has a private sauna. The Upnit Lodge is just a short walk from the pub.
Hacas Inn – Bamfield’s only motel, the Hacas Inn offers standard, deluxe, kitchenette and backpacker rooms. Owned and operated by the Huu-ay-aht First Nations, all of the welcoming rooms have en-suite bathrooms, microwaves, fridges and coffee machines.
Gordon River
Pacheedaht Campground: Most of the 65+ campsites here are situated on or just behind a beautiful 2km long sandy beach. Facilities are rustic though there are coin operated showers available.
If camping isn’t your thing, there are also waterfront ‘sleeping barrels’ ($120/night in 2023). Reservations can be made via the campground website or phone (250) 647-0090.
Wild Renfrew: Treat yourself with a stay at Wild Renfrew, where you’ll find private waterfront cottages (some with hot tubs) and luxury canvas tents. Better still, the Renfrew Pub is only a few steps away! It’s perfect for your first post-hike beer.
Trailhead Resort: Choose between comfortable private cabins and suites at Trailhead Resort. Each features a full kitchen and deck, as well as access to hot tub, BBQ and fire pit areas. For those on a budget, there’s also a collection of ‘Hiker Huts’ with shared bathrooms (no hot tub access though!)
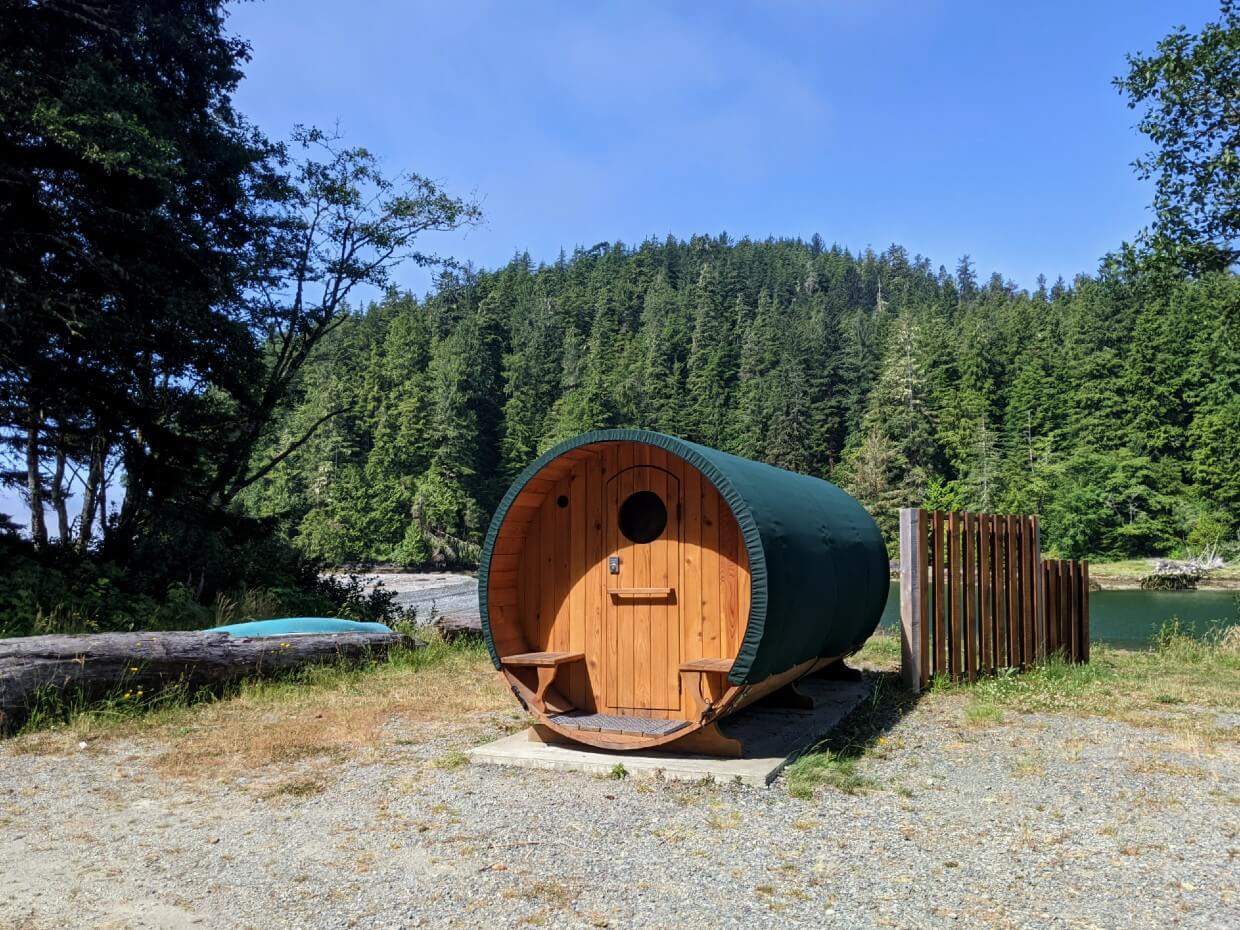
Nitinaht Village
Nitinaht Lake Campground: Run by the Ditidaht First Nation, this rustic campground has a beautiful forested setting alongside Nitinaht Lake. It is very popular with windsurfers. There are campsites set aside for West Coast Trail hikers, so no need to reserve.
Nitinaht Wilderness Charters B&B: The Edgar family run the Nitinaht Narrows water taxi service. They also have three bed and breakfast rooms for rent in Nitinaht Village. Rooms can sleep up to four people. Contact Nitinaht Wilderness Charters for more info.
Nitinaht Lake Motel: Located the center of Nitinaht Village, this motel reopened in 2025. Some of the rooms have kitchenettes.
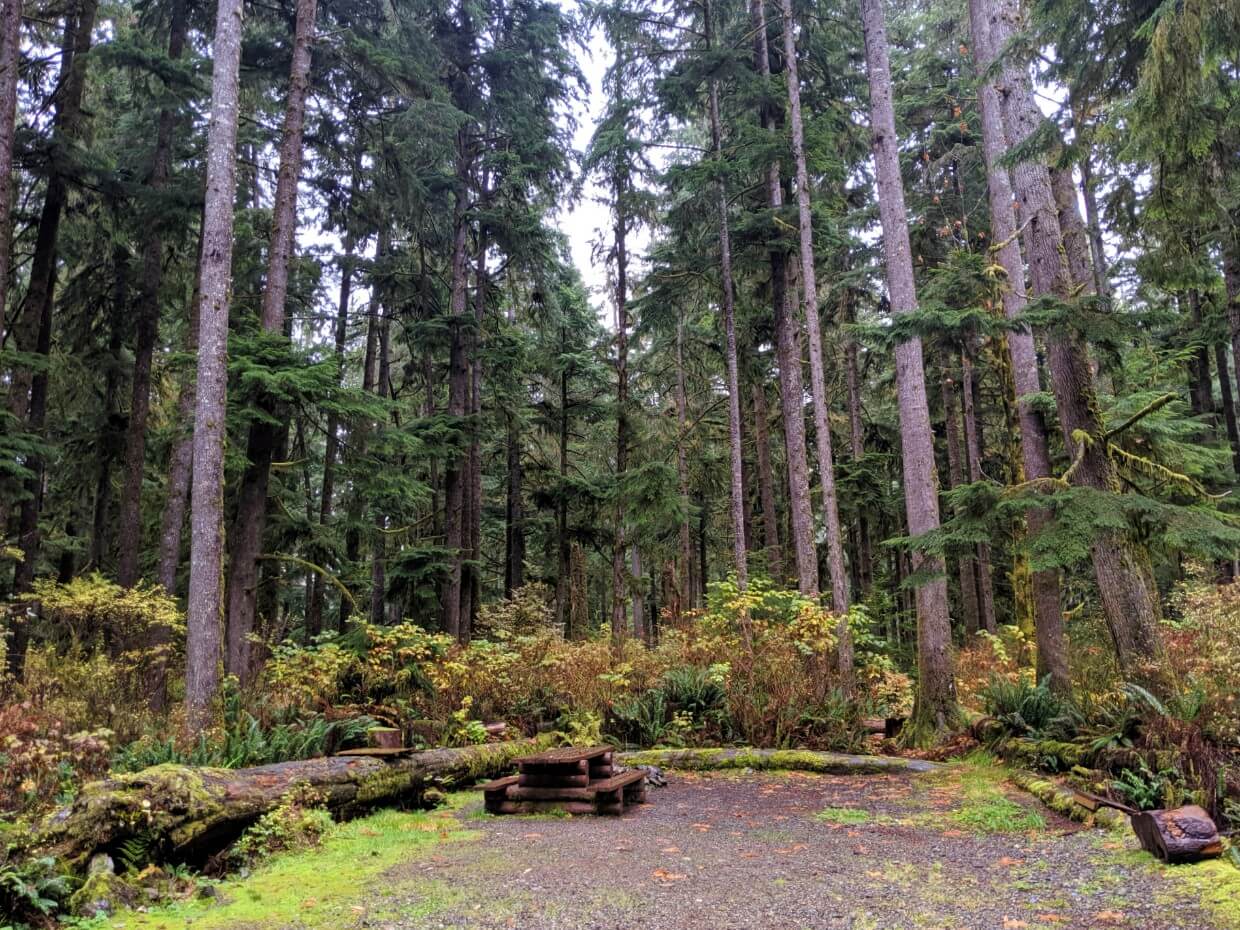
Planning resources
- Parks Canada West Coast Trail map – Our most helpful trip planning resource was the official Parks Canada WCT map. I printed it off onto four sheets of paper so we could make notes and calculate distances directly on it
- Parks Canada Hiker Preparation Guide – Official, annually updated PDF guide
- Tofino tide tables – Our second most important resource was the Tofino tide tables (zone 11), produced by Fisheries and Oceans Canada. These are usually posted online months in advance
- Blisters and Bliss: A Trekkers Guide to the West Coast Trail book – A light hearted take on the WCT by two trail veterans. Includes a day by day overview, essential tips and some fun illustrations. The 9th edition (from 2018) is the most recent at the time of writing
- Hiking the West Coast of Vancouver Island book – The WCT Trail is included in this guide by Tim Leadem. There isn’t a lot of detail (the author has a separate WCT-specific guidebook for that) but if you’re planning to hike other coastal backpacking trails on Vancouver Island, this book offers good value for money
- WCT information centres – If you have specific questions about the WCT during the operating season, you can call the Pachena office (250-728-3234), Gordon River office (250-647-5434) or the Ditidaht First Nations Visitor Centre (250-745-3999)

West Coast Trail souvenirs
Commemorate your once in a lifetime hike with West Coast Trail merchandise from the Parks Canada offices at Gordon River, Nitinaht Village and Pachena Bay. Choose from patches, hats, stickers and more.
Alternatively, check out these awesome West Coast Trail products on Etsy:


Check out these other BC backpacking guides next:
The HBC Heritage Trail, from Hope to Tulameen
Mount Assiniboine Provincial Park
Lake O’Hara, Yoho National Park
The Cape Scott Trail, Vancouver Island
The Iceline Trail, Yoho National Park
Eva Lake, Mount Revelstoke National Park
The Heather Trail, Manning Provincial Park

One half of the Canadian/British couple behind Off Track Travel, Gemma is happiest when hiking on the trail or planning the next big travel adventure. JR and Gemma are currently based in the beautiful Okanagan Valley, British Columbia, Canada. Consider buying us a coffee if you have find any of our guides helpful!
Thank you for your great guide – I’ve been going through it as I planned for a trip with my granddaughter (and successfully booked for mid August, yesterday)
One question – you comment that, having carried the majority of your food, your pack weight was down by 3.1 kg at the end of the trip. Could you share your food load? 3.1 kg, especially when it’s more than half of the total for two people, seems amazingly light for an 8 day trip. My goal is about .7 kg per day (1.5 lbs per day, instead of the 2 lbs per day that is often quoted), and I am challenged to meet that.
I assume that you were were likely able to save one day’s food by eating at the Crab Shack, but I’m still impressed with how you were able to keep your food weight that low since on 7 days I would likely be around 5 kg or more.
Thank you again for a great, detailed guide.
Hi Michel,
I’m so glad you’ve found this guide helpful. I’m also pleased that you managed to secure reservations!
Our food averages out at 1.1lb (0.49kg) per person per day for the vast majority of our backpacking trips.
We carried 8 days of food on the West Coast Trail. On longer trips, we usually carry one extra day worth of food in case of delay (so nine days of food for an eight day trip). But since we knew we would be eating at the Crab Shack, we only carried eight.
I believe we finished with just one spare meal and a few snacks. As my backpack weight decreased, I took some of JR’s items so he could enjoy a light backpack too. So hence why my backpack didn’t decrease the full 17.6lb (7.9kg)!
Hi I see you have dates listed open until Oct 6 for 2024, but I don’t see this date anywhere else? I’ve only seen open until Sept 30. Am I missing something?
Hi Becky,
The West Coast Trail is reservable until September 30th i.e. you can still start the trail on this date. The last operating date is 7th October (it was originally the 6th for this season, they must have had to change that), meaning all hikers still on the trail at that point need to be finished on or by the 7th October. This date is displayed on the Parks Canada reservation system.