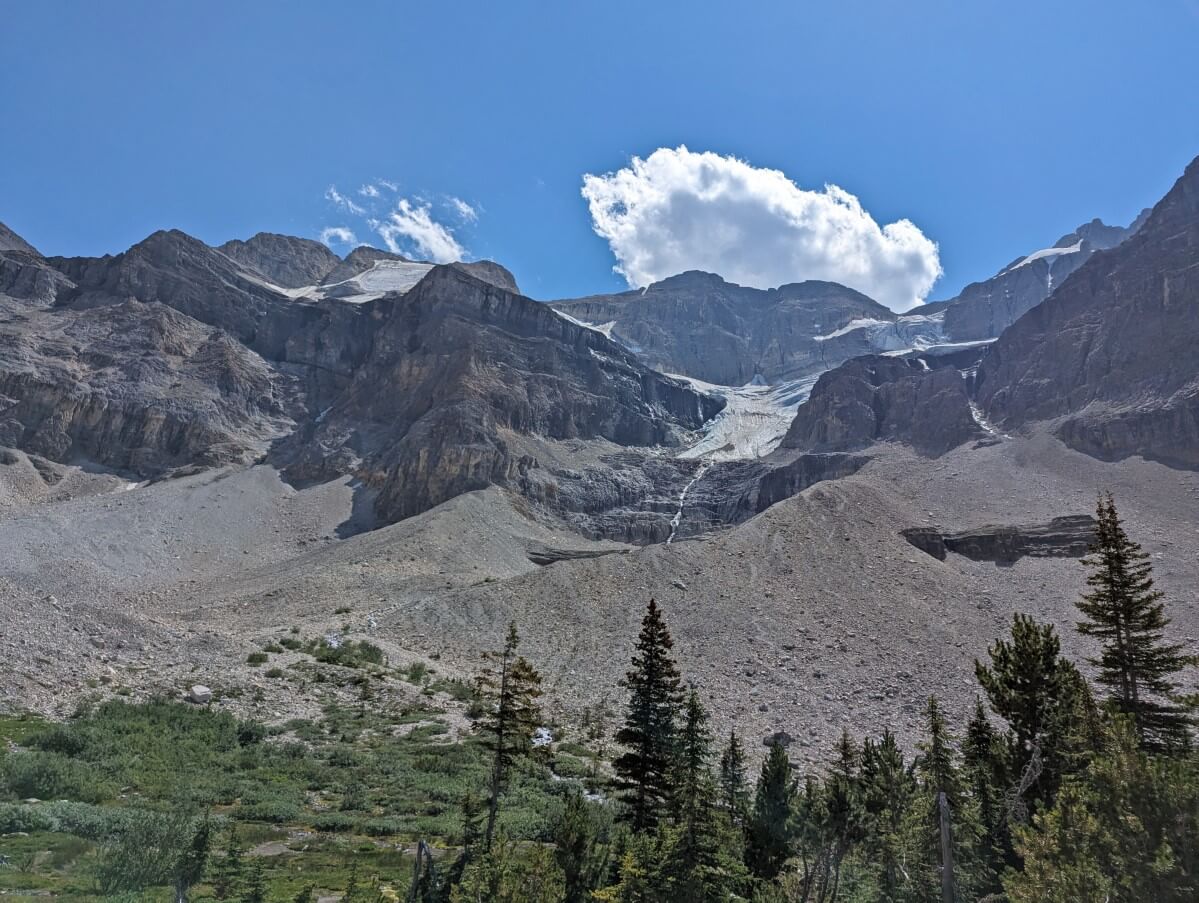
Stanley Glacier sits atop a spectacular hanging valley in Kootenay National Park in British Columbia, Canada.
A relatively short and approachable trail leads to a wide basin with impressive vistas of the glacier itself as well as surrounding mountains, tall waterfalls and impossibly steep cliffs.

With a relatively low effort to reward ratio (to the lower basin), Stanley Glacier is a breathtaking half-day hike destination in the Canadian Rockies.
An optional extension loop offers the chance to climb to the top of the basin for even better views. It’s definitely more challenging though!

In addition to the many incredible viewpoints, the Stanley Glacier hike is particularly special as it is one of the very few locations where you can find and study rare Burgess Shale fossils.
With all this in mind (particularly the short length), I’d go so far to say that I think that the Stanley Glacier Trail is one of the best half day hikes in BC! I can see us doing this one again and again.
This detailed post will help you plan a hike to Stanley Glacier. It includes a trail description, safety information and more.
The breakdown looks like this:
Stanley Glacier Trail (main route / with optional loop extension)
Location: Kootenay National Park, British Columbia
Distance: 8.4km return / 10.8km
Elevation gain: 370m / 615m
Hike type: Out and back (with optional loop extension)
Time: 3 to 4 hours / 4.5 to 5.5 hours
Difficulty: Easy side of moderate/challenging
Camping: No
Fees: National park pass ($12.25/adult)
When to go: June to September
Dogs: Allowed on leash
Backcountry necessities
- Always bring the 10 Essentials
- Know how to stay safe in the backcountry
- Remember to Leave No Trace to help keep the wilderness wild
- Understand how to avoid negative bear encounters
- Check out our packing guide with gear recommendations
- Sign up to our newsletter for a free backpacking checklist
Stanley Glacier Trail, Kootenay National Park
The Stanley Glacier Trail is located just off Highway 93 in Kootenay National Park in British Columbia, Canada, on the traditional territory of the Ktunaxa and Secwepemc First Nations.
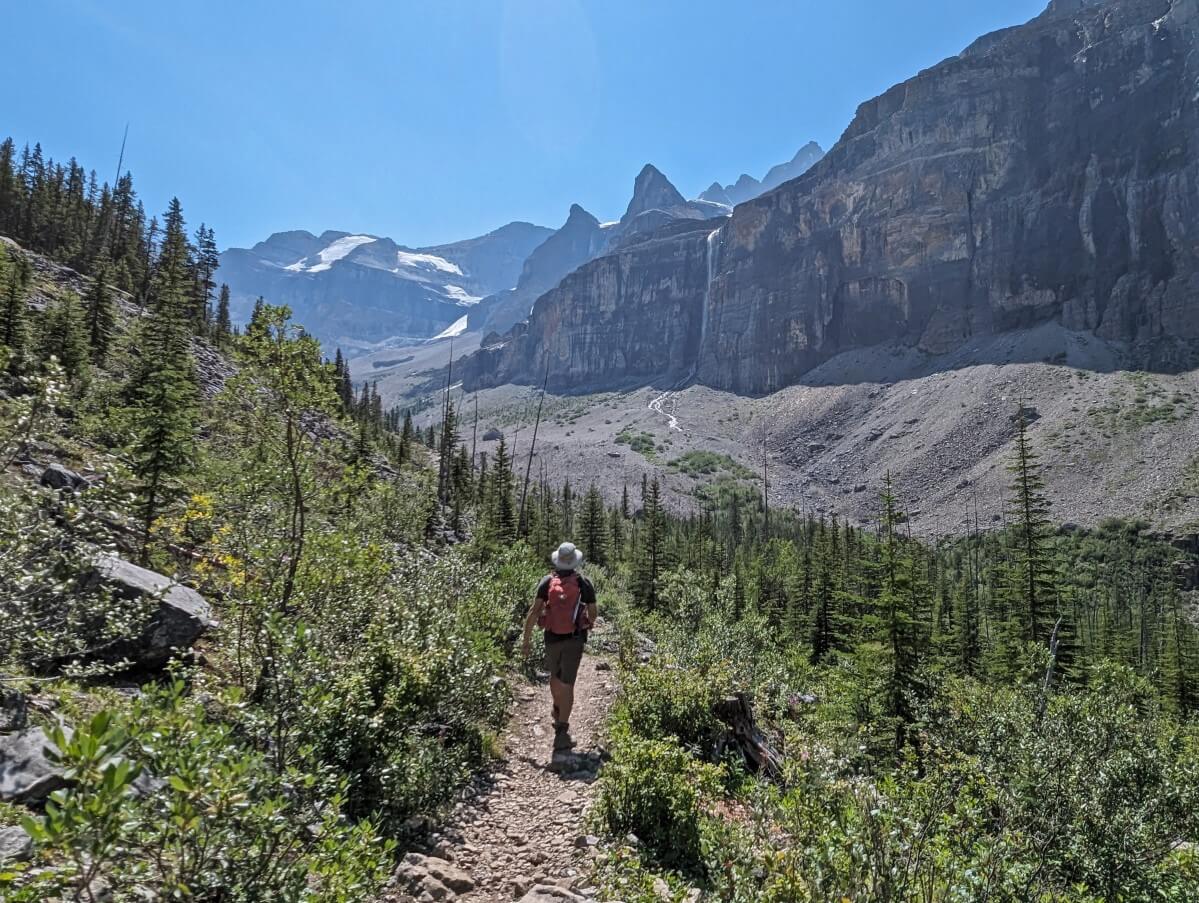
The hike is a tale of two parts. A moderately easy trail winds its way up from the Highway 93 parking lot to the valley basin.
This uphill pathway is well-maintained and has plenty of breathtaking viewpoints.
At the 4.2km (one-way) mark, the maintained trail finishes. Novice hikers and families usually turn around at this point.
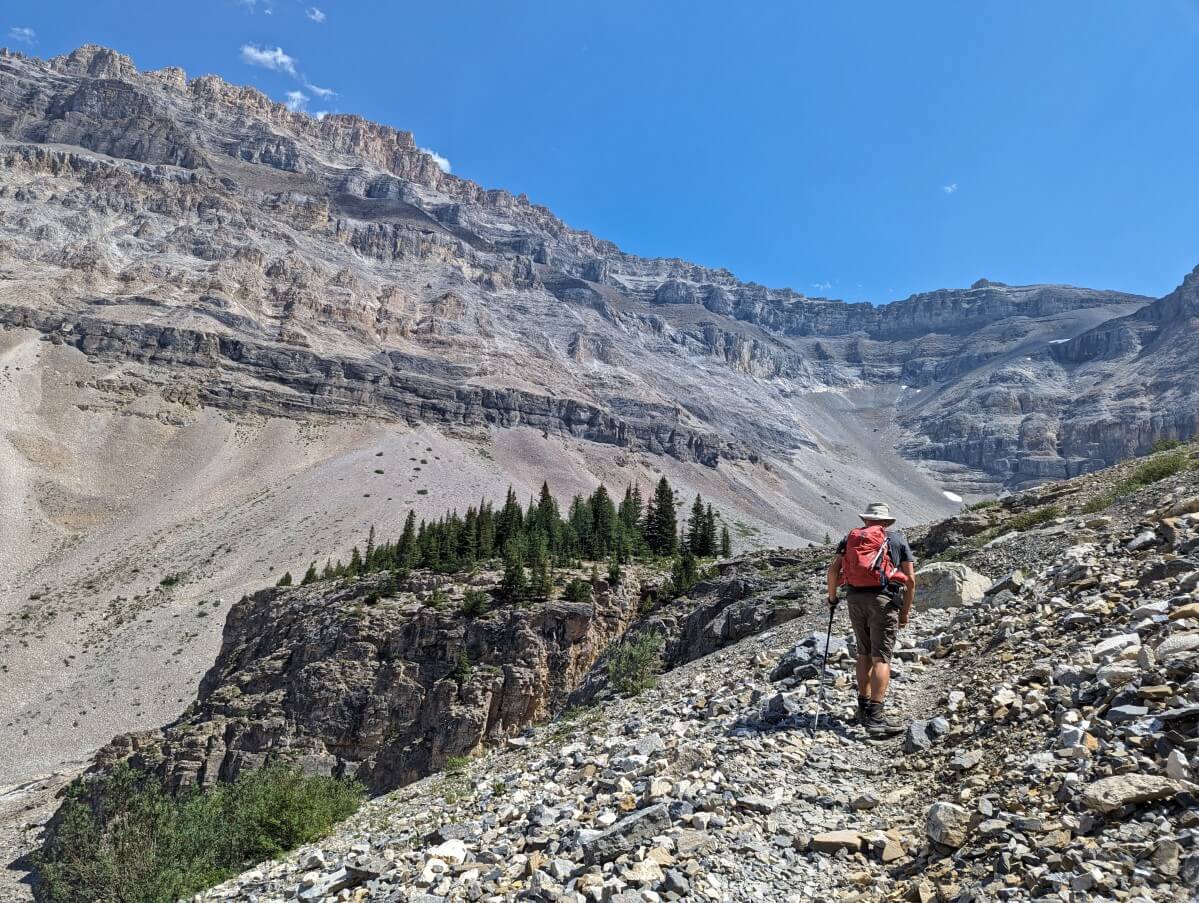
An established but unmaintained loop 2.4km route ventures further into the valley, traversing steep scree slopes below the cliffs to reach the upper basin.
Those who hike this challenging add-on route are rewarded with grand panoramas of the glacier valley.
The existence of both the official trail and the loop route extension means that researching the Stanley Glacier hike can be a little confusing. In this post, I’ll describe both so you can decide which to hike.
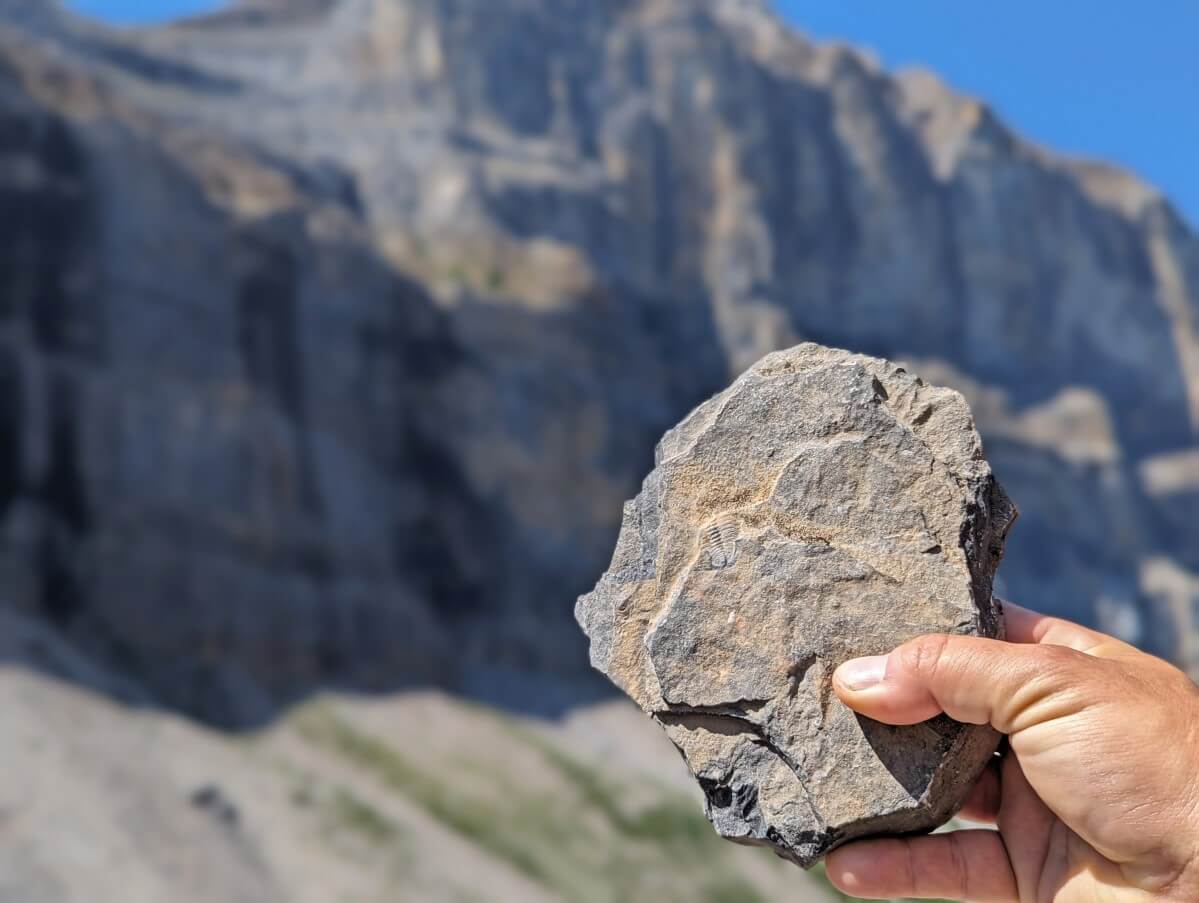
As previously mentioned, the Stanley Glacier valley area is one of the few locations in Canada (and indeed, the world!) where the Burgess Shale formation is exposed.
This layered rock deposit features half a billion year old fossils of (rare) soft-bodied creatures. We found fossils independently while hiking the trail but it’s also possible to join a Parks Canada guided tour.
Quick Stanley Glacier facts:
- 8.4 km return distance for main trail
- 10.8km return distance with loop extension
- Usually snow-free from mid June to late September
- Optional loop extension is challenging but worthwhile
- Loop extension usually snow-free from late July to early September
- Parks Canada National Park pass required
- Leashed dogs are allowed (but please note the lack of shade)
- Guided fossil hike available via Parks Canada

Stanley Glacier hike experience
Know what to expect on the Stanley Glacier hike with this trail overview.
Parking lot to second bridge
The Stanley Glacier Trail starts in the Highway 93 parking lot. A bridge leads over the Vermillion River, which is usually running quite fast (and cold!)
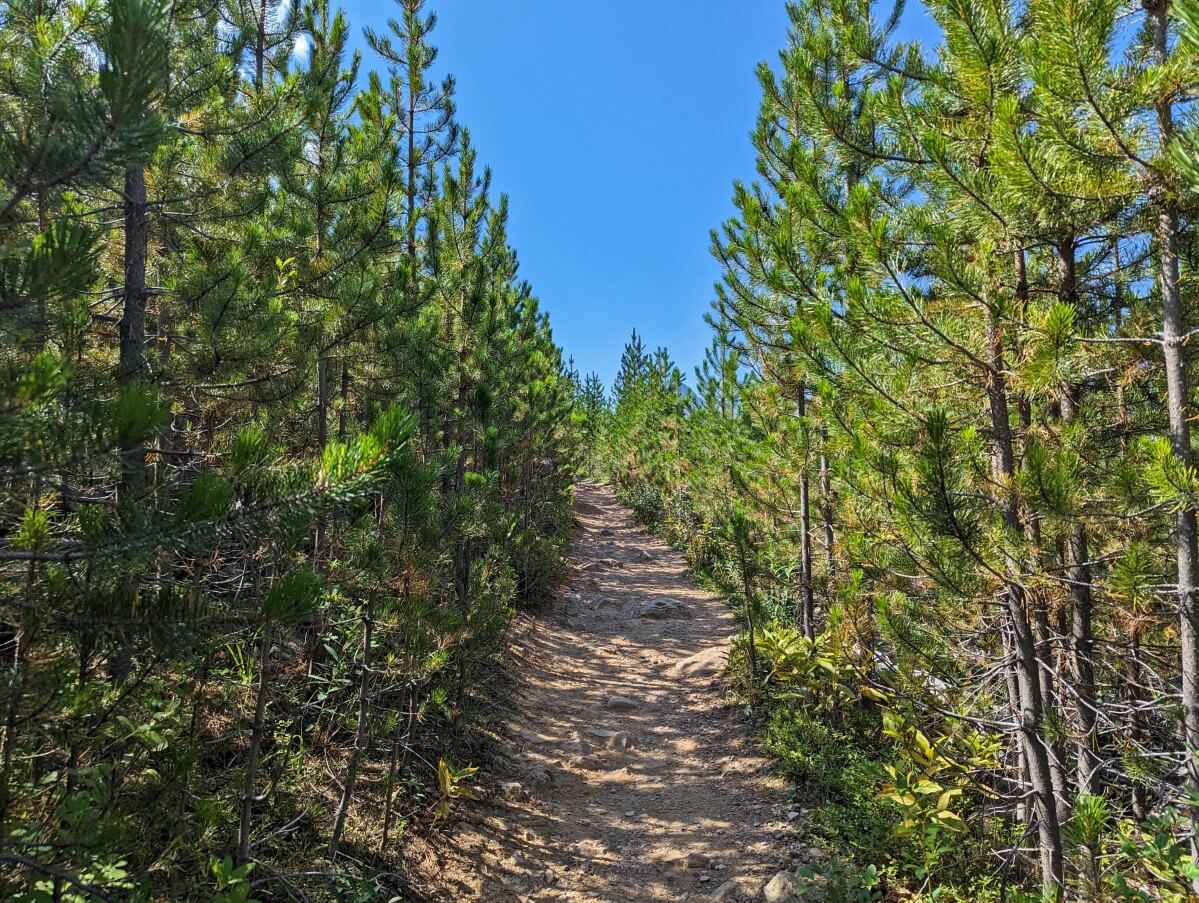
The path then starts to climb, with the dusty surface studded with rocks. Bright pink fireweed flowers blossom along the trail in July.
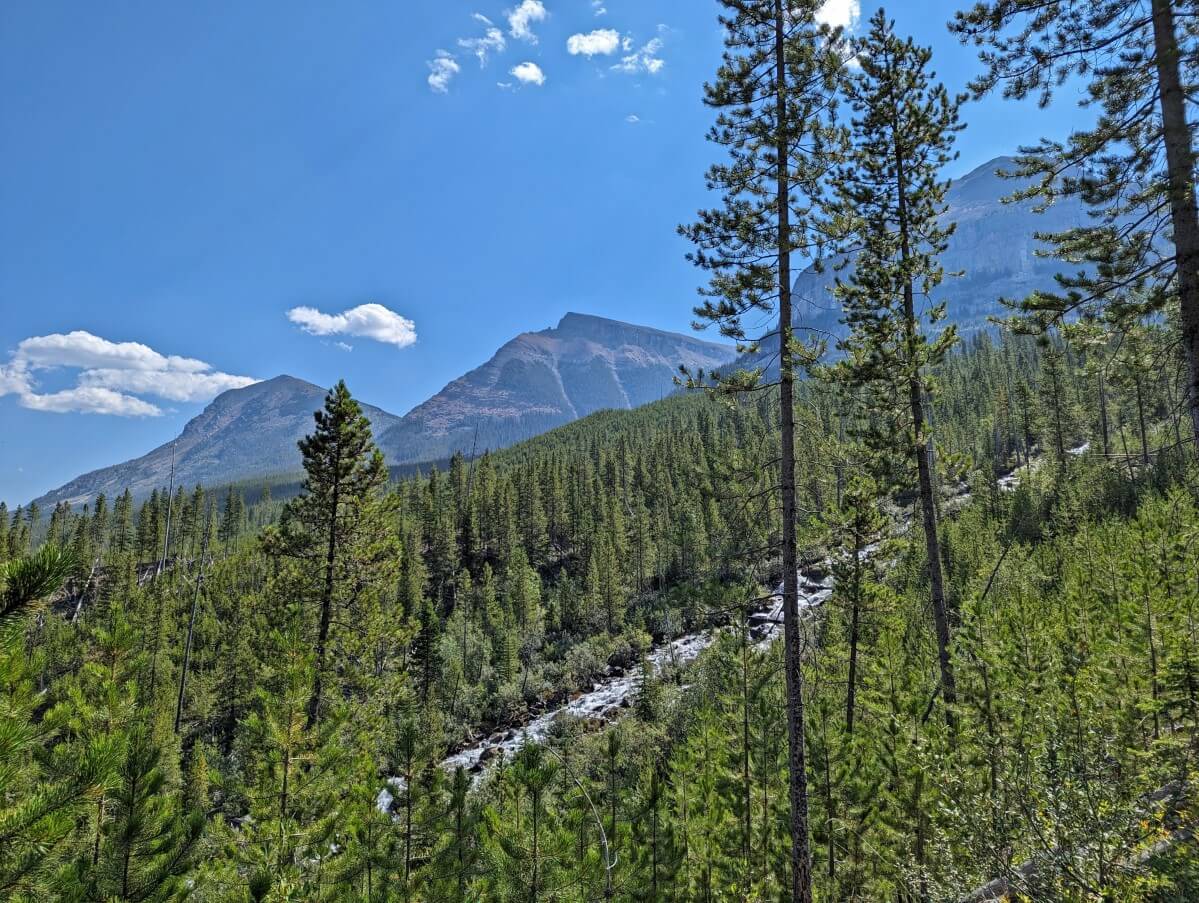
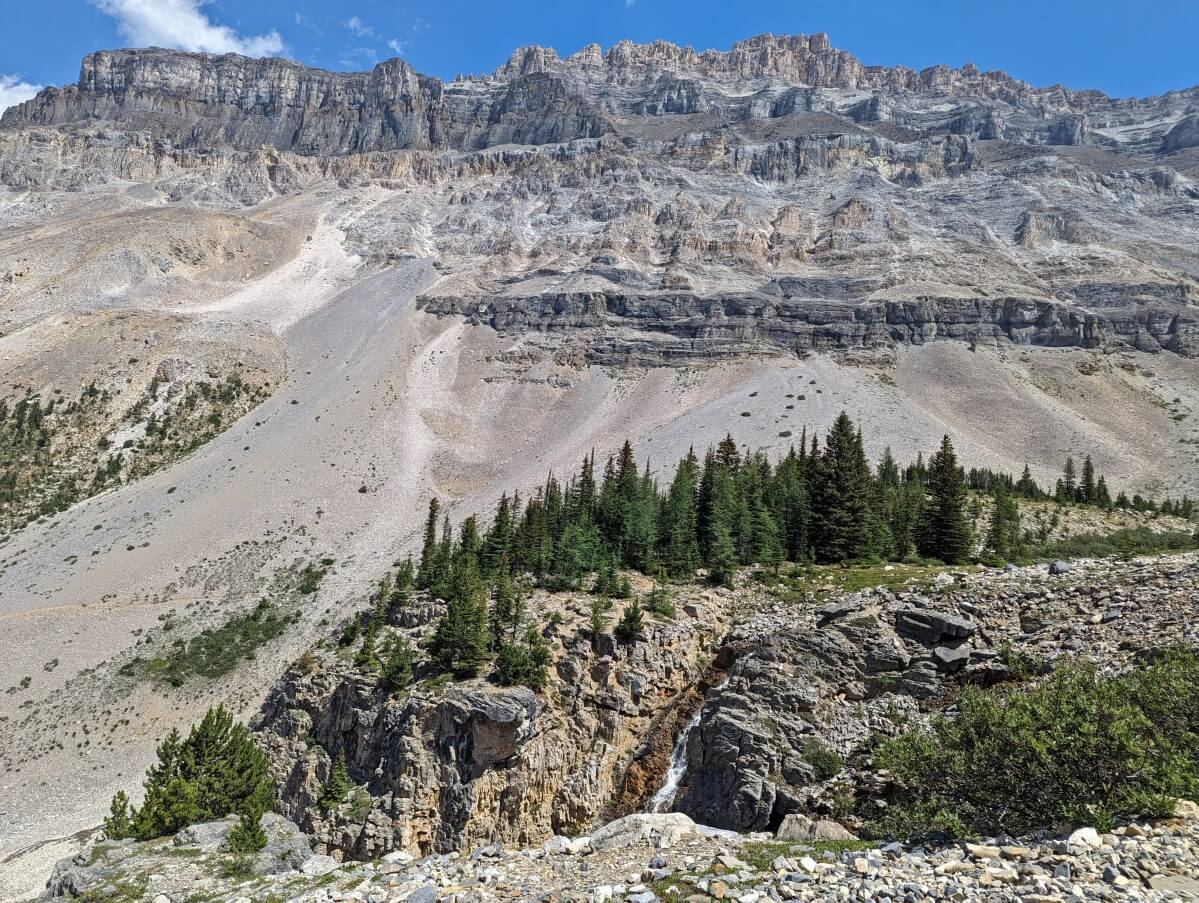
Most of the elevation is gained via long switchbacks, with the end of one offering a great view of a cascading Stanley Creek.
A fire swept through this area in 2003, so most of the foliage bordering the trail is fairly new. The trees are still quite short, so the surrounding mountains (and highway) are far more visible than they would be otherwise.
Not only does this provide plenty of distractions as you climb, but it also allows great perspective to how far you’ve ascended already!
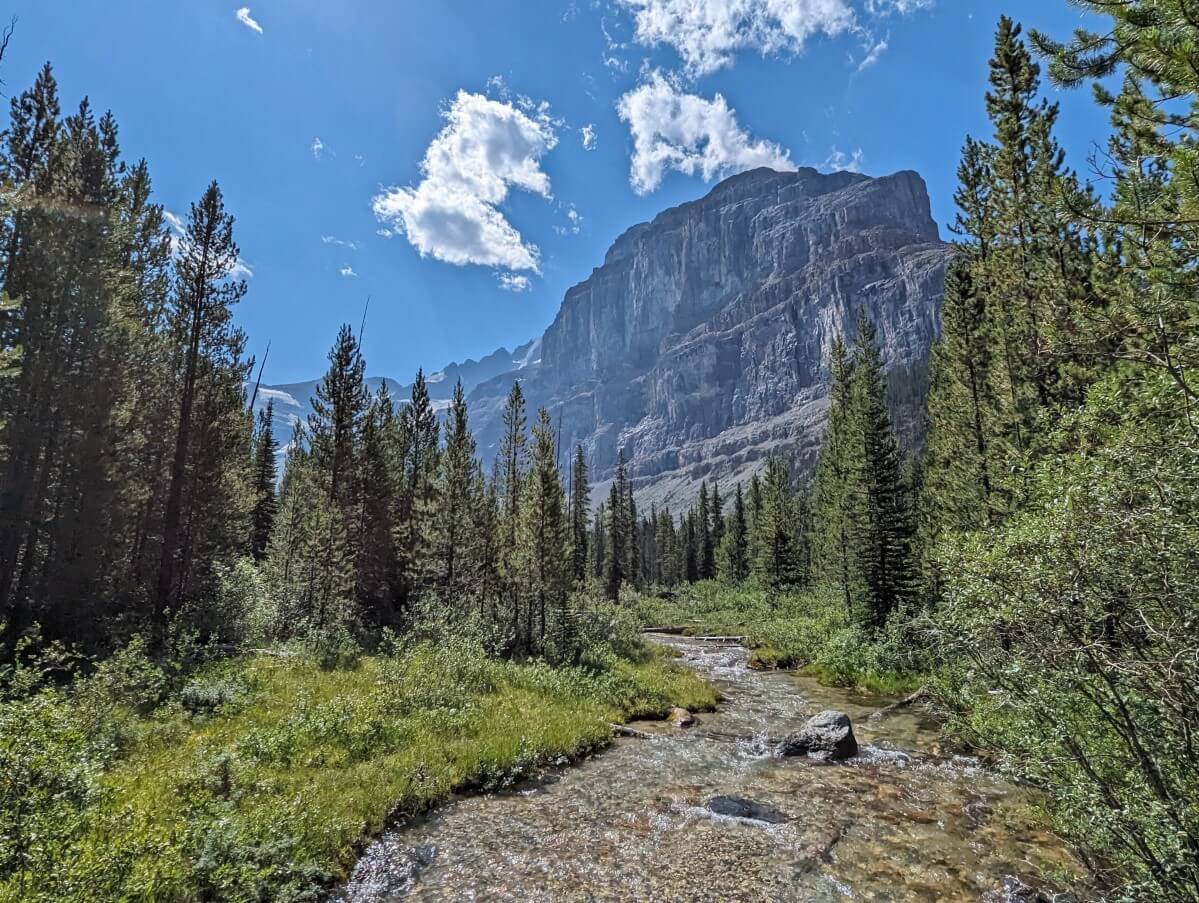
At the 2km mark, the path flattens out. Enjoy this short stretch of easy hiking! 300m later, you’ll cross another bridge. This one crosses Stanley Creek. The views get better and better from here.
Second bridge to hanging valley viewpoint
The easy hiking continues a little beyond the bridge. There is a short, potentially muddy section (dry in late July).
The elevation then ramps up a little. The dirt path disappears and is replaced with a steep rocky section.
For most people, this will be the hardest part of the main trail. The rocks are uneven, so watch your step. This steep section isn’t very long, with the path eventually returning to dirt.

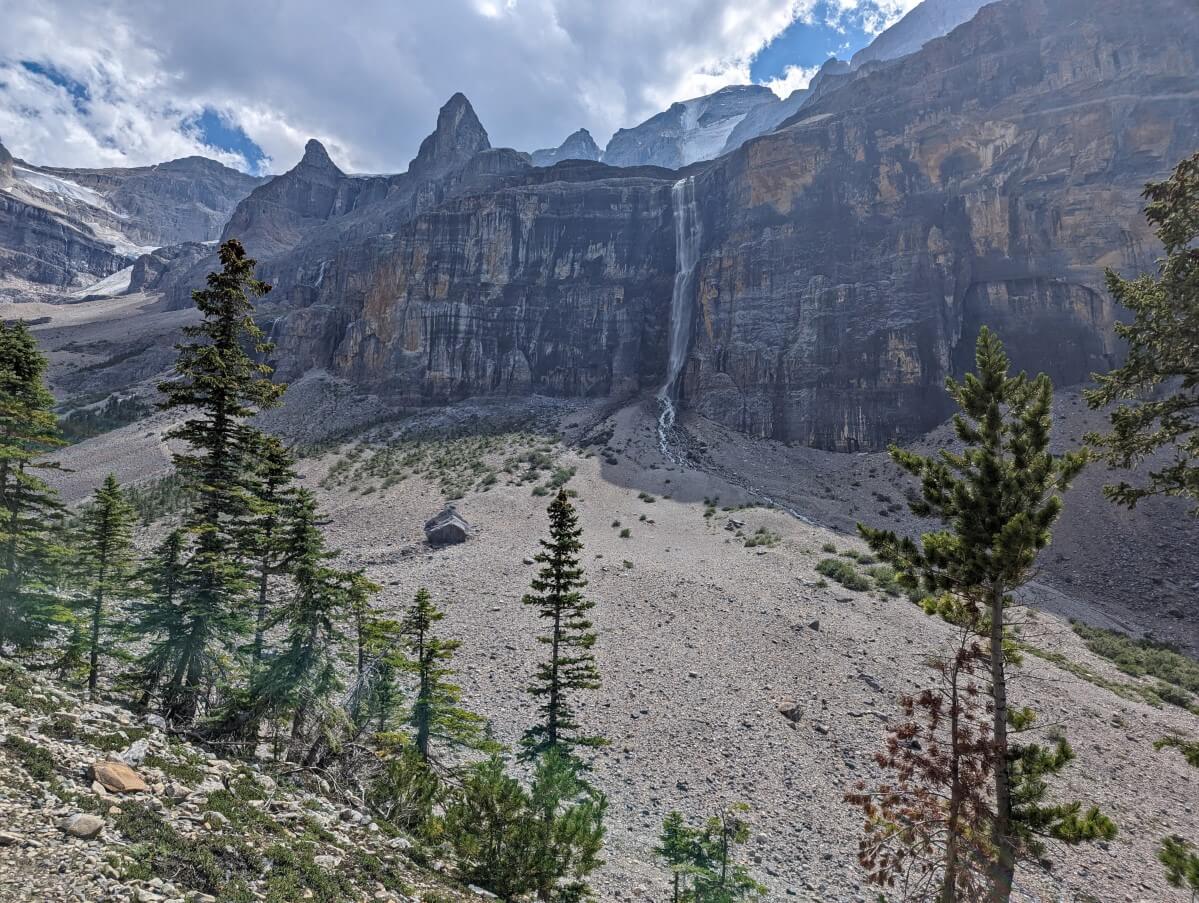
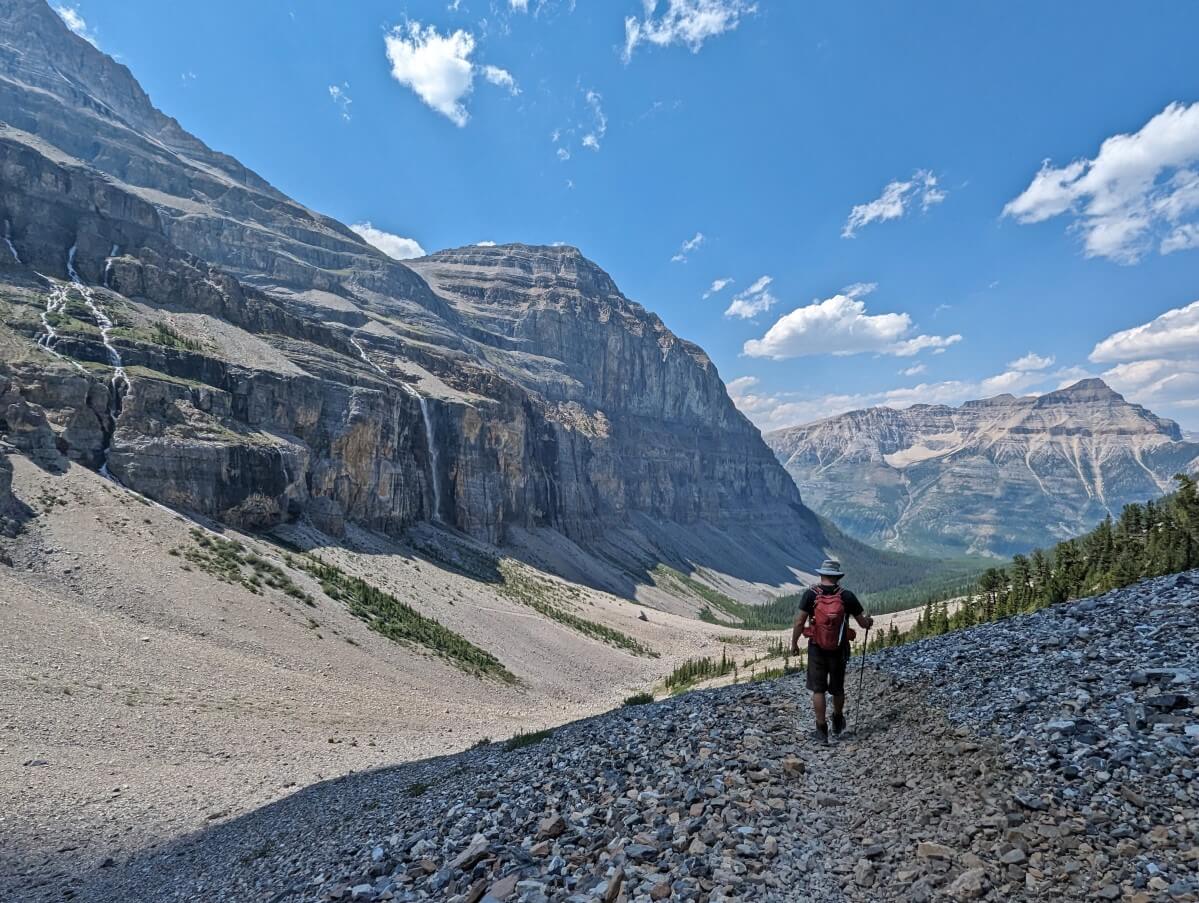
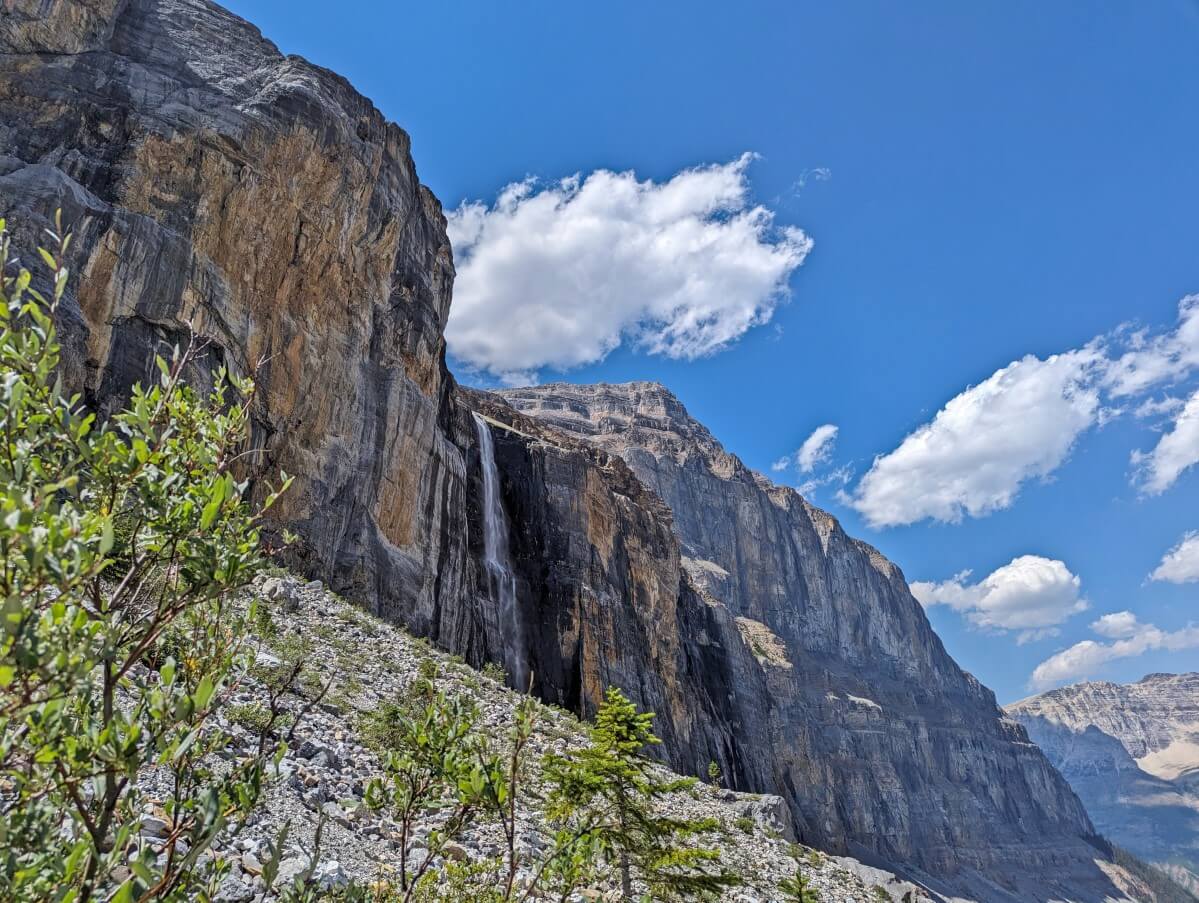
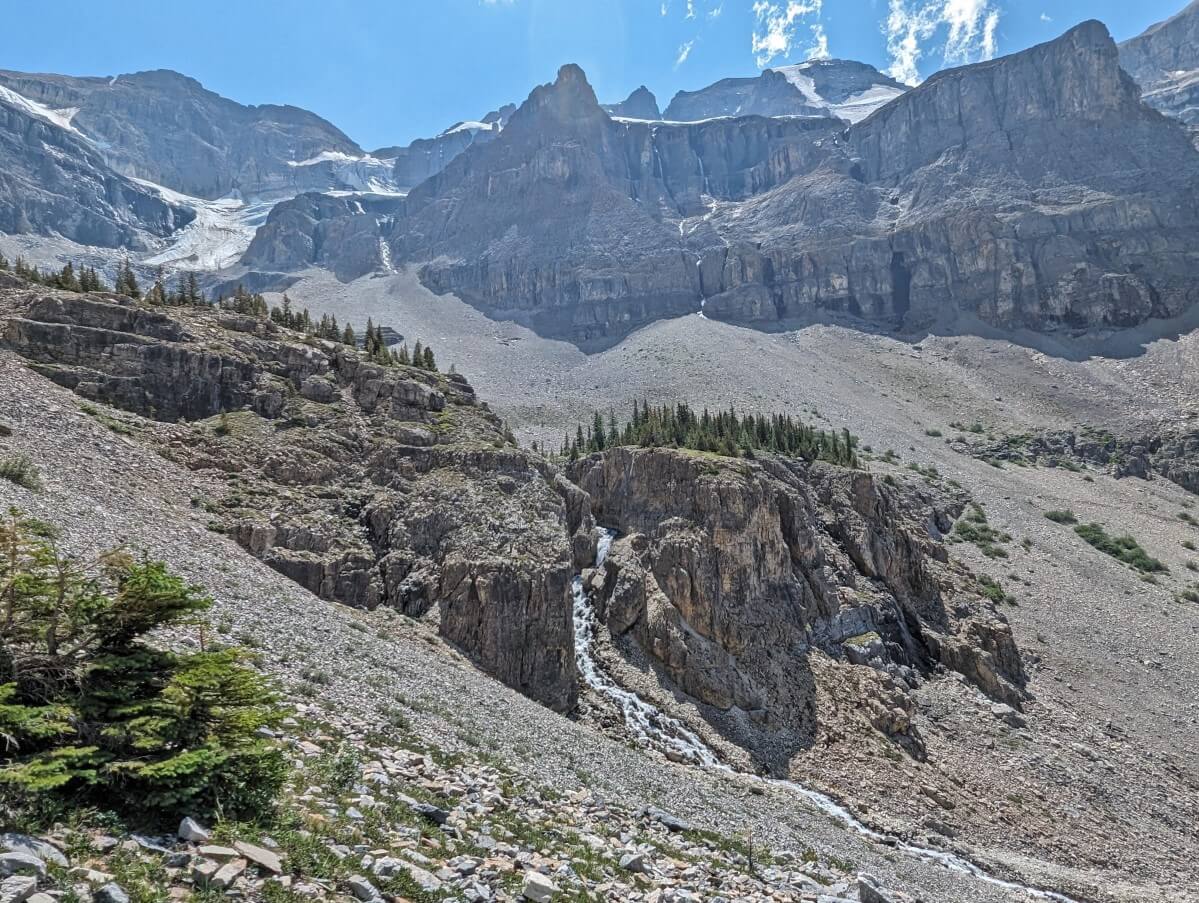
A huge waterfall is now visible ahead, cascading from the almost vertical cliffs on the right-hand side.
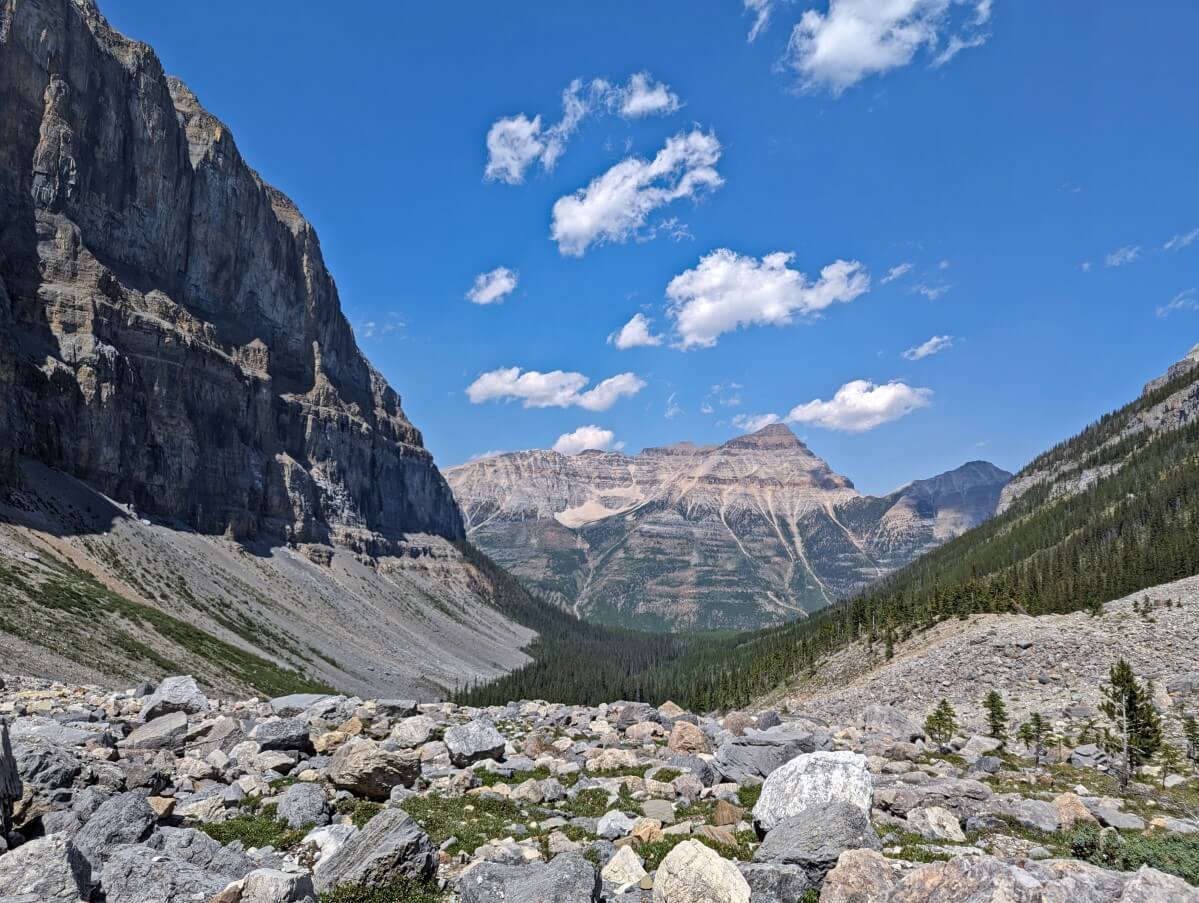
At the 4km mark, the trees melt away and the views become panoramic. Stanley Glacier is visible at the end of the valley.
There is a rocky area to the left, where many people choose to stop for a break. This is a great viewpoint, but I’d suggest going just a little further (unless shade is important to you).
Trail end
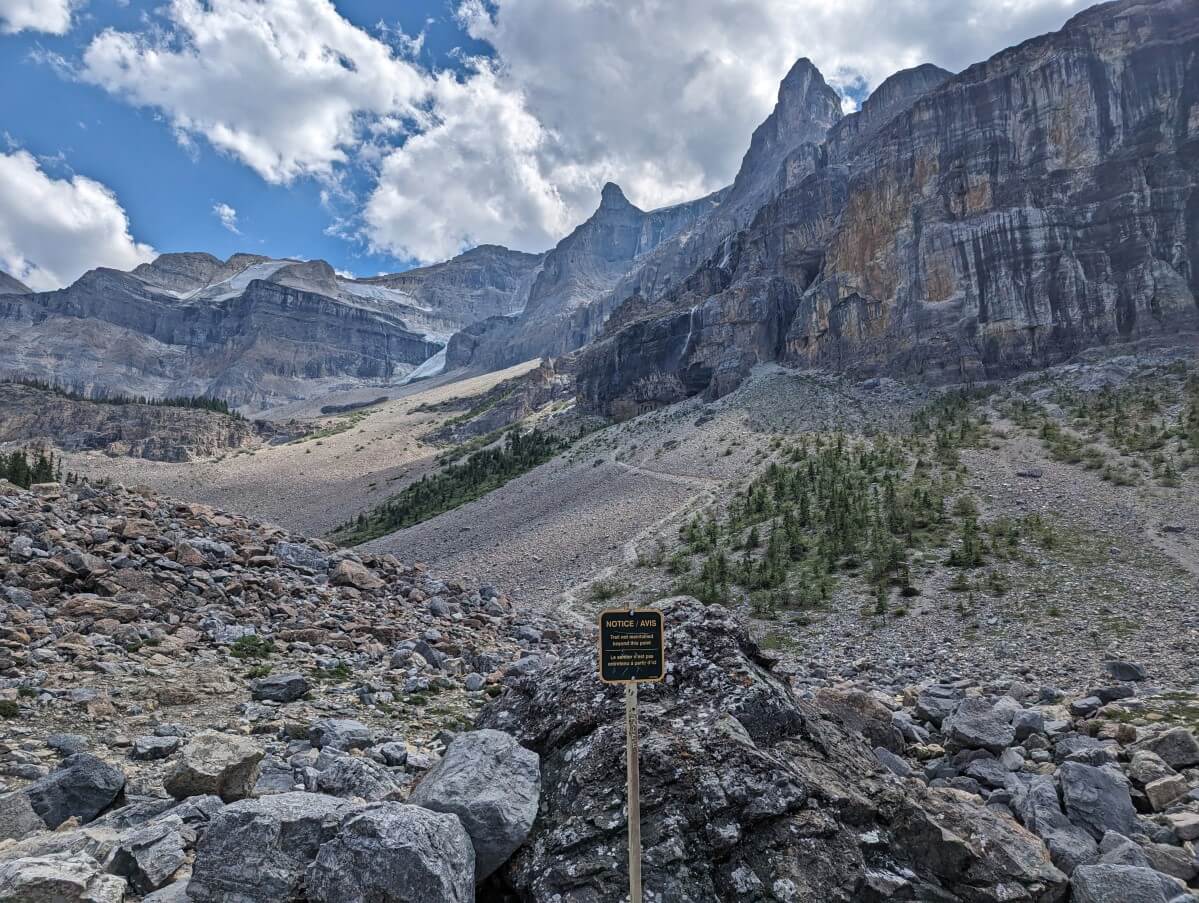
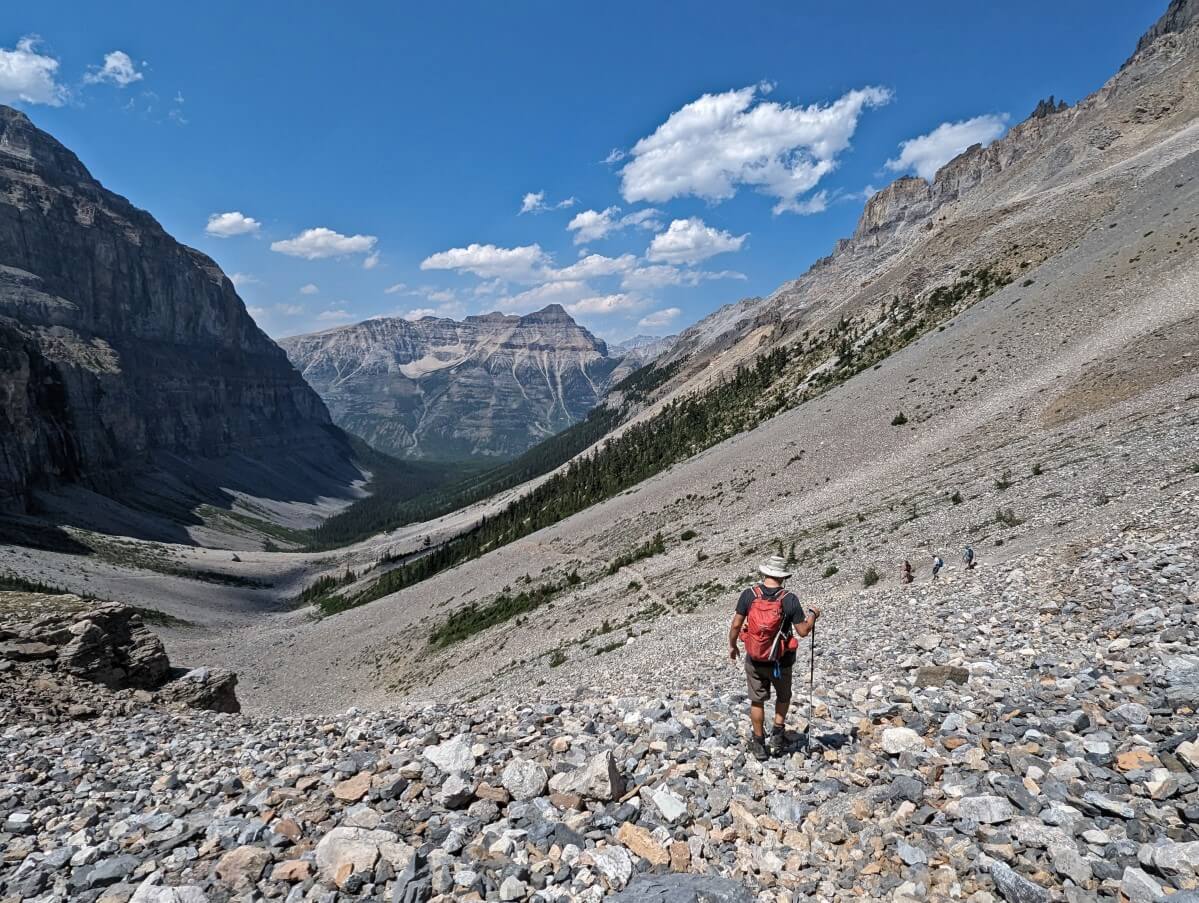
Soon after the 4km viewpoint, the trail splits.
The left path stays high, while the right path heads downhill towards the basin boulder field. These paths lead to the loop extension route.
The official end of the maintained trail is signposted on the left path, about 200m from the split.
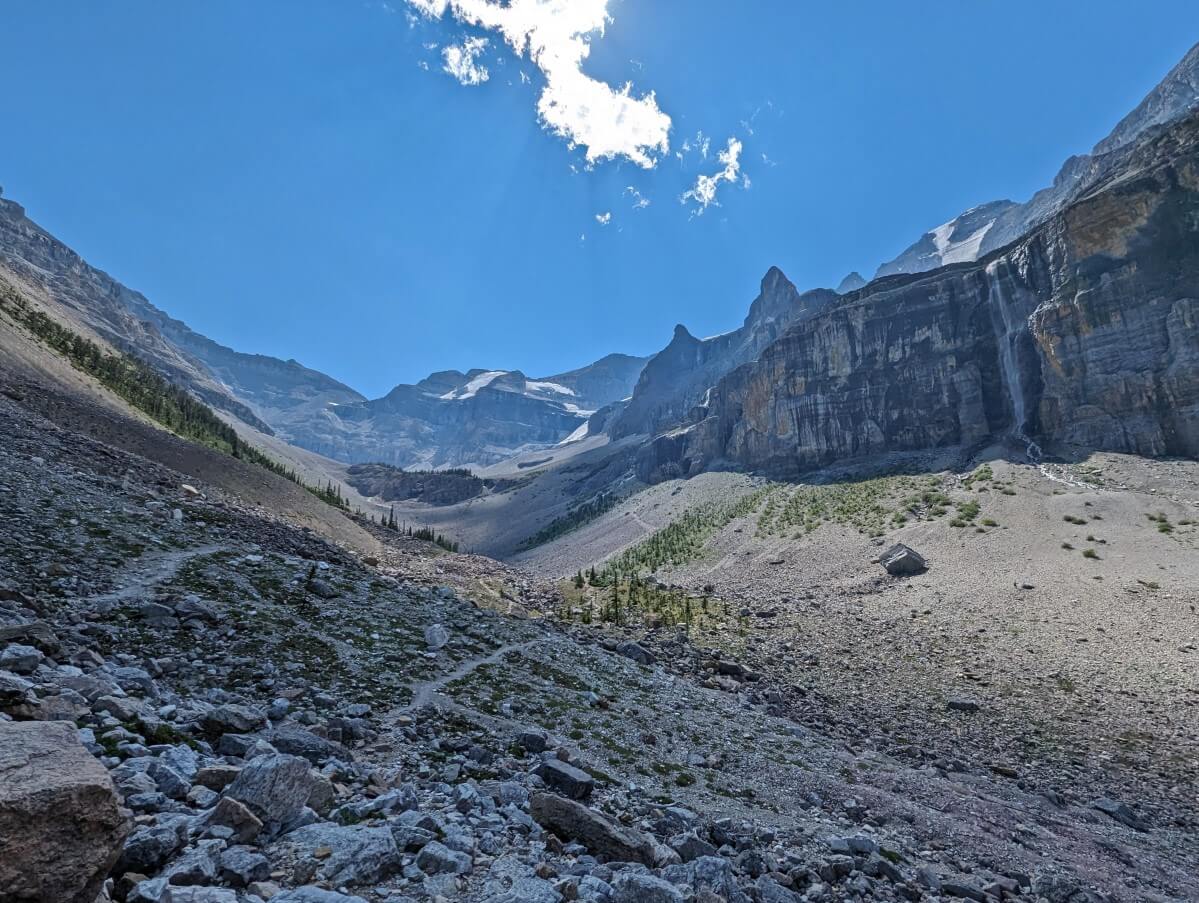
The landscape is wide open in this lower basin area, with many options for places to stop and snack with a view. Keep in mind that there is very little shade, however.
At this point, you decide to continue or head back to the parking lot on the same trail.
Interested in fossil hunting? The Parks Canada guided tour group spent a lot of time in the area around the big boulder near the base of the large waterfall. We found a couple of fossils just off the main trail.
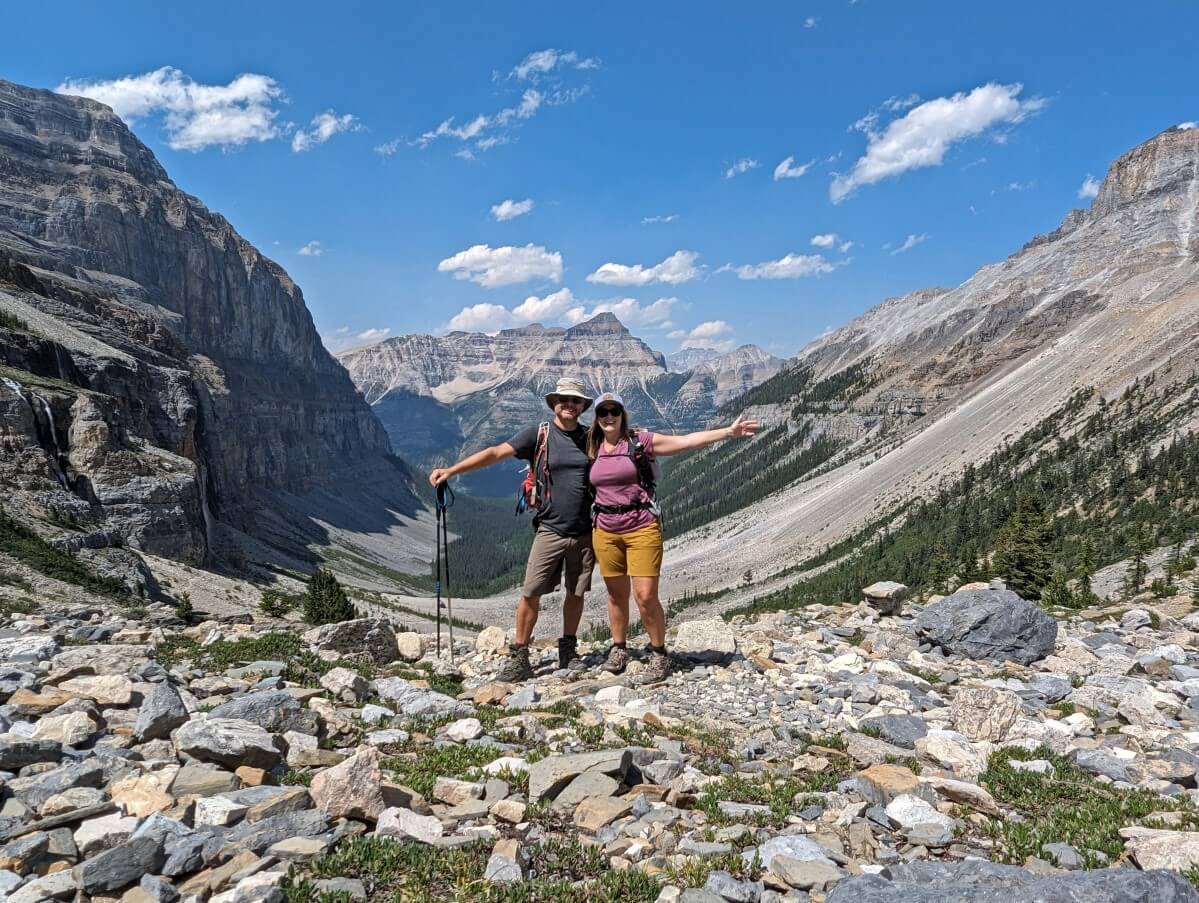
Optional loop extension
If you have the time, fitness and energy, consider continuing on the optional loop extension to the forested bench at the end of the basin.
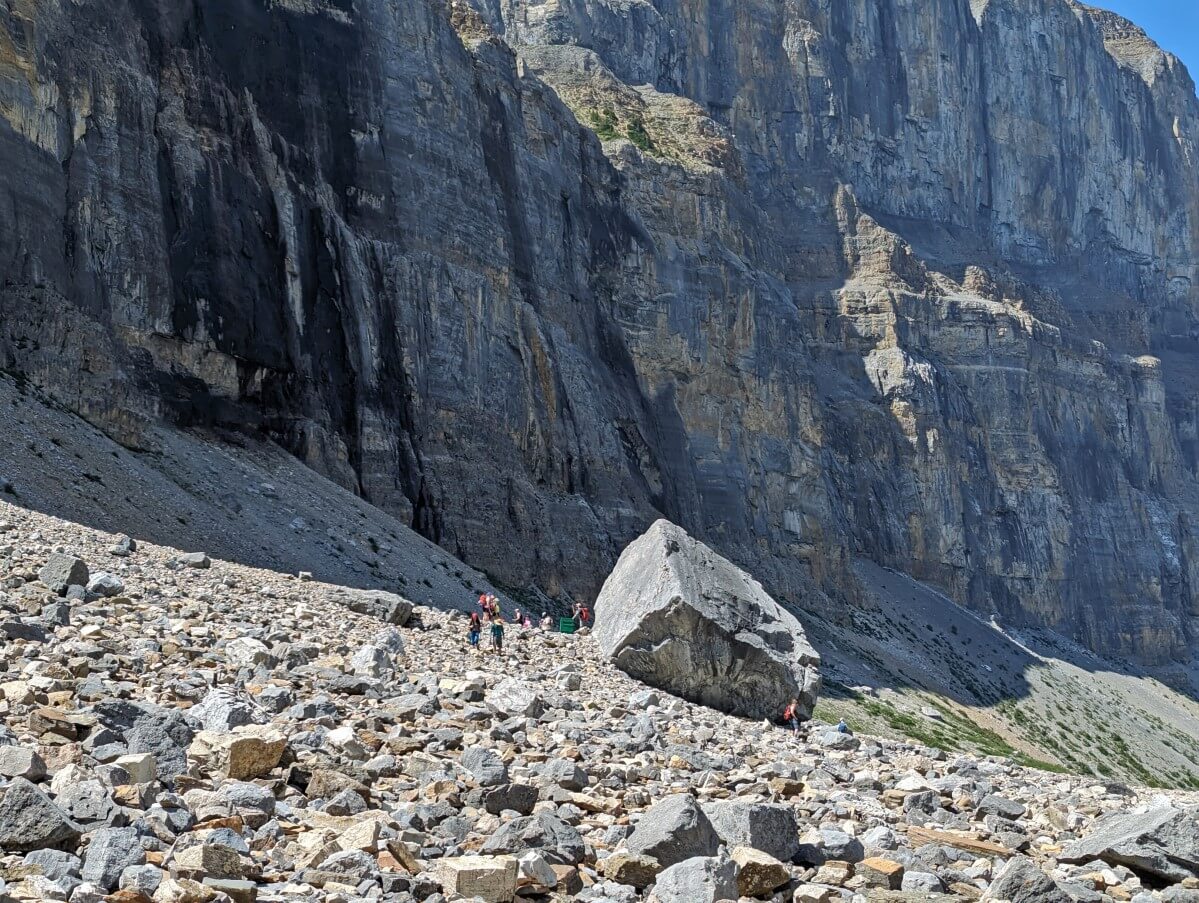
Though well used, it is important to keep in mind that this 2.4km long loop is not maintained and is therefore challenging to hike.
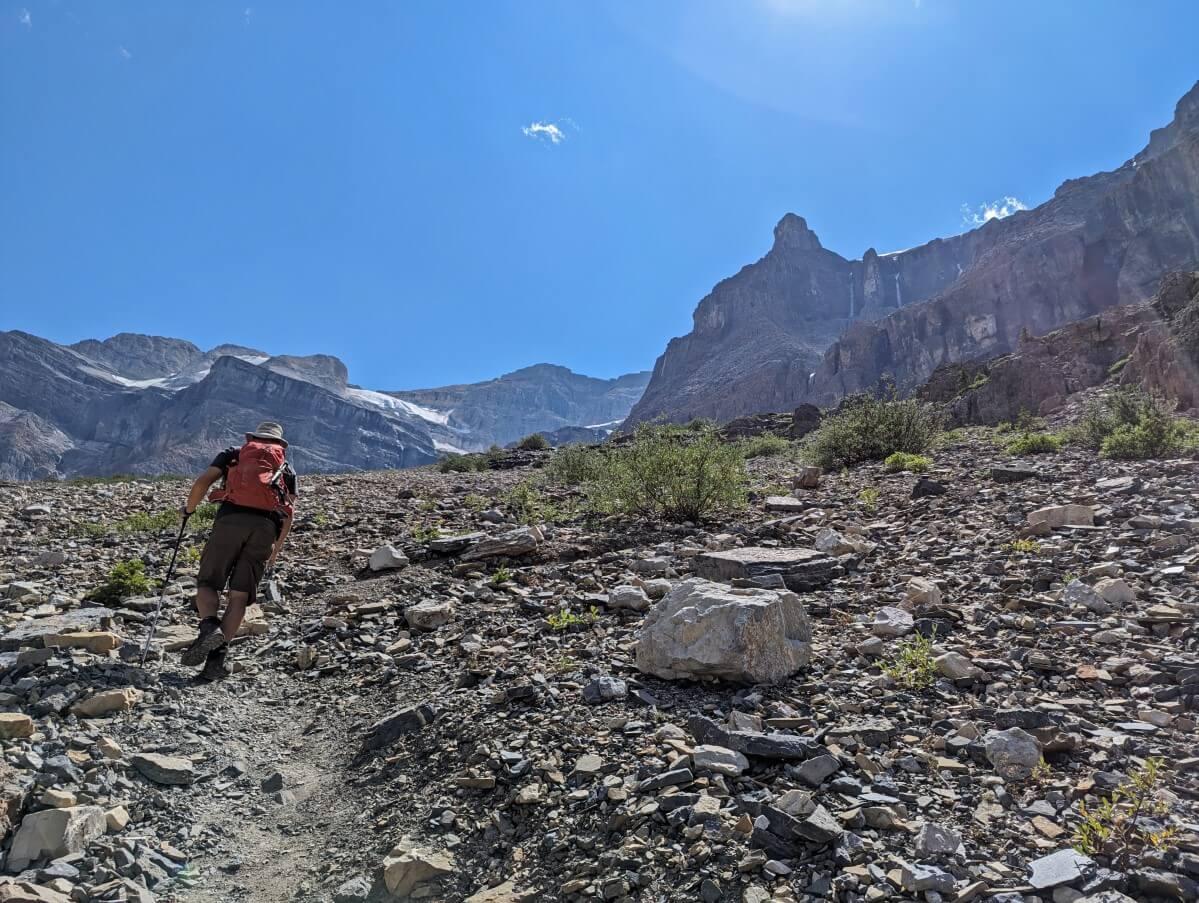
It is possible to hike in either direction. We hiked counterclockwise. Personally, I found both directions to be very steep with plenty of loose rock and drop-offs. The clockwise side features more switchbacks.
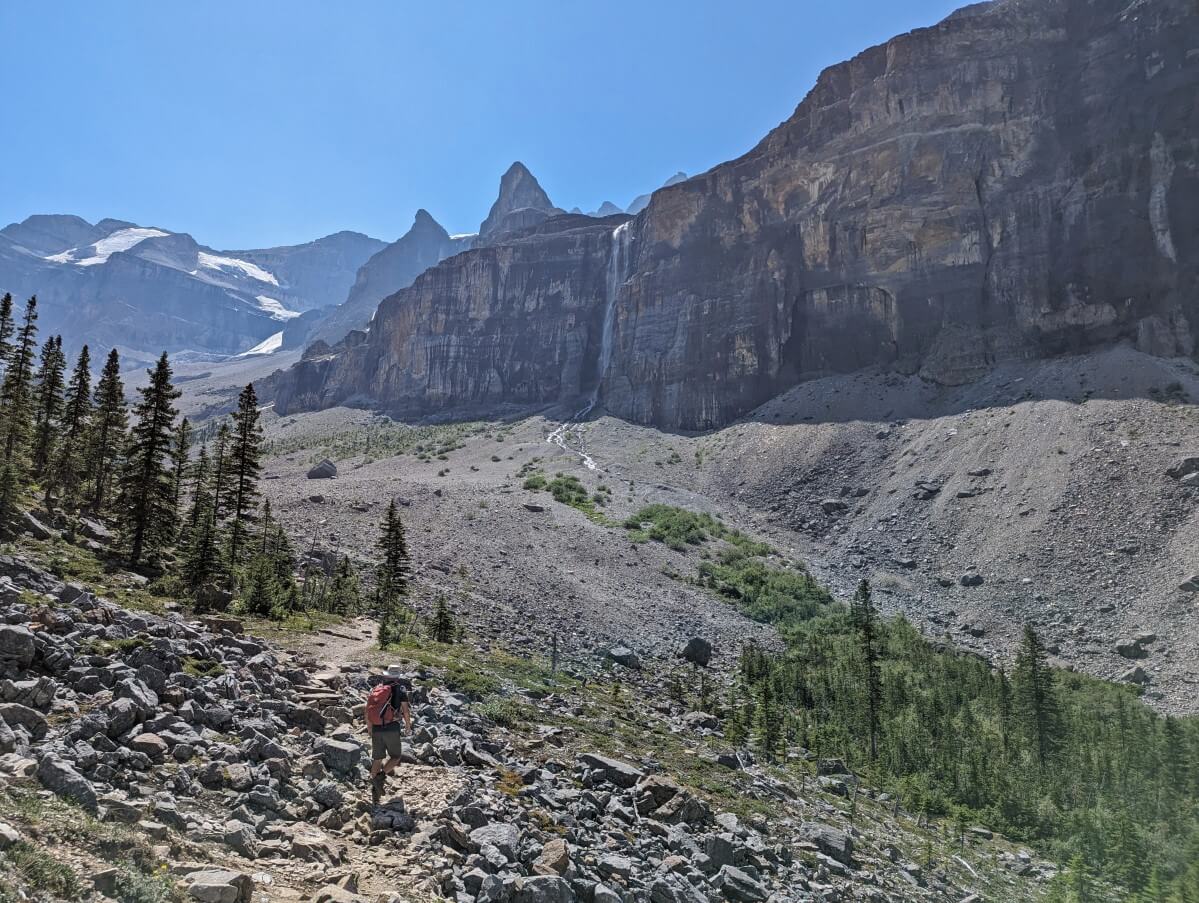
The counterclockwise route up the steep slope is visible from the trail split at 4km. It first travels towards a tall set of waterfalls with caves at the base. On a hot day, the spray from the waterfall is very welcome!
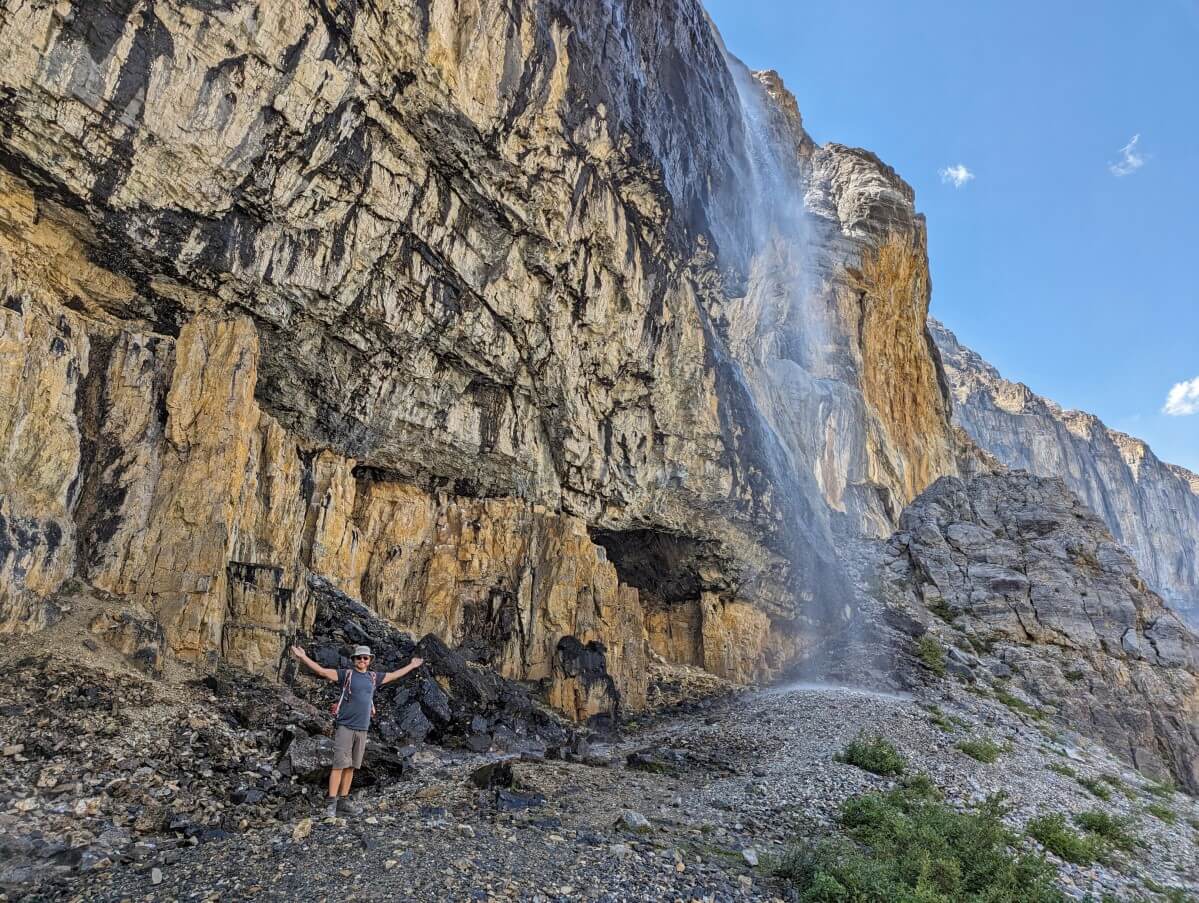
There is a creek crossing just beyond here. Due to high snow melt, we had to wade through freezing cold calf-deep water. Usually, rock hopping is possible. The steep trail continues all the way up to the forested bench area.
The views on top are simply sublime, with the glacier above, the dramatic valley below and waterfalls everywhere! 2845m high Mount Whymper looms above Highway 93 to the west.
There are many pathways across the upper basin. If in doubt, follow the stream towards the forest; you’ll need to cross it to continue the loop (rock hopping is usually possible). There are some cairns too.
The route down is on the other side of the valley and is a real knee burner. Take it slow and steady. When you reach the trail end sign, return to the parking lot via the main path.
Stanley Glacier hiking guide
Inspired to hike the Stanley Glacier Trail? In this section, you’ll discover everything you need to know to start planning a trip.
There are affiliate links in the text ahead. If you make a purchase via one of these links, we may receive a small percentage of the sale at no extra cost to you.
Trailhead and parking
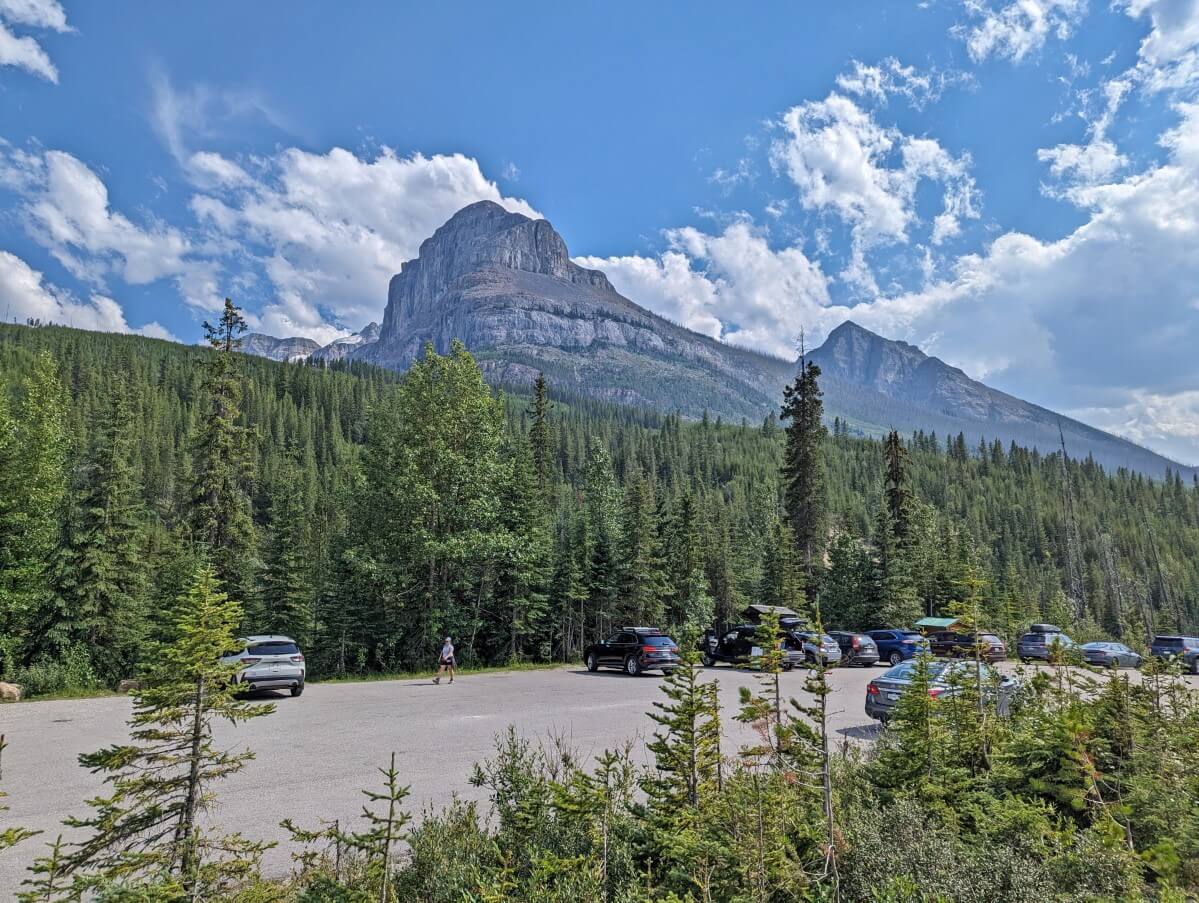
The Stanley Glacier hike starts in a parking lot on Highway 93, 3.5km south of the Continental Divide (and BC/Alberta border).
There is space for around 25 vehicles in this paved parking lot. Stanley Glacier is a popular trail, so this parking lot is often full by 11am on fair weather days in July and August. It fills up sooner on weekends.
There is additional parking space available next to the highway – pull over as far as you safely can.
An outhouse is located in the parking lot as well as trail signage. There is no charge for parking but vehicles must have visible Parks Pass.
When to hike the Stanley Glacier Trail
The main Stanley Glacier Trail is usually snow-free from mid June to late September. The path may be snow-free for a longer period, but it varies from year to year. In 2023, the trail was snow-free in late May.
The loop extension is a little higher in elevation and patches of snow may still be visible until later in June.
Stanley Glacier Trail difficulty
I would rate Stanley Glacier’s main trail (to the lower basin) to be on the low side of moderate. It is uphill most of the way, so some cardio is required. The views appear quickly and are a great distraction.
There are some steeper, rockier sections closer to the end of the maintained trail but nothing that lasts very long.
The total distance is relatively short (8.4km), with most people likely to complete the hike in around 3 hours.
The extension loop is significantly more demanding. It features a very steep ascent and descent, with much of the route featuring scree (small rocks) and talus (larger rocks) rather than a dirt trail.
There are some narrow sections with steep drop-offs as well as some stream traverses, which can usually be rockhopped but not always (as with our experience).
If you dislike lofty trails or descending loose rocks, I would not recommend Stanley Glacier’s loop extension.
Trail navigation
The main Stanley Glacier Trail features a very well-established pathway. There is signage at the start of the trail and some sporadic signs along the way (look for the hiker image).
The foliage is quite low throughout, which makes it easier to see the route ahead. Above the treeline, the trail is even more visible.
There is one short rocky section around the 3.2km mark. It can be harder to see the route here.
Near the trail end, the path splits. The upper route leads to the official end of the maintained path, with the lower route heading down to the rocky basin bottom.
If you don’t expect it, this could be confusing. It is not necessary, however, to go to the official end of the trail, since the views are fabulous before this point.
The loop extension route is not maintained and is therefore not always as obvious. In some places, there are multiple paths. This can be a bit confusing.
If planning to hike the extension route, I’d suggest downloading an offline GPX route (All Trails or Organic Maps, for example) so you can keep an eye on your location.
Stanley Glacier fees and permits
While there is no specific fee to hike the Stanley Glacier Trail itself, there is a requirement to have a valid Park Pass for Kootenay National Park.
In 2026, park pass fees for Kootenay National Park are $12.25/day per adult or $10.75/day for seniors. Youth and children are free.
Park passes for the Canadian Rockies parks are interchangeable. So if you have a Park Pass for Banff National Park (or Jasper, Yoho, Glacier, Waterton or Mount Revelstoke), it is also valid in Kootenay National Park.
Be sure to buy a park pass before heading to the Stanley Glacier trailhead. It will need to be displayed on your vehicle’s dashboard while parked.
Park passes can be purchased at Parks Canada Visitor Centres (Banff, Lake Louise, Radium Hot Springs, Field) or at park entrance gates (Radium Hot Springs, Banff). It is also possible to buy park passes online.
Hiking other trails in the Rockies? It may be better value to buy a Discovery Pass (an annual pass). Discovery Passes are $83.50/adult OR $167.50 for a group (up to 7 adults).
Wildlife
Kootenay National Park is home to a variety of mammals and more than 180 species of birds. Both grizzly and black bears roam this area. The latter are occasionally spotted in the upper basin area, rarely in the lower basin.
Negative wildlife encounters are rare on the Stanley Glacier Trail (and across the Canadian Rockies more generally). Parks Canada promotes coexistence and there are a few things hikers can do to help:
- Make noise while hiking. This alerts wildlife to your presence and gives them a chance to avoid you. As a general rule, animals don’t want to be close to humans
- Leave No Trace. After eating, make sure you haven’t left any food or wrappers at your location (read more Leave No Trace tips)
- Give wildlife space. If you do see any animals, keep your distance – ideally 100m or more. This offers them an escape route
- Know what to do if a bear approaches you. Always remain calm. Depending on the behaviour of the bear, different techniques are required (read our bear safety post for more info)
- Bring bear spray and store it in an accessible place. An aerosol deterrent made with chilli pepper oil, bear spray is a ‘last resort’ tool intended to be used only when other methods have failed
We hiked the Stanley Glacier Trail in late July and were not bothered by mosquitoes. I have heard, however, that mosquitoes can be a bit annoying earlier in the season (June, early July).
Safety information
While the Stanley Glacier Trail may be relatively well travelled, it is still located in remote mountainous terrain. Keep the following in mind when planning a trip and on trail:
- There is no phone signal at the trailhead or on the trail itself. We carried an InReach device in case of emergencies
- Tell someone where you’re going and when you plan to be back (check out our outdoor safety guide for more tips)
- Weather conditions can vary and change quickly. Snow is possible at any time of year. Bring extra clothing in case of cold or wet weather
- There may be snow on the main trail until mid June, sometimes later
- The Stanley Glacier Trail doesn’t have a lot of shade. Bring sun protection and plenty of water in warm weather. Start early (pre-9am) if you can
- The main section of the trail has some elevation gain and short sections of rocky terrain. Depending on your fitness and experience, you may find this difficult and/or tiring
- There is significant elevation gain on the extension loop. Both the ascent and descent features a steep scree slope
- Depending on recent weather, hikers may need to cross some small seasonal creeks on the loop route
- Besides these hazards, it’s also important to be aware of wildlife, particularly bears (see previous section)

Stanley Glacier packing list
Even if you’re just planning to hike the main out and back route, be sure to wear a pair of tried and tested hiking shoes/boots. Bring the 10 Essentials in your daypack (we use an Osprey Talon 22):
- Extra clothing for the coldest possible conditions during the season you are travelling in
- Sun protection to prevent sunburn and sunstroke (sunscreen, sunglasses, lip balm, sunhat)
- Food, including lunch and snacks
- Water, at least 2l per person during warm weather
- First Aid supplies in case of injury or sudden illness
- Fire starters, carry matches at a minimum
- Personal light to illuminate your route if delayed (such as a headlamp)
- Repair kit and tools, such as a knife and a small amount of duct tape
- Emergency shelter, carry an emergency blanket at a minimum
- Signalling device such as a whistle. There is no cell phone signal in this area. If you have a satellite device, bring it
While a map is not really needed for the main out and back route, I would highly recommend a GPS track (AllTrails or otherwise) for the loop extension as the path is not well marked.
I would also suggest bringing bear spray, in an easily accessible holster. Those sensitive to mosquitoes may want to bring repellent during early summer.

Parks Canada guided hikes
Stanley Glacier is one of only a handful of places worldwide where it is possible to find Burgess Shale fossils.
Parks Canada runs regular guided hikes to the Stanley Glacier basin from mid-June to early September.
The 7.5 hour long tour is family friendly with children 8 years and older welcomed. The fee is $88.25/adult, $74.13/senior, $60.01/youth.
The fossil-rich area is found in the middle of the rocky basin, so some walking on large, loose boulders is required. For that reason, the tour is not recommended for people with back, knee or ankle problems.
Reservations are required, with availability usually opening in January each year.
In 2026, the reservation launch date is 20th January at 8am MT.
We haven’t tried this tour yet, but we did join a Burgess Shale guided hike in Yoho National Park.
It was a fantastic experience and we learned so much about palaeontology, the Rockies and geology in general.
And, of course, I will never forget holding a 500 million-year-old fossil! I really would highly recommend it.
In my opinion, this tour is also ideal for new hikers apprehensive about hiking in the Rockies.
Where to stay before/after hiking the Stanley Glacier Trail
If you can, I’d suggest spending at least one night in Kootenay National Park. It is quieter than Banff but still has plenty to offer.
Created by the meeting of two glaciers thousands of years ago, Marble Canyon is well worth a short visit. The Floe Lake Trail is another worthwhile, but much more challenging, day hike in the area.
After hiking all day, head to Radium Hot Springs for a relaxing soak.

Camping options
The closest frontcountry campground to the Stanley Glacier hike is Marble Canyon (less than 5 minutes drive south).
The sites at Marble Canyon are generally small, though some offer views of the surrounding mountains. There are flush toilets but no showers. I’d recommend a reservation in July and August.
The closest frontcountry campground with showers is located at Johnston Canyon in Banff National Park (20 minutes drive north).

Local accommodation options
Storm Mountain Lodge and Cabins is a beautiful 100 year old property set on five acres of land in Banff National Park, just 8 minutes drive from the Stanley Glacier hike.
Banff is the closest town to the Stanley Glacier Trail (35 minutes drive). Our favourite place to stay in downtown Banff is Moose Hotel & Suites.
Situated right on Banff Avenue, Moose Hotel & Suites is just a few minutes from a huge choice of restaurants, cafes and stores. The rooftop hot tub is a much-appreciated bonus!

Other BC trail guides you may find helpful:
Glacier Crest Trail, Glacier National Park
The Rockwall, Kootenay National Park
The Iceline Trail, Yoho National Park
Mount Assiniboine Provincial Park
Lake O’Hara, Yoho National Park
Eva Lake, Mount Revelstoke National Park
Juan de Fuca Trail, Vancouver Island


One half of the Canadian/British couple behind Off Track Travel, Gemma is happiest when hiking on the trail or planning the next big travel adventure. JR and Gemma are currently based in the beautiful Okanagan Valley, British Columbia, Canada. Consider buying us a coffee if you have find any of our guides helpful!