Offering a mix of climbing, hiking and scrambling, Via Ferrata is an exciting way to explore mountainous areas in complete safety. Better still, you don’t need any technical skill or climbing experience!
Mt Norquay (near Banff, Alberta) has five thrilling Via Ferrata courses, each offering phenomenal views of the Bow Valley mountains.
Always looking for unique ways to see Canada’s most beautiful places, we took up the challenge to try the Skyline route. While we’ve explored a lot of Banff National Park over the years, we hadn’t spent much time on Mt Norquay.
Little did I know just how much of Mt Norquay we would experience!
Read on to discover what we thought plus everything you need to know to climb Mt Norquay’s Via Ferrata course yourself!
Thank you to Banff and Lake Louise Tourism for hosting us during our two night stay in Banff. We stayed at the fabulous Moose Hotel and Suites on Banff Ave, the perfect location for exploring downtown. We were also invited to visit Lake Louise Ski Resort.

What is a ‘Via Ferrata’?
Translating as ‘iron path’ (or road) in Italian, Via Ferrata refers to a mountain climbing route with metal handholds, ladders, bridges, steps and other fixed equipment.
Via Ferrata users wear a harness and clip into a steel safety cable that runs along the entire course. This anchors climbers to the rock at all times, ensuring safety even when suspended hundreds of metres above ground!
JR and I do climb occasionally but both of us find the risk aspect somewhat off putting. Via Ferrata provides a happy medium – still exhilarating and fun but without any of the stress of anchor building or checking knots!
Plus, if you’ve ever wanted to try climbing, Via Ferrata offers the perfect introduction.

The Via Ferrata at Mt Norquay
Although Via Ferrata routes have been around for a long time in Europe (back in WWI, it was a way to move troops around Italy), they are still a fairly recent addition to the North American mountain scene. Mount Norquay’s Via Ferrata has five different experiences:
- Explorer – 2 to 2.5 hour round trip, 1km distance
- Ridgewalker – 3.5 to 4 hour round trip, 1.4km distance
- Alpinist – 4 to 4.5 hour round trip, 1.9km distance
- Skyline – 4.5 to 5 hour round trip, 2.5km distance, 290m elevation gain
- Summiteer – 5.5 to 6 hour round trip, 3.2km distance, 360m elevation gain
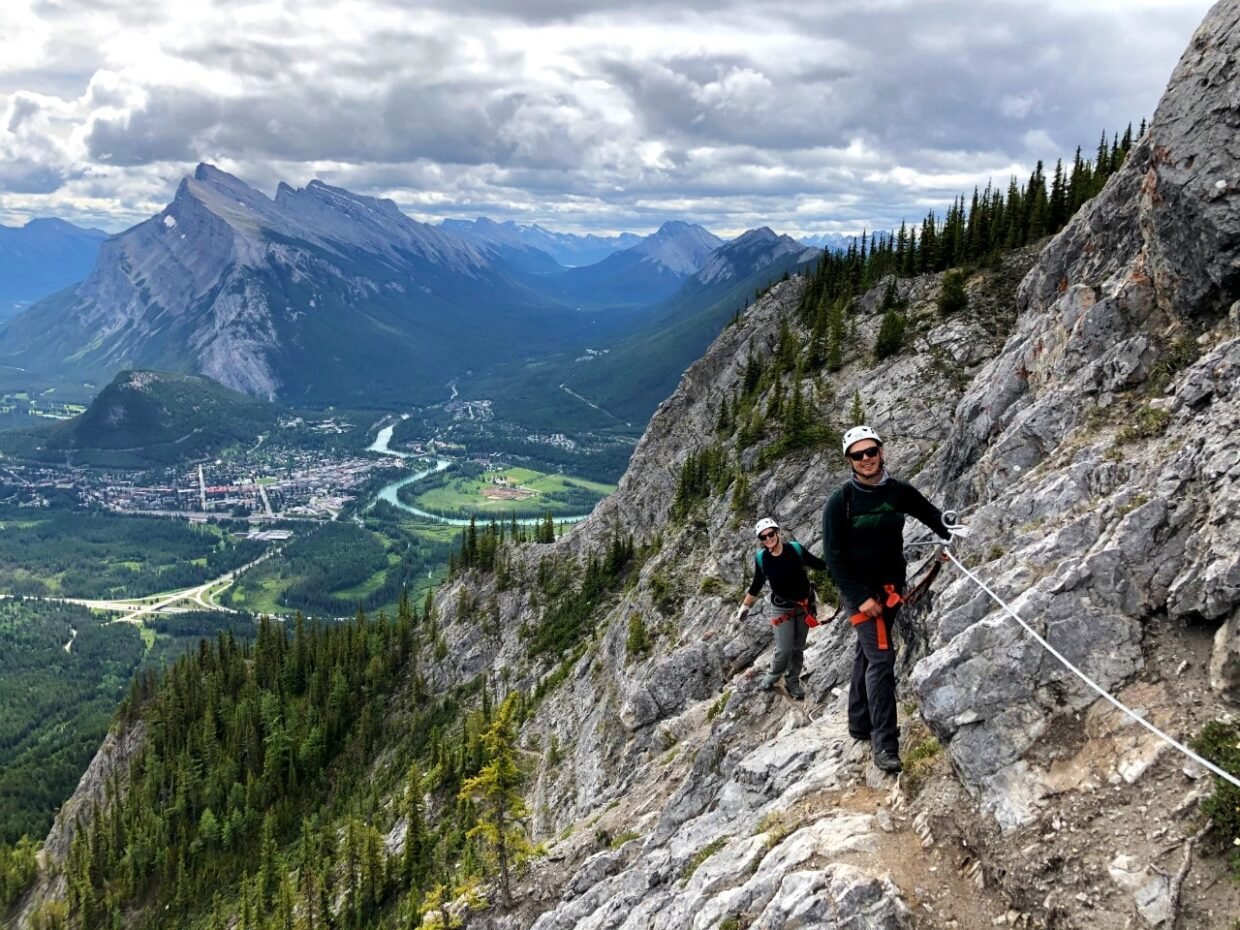
All of the tours include sections of hiking, vertical climbing and traversing as well as a trip across a suspension bridge. Spectacular views are a given, with the Canadian Rocky Mountains stretching out in every direction. The town of Banff can also easily be spotted in the valley below.
The Skyline and Summiteer courses feature more exposure than the other two, plus some more challenging obstacles including a suspended ladder and narrow beam.
Continuing on from the Skyline to the East Summit of Mt Norquay, the Summiteer is the ultimate Via Ferrata experience with an additional three-wire suspension bridge section.
The Explorer is a good option if you’re feeling really nervous but otherwise I’d suggest trying the Ridgewalker at a minimum (ideally the Alpinist or Skyline!)

Our Mt Norquay Via Ferrata Experience
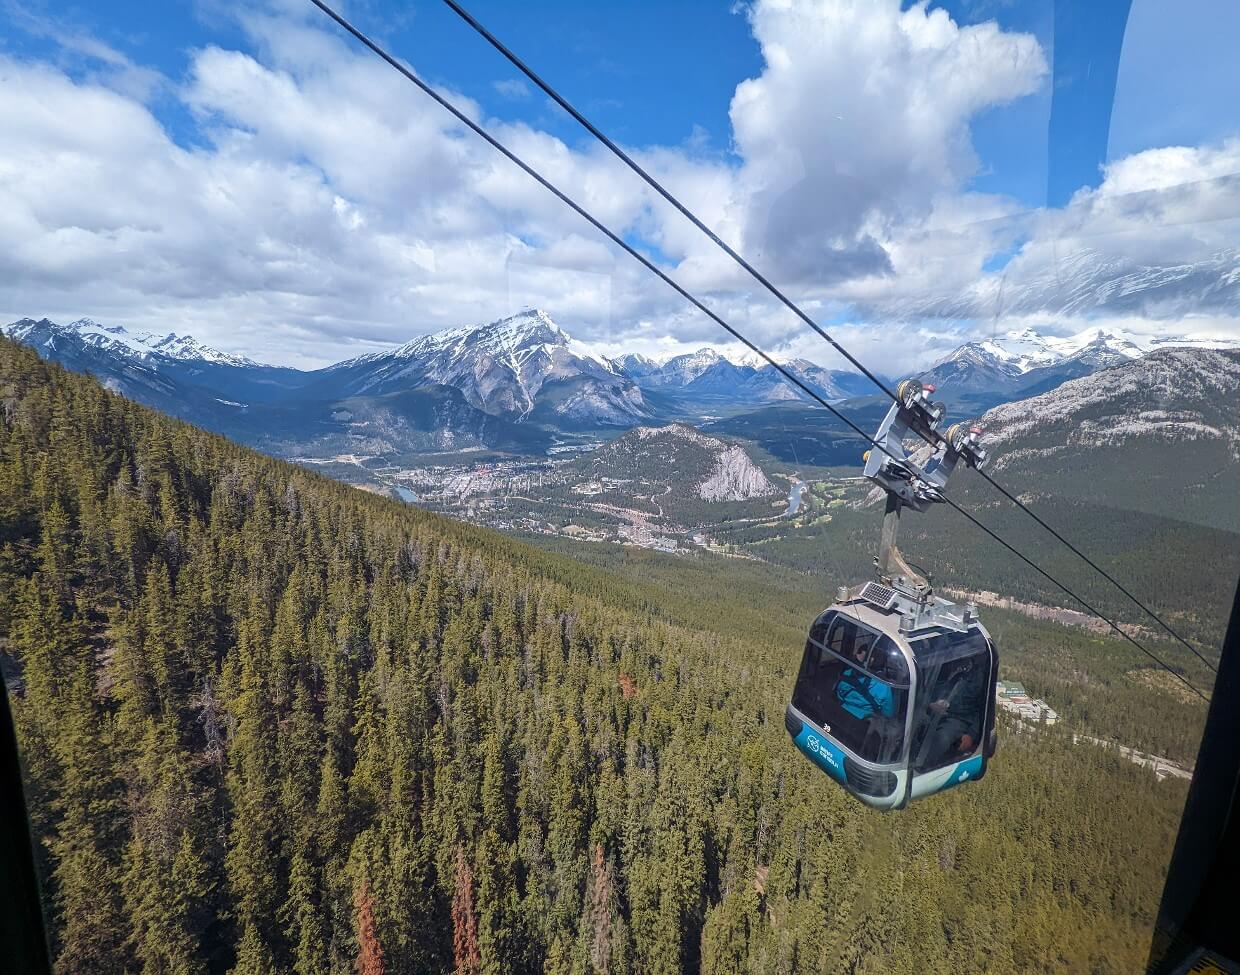
Following a guide briefing and equipment pick-up, every Via Ferrata tour at Mt Norquay starts with an 8 minute scenic chairlift ride.
This is definitely the most relaxing part of the whole experience so take the opportunity to sit back and enjoy the beautiful views of Banff and beyond!
At the top, it’s time to practice on a test Via Ferrata course. This helps everyone get used to clipping on and off the safety cable (one carabiner stays on at all times) and using the steel holds to ascend and traverse.
This was our second time trying a Via Ferrata course so this time I felt a lot more confident! Next up was a short uphill hike to the course start. After a pause to catch our breath, it was time to begin the real Via Ferrata route!

The Skyline Tour
Starting slowly, the first couple of climbing sections on the Skyline Tour are fairly easy. This offers a chance to get used to the Via Ferrata system and also the exposure. There’s no two ways around it – it’s high up here!
Easy or not, there’s no rush to go quickly on the Mt Norquay Via Ferrata. As long as you always remain at least one cable ‘segment’ behind the person in front, you’re all set.
The fixed steps and ladder rungs make ascending a lot easier than regular climbing but there’s still some thought required on the Via Ferrata. There are places where it is helpful to use the rock for better foot and hand holds and your Via Ferrata guide will suggest options when needed.
The more vertical climbing sections are never too long, which allow for a pause for recovery and a chance to check out the surrounding views.

Exposure, ladders and bridges
I admit it, I’m a little afraid of heights. I never go too close to the edge of a cliff at viewpoints and prefer to avoid hiking trails featuring extremely narrow ridges. But being on a Via Ferrata course is different for me – it is incredibly safe and for the most part, I feel comfortable.
And then there was the ladder. It came after an extended snack break, purposely long to ready us for the more difficult half of the Skyline route.
This ladder wasn’t attached directly on the rock. It was actually in front of the rockface, forcing me to turn around and face the sheer drop to climb it. And then, at the top, I’d need to turn around again and step off of it, back onto the rock. Ahhhhhhhh.
Needless to say, I think I had my eyes closed the entire way up. By the time I opened them, the next obstacle was almost in sight – a narrow balance beam across an abyss. Somehow, that one was actually fun!
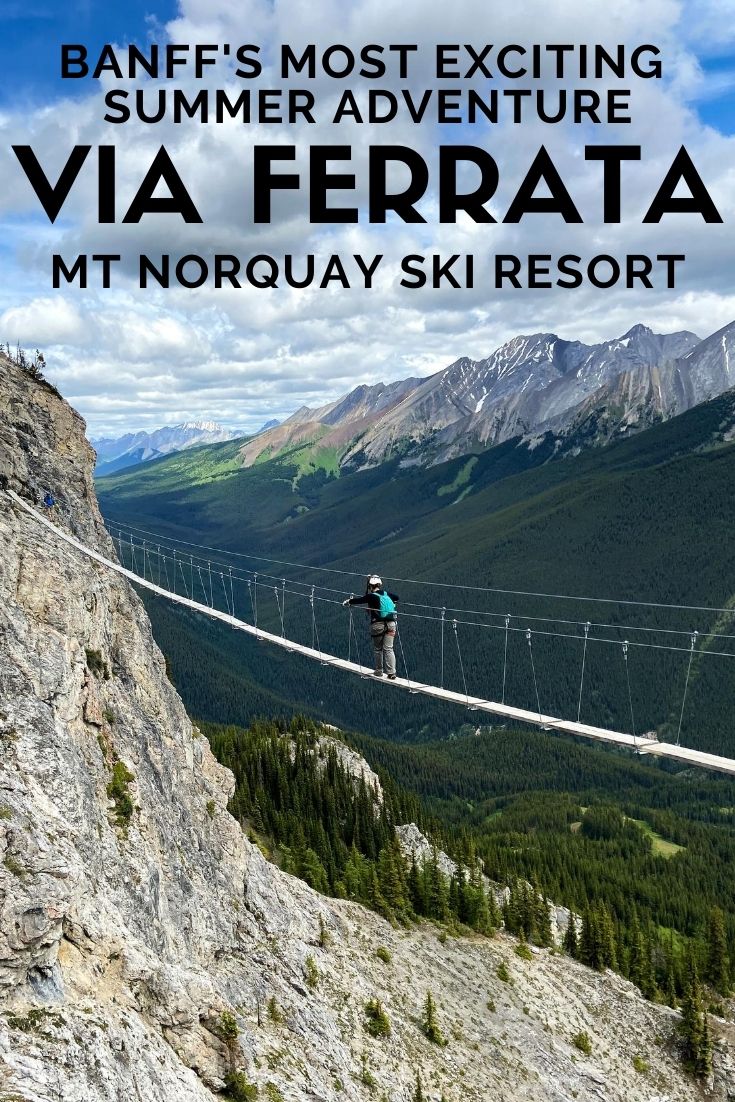
The trifecta was completed by a very wobbly 55m long suspension bridge. Being naturally unbalanced as I am, I was quite happy to reach the other side and be back on solid rock! JR, of course, loved it.

Reaching the top
A couple more vertical ascents and traverses later and we were witnessing the incredible panoramas that marked the finale of our tour.
We had made it almost to the very top of Mt Norquay and here was the reward to prove it. That feeling of accomplishment is hard to beat!
The hike down was harder than I initially thought it would be. Steep in parts, there are sections that require clipping back onto a safety cable. Facing down the mountain all the way, though, the views are front and centre. So the hike goes fast.
The Via Ferrata tour ends next to the Cliffhouse Bistro. The Summiteer is the only Via Ferrata course that features a post-tour meal but I’d highly recommend making a stop here anyway (more info below). It’s the best way to treat yourself after scaling mountains like a pro!

What you need to know about Mt Norquay’s Via Ferrata
- No climbing knowledge or experience is needed to join a Via Ferrata tour at Mt Norquay but you do need a basic level of fitness and a sense of adventure! If unsure, call first before booking
- Mt Norquay’s Via Ferrata usually runs from June to October. In my opinion, July and August would be the best months with the most comfortable weather
- Online reservations can be made up to an hour before the tour. After this, just give them a call to see if there’s an available spot
- The shorter Via Ferrata routes have tours leaving both in the morning and afternoon, while the longer experiences (Skyline and Summiteer) start in the morning only
- Usually, a free shuttle service runs between Mt Norquay and Banff
- The meeting time (or check in) is 30 minutes prior to the tour start. This allows time to use the washrooms and get prepared. The tour leaves from the front desk area at the base of the chairlift
- If you’re absolutely petrified of heights (or have vertigo), Via Ferrata may not be the activity for you. The experience starts and ends at elevation and also features plenty of exposure
- The journey to the start and end of each Via Ferrata course involves some hiking on narrow (sometimes steep) rocky trails. The amount of hiking depends on the tour chosen
- All courses have ‘escape routes‘ early on if you do find it too scary or experience vertigo. The guides will try to help as much as possible

What to wear
Mountain weather is extremely variable (even in July and August!) and can change quickly. Rain clouds can appear from nowhere, just as the sun can come out on the gloomiest of days!
This is one reason why it is so important to be dressed appropriately when exploring the alpine.
Here’s what to wear on your Mt Norquay Via Ferrata tour:
- Comfortable pants with some stretch (most hiking varieties will do)
- Warm but breathable clothing layers
- Sturdy hiking shoes or boots
- Light gloves suitable for holding onto metal rungs
Hopefully it won’t be raining when you start your tour, but you should also bring a waterproof jacket.
Closed toe shoes with grip are important for any kind of climbing route but since Mt Norquay’s Via Ferrata experience includes hiking sections, it is vital to bring the right kind of shoes (the website has a helpful guide here). The staff will check your shoes on arrival.
Mt Norquay does have hiking boots, rain jackets, rain pants and gloves available to borrow free of charge on a first come, first serve (no guarantees) system. With the current situation in mind, it’s preferable if you can bring your own.

What to bring
Mt Norquay provides helmets, harnesses and all the climbing gear required for the Via Ferrata route. Besides the clothing and footwear mentioned above, you’ll need to bring:
- Small backpack
- Sunglasses/sunscreen
- Water (at least 1 litre)
- Snack (granola bar, nuts etc)
- Hair tie
- Camera
- Money (for post-tour food and drinks!)
If you don’t have a suitable backpack, Mt Norquay has some available to rent (free of charge).
Baseball caps can be wore underneath helmets, as can thin beanies (toques) if the weather is on the colder side.
While the Via Ferrata is a pretty active experience, there are opportunities to stop and have a drink of water and something to eat along the way. I definitely appreciated the snacks we brought with us.
There are also plenty of occasions to take photographs. Of course, you need to be careful and also mindful of the other people on your tour.
We carried our cell phone on a belt clip to ensure it was safely attached while climbing. Our tour guide, Katsu, was kind enough to take some photos of us too.

How to get to Mt Norquay
Mt Norquay is located very close to Banff, just off Highway 1. The drive from town takes less than 15 minutes and just 10 from the highway.
The road features numerous switchbacks but is completely paved and well maintained. There’s a viewpoint on the way up that is worth stopping at. Watch for animals at any time of day, especially around the tight corners.
The main lodge at at the end of the road, at the base of the summer sightseeing chairlift. There’s a small parking lot here and then a much larger one a little further back.

What to do after your Via Ferrata experience
The Via Ferrata tour ends at the top of Mt Norquay’s summer chairlift. But don’t leave right away!
The best reward after you Via Ferrata experience is a bite to eat at the Cliffhouse Bistro. This modern but cosy eatery is perfectly positioned to offer spectacular panoramas of Banff.
And the quality of the food matches the views, with the menu featuring upscale versions of Canadian classics as well as some new favourites (many using local ingredients). We absolutely devoured the amazing meat and cheese board, featuring over 25 different items!


Be sure to also take some time to enjoy the outstanding panoramas from the viewing platforms outside the Cliffhouse Bistro. We were joined here by a herd of bighorn sheep, who were also enjoying the sunshine!


Things to do around Mt Norquay
Being only 15 minutes drive from Banff, there are so many other amazing things to do around Mt Norquay. Here are some of my favourites!

Explore downtown Banff
Surely one of the most scenic towns anywhere in Canada, downtown Banff is a pleasure to explore on foot.
There’s a myriad of museums, galleries, cafes and boutiques to visit along the core streets, all backdropped by dramatic Mount Rundle.
My top dining recommendation has to be Farm and Fire, an upscale restaurant showcasing local ingredients cooked with fire-based techniques. It’s one of those places where everything tastes incredible, from the extensive cocktail menu all the way to dessert.
During the summer months, some sections of downtown Banff are closed to vehicle traffic to provide more space for pedestrians (we love this!!)

Walk along the Bow River
If downtown feels too busy, it’s easy to get away. Just a stone’s throw from the centre of town is the calming Bow River. Sparkling with gorgeous turquoise colours on sunny days, this waterway is lined by an easy walking trail. From here, you can extend your adventure to the Fenland Trail or Bow Falls Trail.
For a different perspective, there are also canoe rentals available at the Banff Canoe Club.

Paddle on Two Jack Lake
Getting out onto the water anywhere in Banff is a great idea but I’d highly recommend making Two Jack Lake a priority. This pristine lake has a stunning backdrop and is a quick 11km drive from Banff. If you can, make the effort to visit at sunrise for the most beautiful panoramas.
SkiBig3 Adventure Hub rents inflatable stand up paddleboards in downtown Banff. These are very easy to transport to Two Jack Lake or any other waterway near Banff.

Hike Mount St Piran
After getting that iconic shot of Moraine Lake, take the short drive back to Lake Louise and get ready for a hike.
There’s a huge choice of hiking trails in the Lake Louise area for all ability levels. If you’re looking for good views with a little challenge, consider the hike to the top of Mount St Piran via the Little Beehive.
The 2649m peak looks imposing from Highway 1, but the 12.5km hike is surprisingly manageable. From the top, there are extensive views of the Bow Valley and Icefield Parkway as well as dazzling Lake Louise itself.
Be sure to arrive at Moraine Lake before 8am (6am in regular years) to secure a parking spot. It’s necessary to be there even earlier on weekends. Lake Louise has more parking areas so there’s a little more flexibility but spaces still go quickly!

Summit Sulphur Mountain
Sulphur Mountain (2451m) is one of many towering peaks surrounding the town of Banff, Alberta. The summit views are simply spectacular, taking in Cascade Mountain, Lake Minnewanka, Tunnel Mountain, the Bow River and more.
There are two ways to see this breathtaking vista – take the Banff Gondola or hike one of two trails to the top.
The most popular hiking trail is 5.5km long with almost 700m elevation gain. If you don’t have the time to hike the mountain (or the fitness level/equipment required), the Banff Gondola offers an excellent alternative. The ride to the summit is only eight minutes long.
From the upper gondola station, a boardwalk offers the opportunity to summit another mountain – Sanson Peak (2270m).
The views are majestic all the way along the boardwalk. Sanson’s summit is also the location of a National Historic Site, the Sulphur Mountain Cosmic Ray Station.
Spot grizzly bears at Lake Louise Ski Resort
I was initially a little doubtful that we’d spot grizzly bears from Lake Louise’s sightseeing gondola but see we did!
A mother bear and and cub foraged in the meadows as we soared quietly overhead. And, as it turns out, it’s not an uncommon sight.
At the top, we enjoyed our own meal at Whitehorn Bistro. Not relying on the stunning view to sell seats (though it really could), this impressive restaurant features gourmet Canadian cuisine with a local ingredient focus and the best drinks menu I’ve ever had in the Rockies. Treat yourself.

Go caving in Canmore
For a more unusual Canadian Rockies experience, take a trip underground with Canmore Cave Tours and discover what lies below the mountains. We joined a guided tour a day after the Via Ferrata experience.
Wonderfully wild and undeveloped, touring the Rat’s Nest cave system involves crawling and sliding past ancient rock formations.
The most adventurous can also squeeze further through narrow passageways and even rappel down an 18m rockface.

Read these articles next:
11 of the Best Things to Do in Sundre, Alberta (& Why You Need to Go ASAP!)
Complete Hiking Guide to Mount Assiniboine Provincial Park
Climbing the Via Ferrata at Kicking Horse Mountain Resort, British Columbia
Burgess Shale Fossil Hunting in Walcott Quarry, Yoho National Park
Hiking the Kananaskis Valley from Mount Engadine Lodge, Alberta
15+ Fun Things to Do in Calgary For Adults
22 of the Best Overnight Backpacking Trips in British Columbia, Canada


One half of the Canadian/British couple behind Off Track Travel, Gemma is happiest when hiking on the trail or planning the next big travel adventure. JR and Gemma are currently based in the beautiful Okanagan Valley, British Columbia, Canada. Consider buying us a coffee if you have find any of our guides helpful!
Lovely post with stunning photo gallery, thanks for sharing a nice article.