Within a few months of moving to Canada in November 2011, we knew we wanted to do another cross-continent road trip.
Just before our move, we had completed a there month UK to Istanbul (and back) road trip via 18 different countries.
The general plan was to leave Vancouver Island and drive across Canada before travelling south through the United States to Mexico. In the end, we stayed in Canada but travelled all the way up to the Arctic Circle.
This post chronicles our Chevrolet Astro van conversion from June 2012 to November 2013, with an update during our Western Canada road trip in May 2014 and also post-trip.
While the following post is very different to any of our content now (I’m writing this update in October 2024!), I wanted to keep it alive as I still receive a surprising number of messages and questions about our Astro van conversion.
The construction updates were written by both me (Gemma) and JR (chief van converter!)
There are affiliate links in this post. If you make a qualifying purchase through one of these links, we may receive a small commission.

Chevrolet Astro Conversion Construction Update 1 – June 2012
We have recently purchased a Chevrolet Astro van to convert into a camper. Our plan isn’t to leave for a while so we have lots of time if things change or don’t work out!
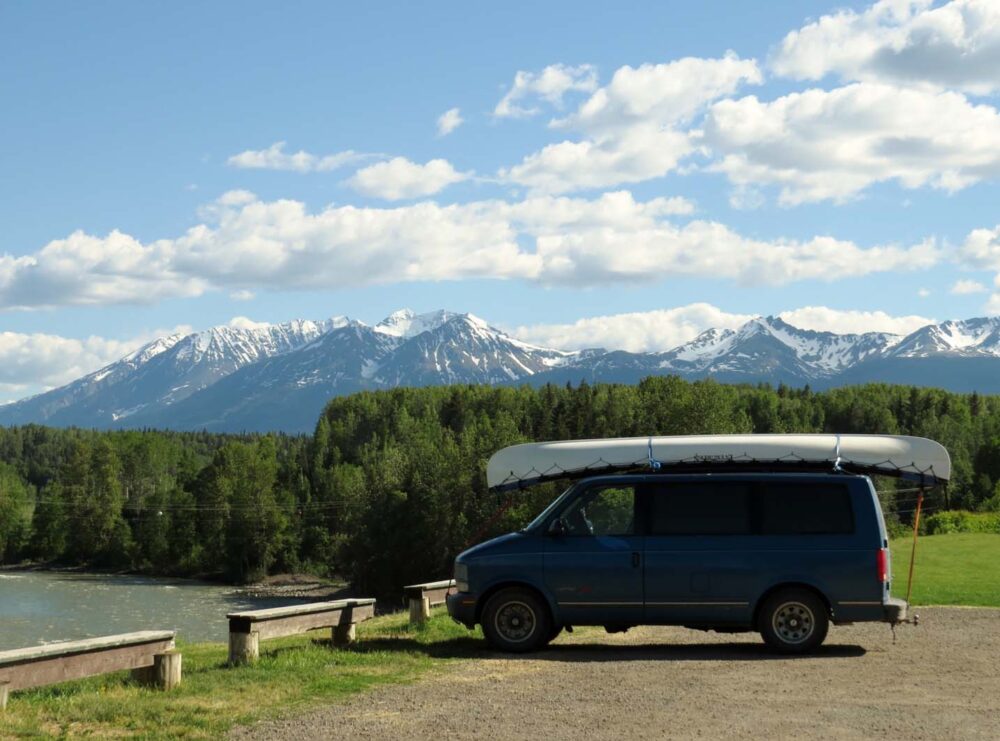
Here is our 1995 AWD 8 seater Chevrolet Astro Van. I really love this vehicle so far, even more so than our previous road trip car (Toyota Lucida).
These vans were built on truck chassis’, so it’s a really sturdy vehicle. It’s perfect for carrying our canoe and the ability to go off-road every now and again.

Basic bed set up
The best thing about this vehicle is the size. It’s much wider than our old Lucida, and a little bit longer.
Jean Robert took out all the sidings at the back of the car (the bits by the seats with cup holders and storage and the like) and found that being 5″9, he could lay width-wise in the car. This is when we saw the potential as a vehicle to convert to a camper.
We figured that if we were able to have a bed all the way in the back, this would free up so much space in the middle, room for more living space.
We both agreed that we definitely wanted a fixed bed for the minimum fuss – it’s so nice to arrive somewhere late and then just crawl into bed rather than fuss around with sorting the bed!
Building a bed frame for our Astro van conversion
To start, Jean Robert put in a basic bed frame to test it out. He calculated the height of the van by how much head space he needed if he sat upright on the frame (as a seat).
This leaves us a good space for storage underneath; way more than our last car! This bed frame’s width is about the same as a double bed, but the height is less.
Though this is definitely not finished (there’s not much insulation for example) as a basic set up, it really works. It’s really exciting to see how much space this bed frees up in the middle of the car; there’s so much potential for a really awesome mini-camper.

Future plans
Our Europe trip provided us with the experience and knowledge to build something much better than the first time.
We now know for example, that the storage really needs to be accessible from the side (so some sort of sliding drawers) and the back – having a ‘trapdoor’ style opening under the bed is really annoying.
Small things like hooks, more storage around the bed and a fan are little things we didn’t think of last time or didn’t have time to implement.
This conversion will also be more self-contained; we want to be able to stay at more free campsites next time, mainly to save money but also for the experience.
We won’t be leaving on any big trip until spring next year, so we’ve got a lot of time to plan and prepare this time.
We’ve also got the chance to take the van on lots of smaller trips, which will help improve the design before we leave for the much longer adventure (potentially one year in length!)
Despite Jean Robert only putting in the basic bed last week, we’ve already taken it for a test camping trip to a nearby Provincial Park which went pretty well!
Chevrolet Astro Conversion Construction Update 2 – September 2012
Here is our second update to our Astro Van small camper conversion with the details of the bed construction and underneath storage.
Completed bed in DIY Astro Van Conversion
The last update showed the ‘first look’ of what it was going to look. Now, the framework is now almost complete and we have a proper mattress!
From this view you can really see the huge amount of space between the bed and the front seats……it’s an area a little bit smaller than the bed itself!

This means the bed is completely self-contained to the back of the van, leaving us way more space for living than our Europe road trip car did.
This is the back framework while still in construction, just so you can get an idea of the storage space at the back.

Back panel of Astro van bed
The entire back panel is on two hinges, so can be lifted up from the back.
This gives us a massive storage space, which we intend to use for larger and less used items, such as our snowboards, winter coats, canoe equipment etc.

The panel can be held up quite easily using a hook from the car roof.
One of the struts providing support to the centre of the bed frame is on a hinge too, so that items like the snowboards can be taken out easier
The back wooden panel can also be lifted up from inside! I will have to ask Jean Robert when he gets home to find out exactly how it works, but it’s pretty awesome!
This is a feature I’m really happy with, I love that most of our storage will be accessible from both inside and outside the car.

DIY Van Conversion Mattress
Our mattress is made up of six differently sized rectangles of 3 and a half inch firm foam. Jean Robert covered the foam with this awesome material from FabricWorld, it’s the thickness of denim but feels much softer.
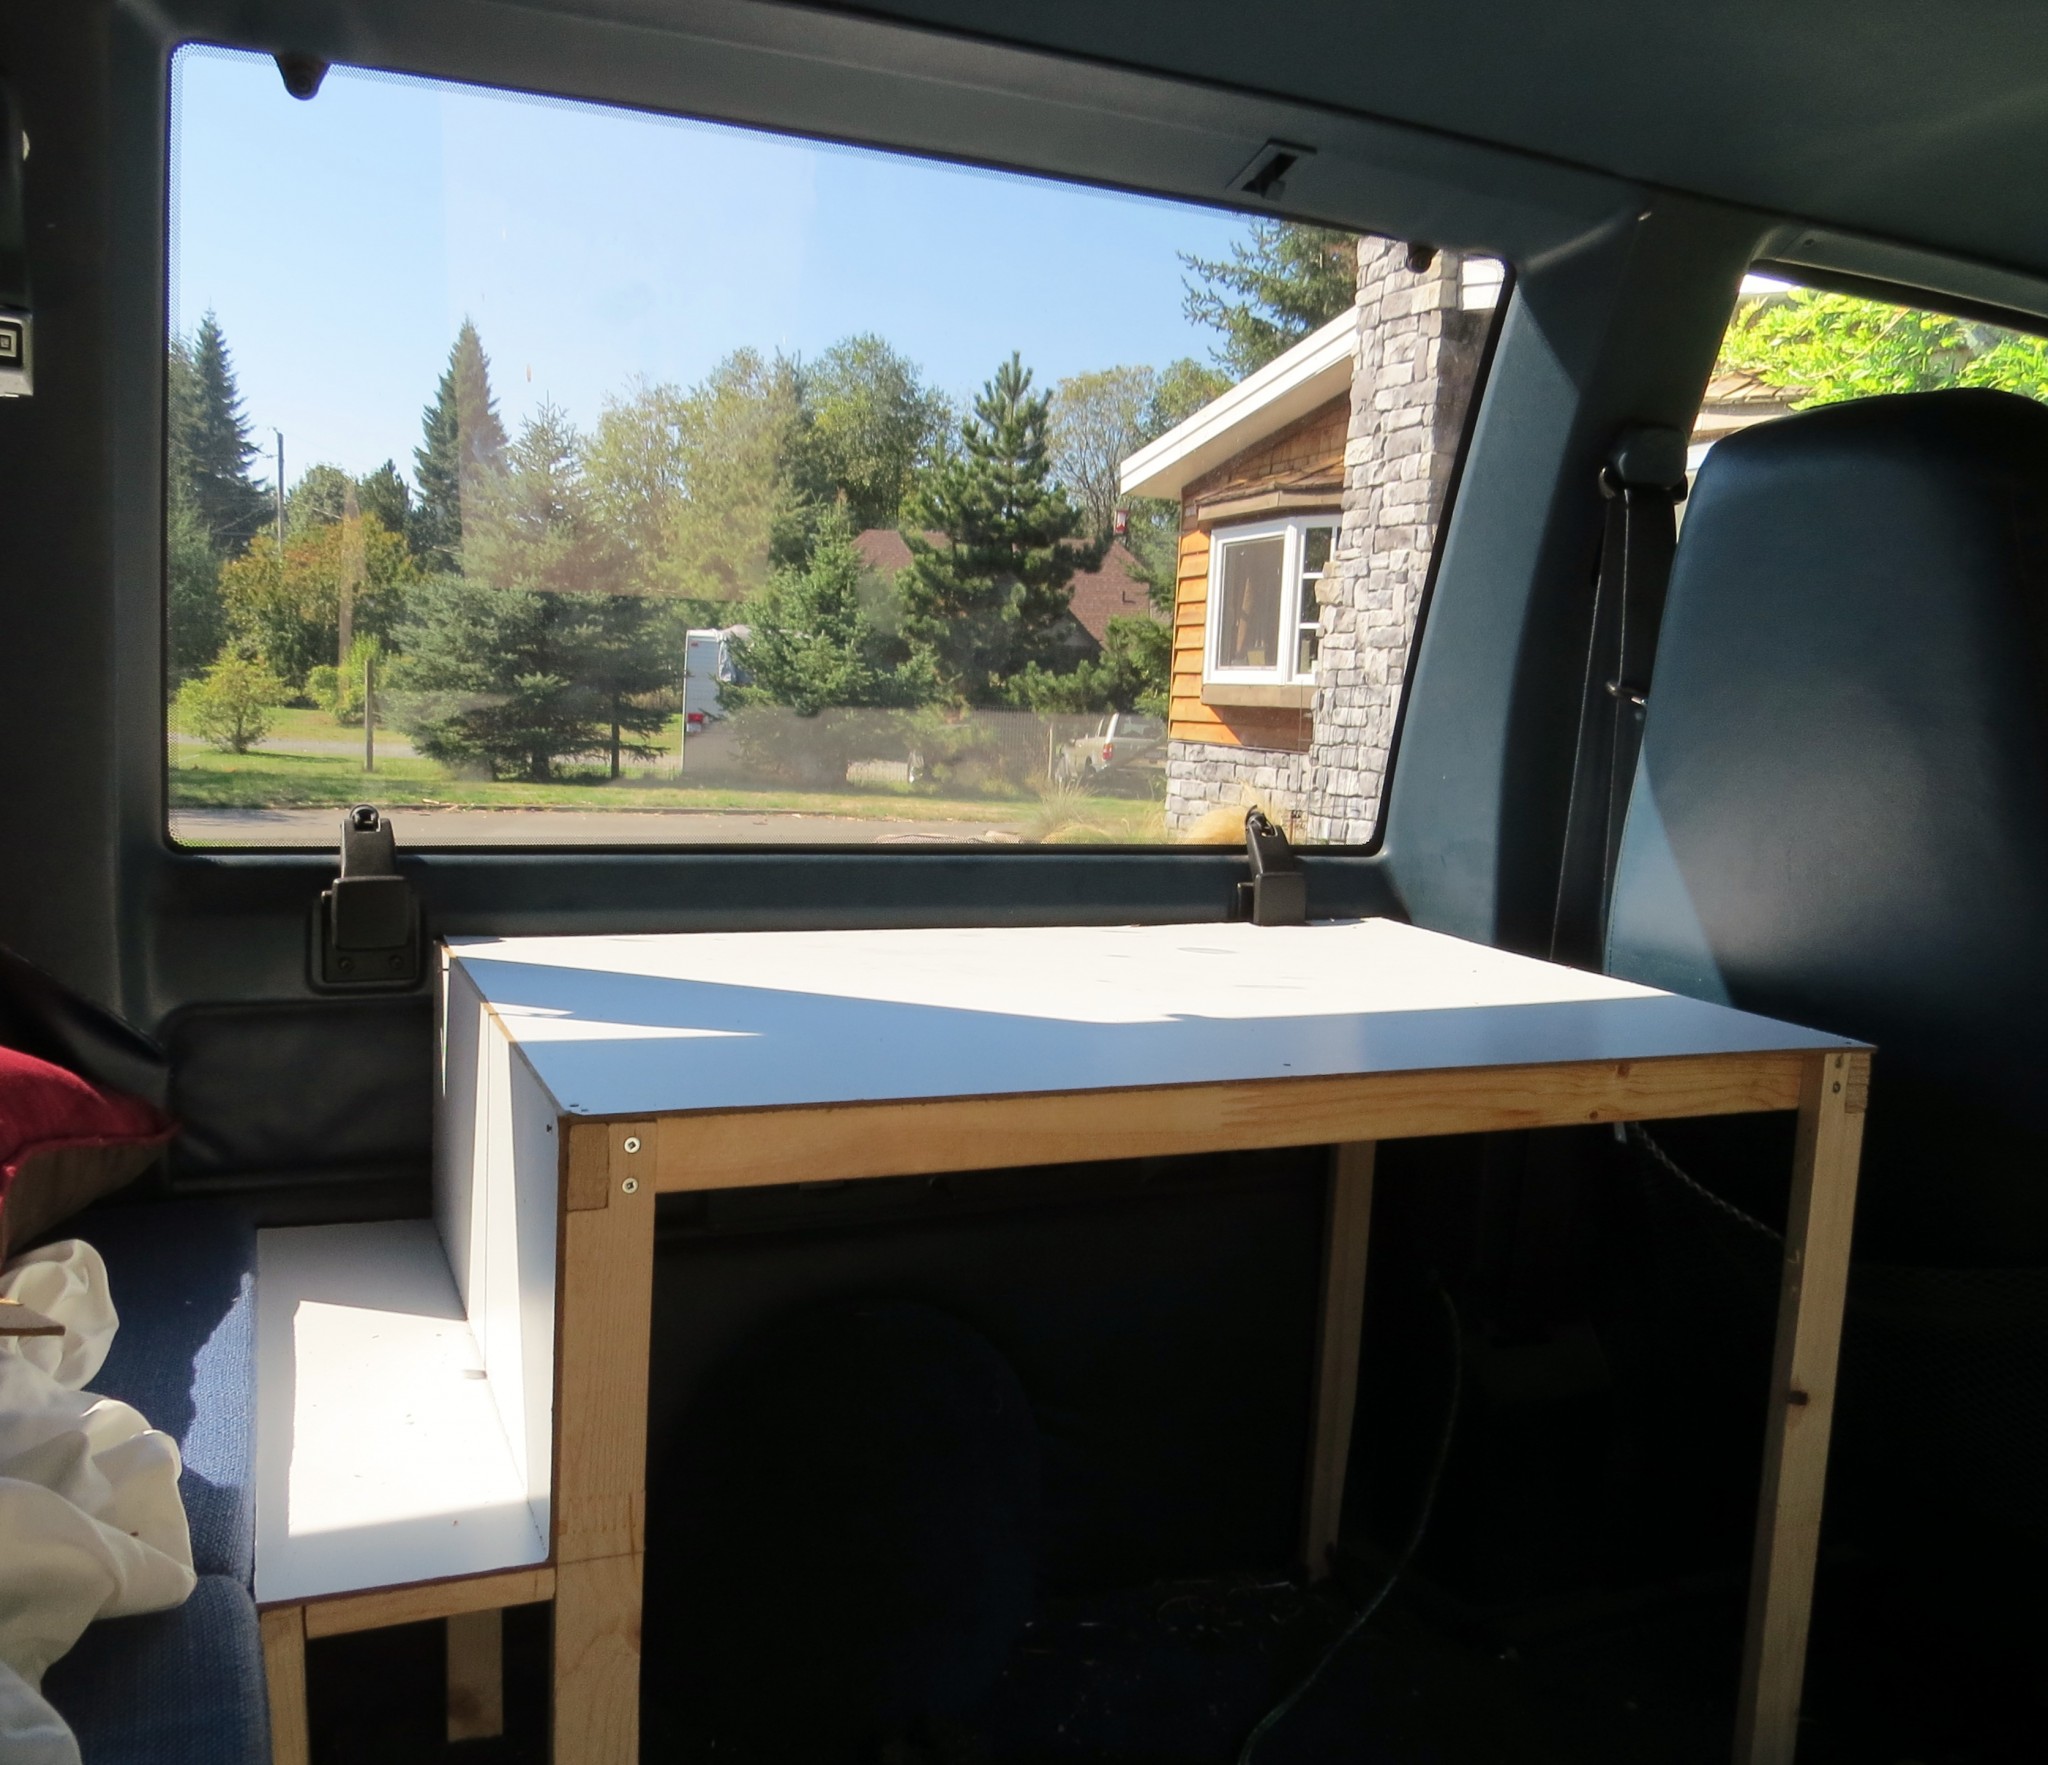
You may ask why we haven’t just got one big piece of foam…..well, one good reason is that the middle rectangle (closest to the front seats) and its framework below can be entirely lifted out, creating an eating area for us.
Jean Robert is going to build a small high table to fit in the space where the middle rectangle is (when sleeping). This will be a huge improvement from our last vehicle since we didn’t really have anywhere really comfortable to eat inside last time.

Future plans for our Astro Van conversion
So that’s the September update! We’ve used the van a few times recently and it works really really well. There is SO much space underneath the bed and it’s very easy to access.
Due to the bed’s position, we have so much room to move and change within the van; it’s crazy how much a slightly bigger car and a re-design can do for a car conversion!
Jean Robert is next going to work on the cabinet I think, which is going to house our fridge (well, cooler really), food storage, and indoor food preparation area. It’s going to be built behind the drivers’ seat, away from the side door.
Meanwhile, it’s my priority to work on curtains…..luckily the van has really dark windows as it is, but we definitely need to get some ASAP!
Chevrolet Astro Conversion Construction Update 3 – May 2013
There have not been any major changes since my last update about our Astro Van conversion, but two pretty good upgrades!
The bed is completed but we have not started on the other elements of the van (cooking area, more storage etc) as these are more related to our long-term plans (i.e. the big trip across Canada) that we have decided to delay until spring. Here are all the details.
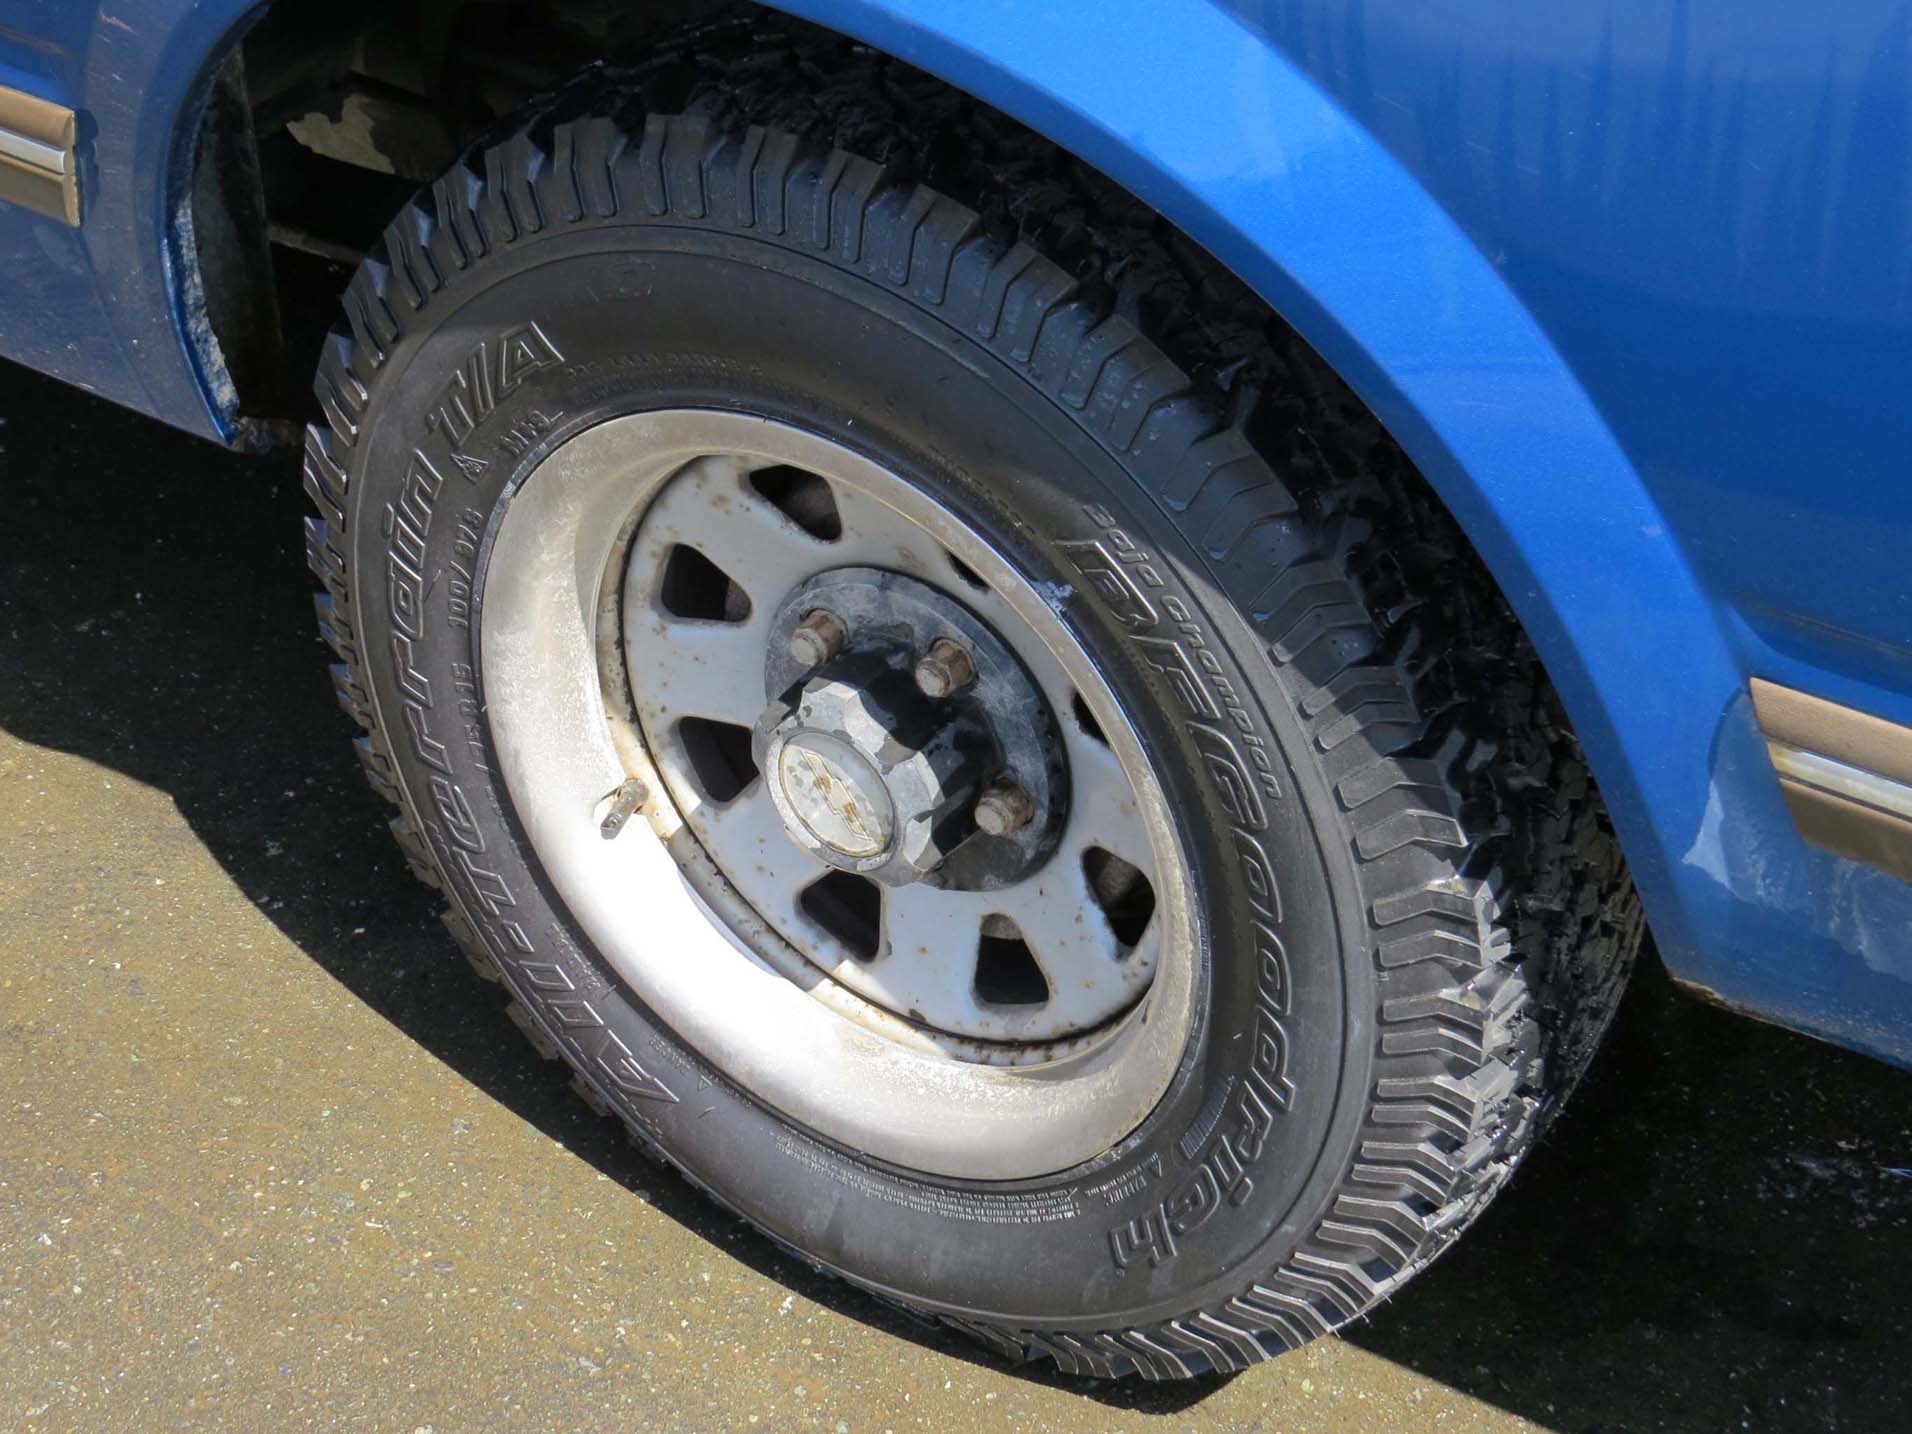
New tires for our Astro Van conversion
We have recently fitted off-road truck tires (spelt the Canadian way), our most useful and expensive upgrade to date! They look impressive and we hope they will live up to the specs.
We purchased BFGoodrich All-terrain T/A KO; an all-season tire with good snow traction. The treads on these are ridiculous, see the second photo below.
These tires should give us the freedom on the logging roads that we have been waiting for! We have had a few dodgy moments at times, including a flat tire last year.
We will still need to be on the look-out for rocks that become embedded in the tires, as this can easily happen with treads like these.
There are a few disadvantages to running our van on truck tires, such as more noise (especially on highways) and less fuel efficiency. We haven’t really tested the van much with these yet, so will do an update in a few months on how the tires are running.
Astro van window covers
The second upgrade is window covers. Over autumn and winter, Jean Robert did fit some black curtains around the bed at the back, using a fairly soft blackout material.
These worked fine (although we still needed one between the front seats and the back/bed area), but then we were told about using foil insulation to cover the windows with by our fellow traveller Joe.
He has this material on his converted van’s windows, and after seeing how well it worked on a camping trip, we were off to Home Depot to buy a roll of our own!
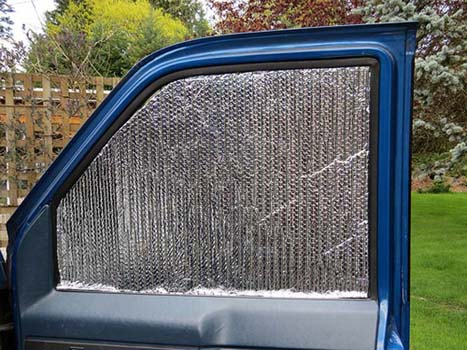
We paid $45 for a roll of Reflectix Bubble foil which covered all of our Astro Van’s windows and windscreen.
OK, it almost did, Jean Robert ran out at the last window (driver’s side) and had to use patch up the leftovers with foil tape to finish.
The insulation is great stuff; it is very easy to cut to fit and sits in the window frame well.
At night, the windows just appear dark, and you really couldn’t tell it was foil insulation until very close to the vehicle. Perfect for stealth/wild camping!

Testing our new window covers
The foil insulation is a much better solution than curtains, providing a complete black-out, great for sleeping anytime!
We haven’t tested our new window covers on a camping trip yet, so I will most likely write a little more on my next update.
By the next update, Jean Robert may have started on more inside construction.
Chevrolet Astro Conversion Construction Update 4 – November 2013
Long time, no van update! The truth is, when summer comes around we spend the whole time either working or camping.
As it’s now autumn and we’re shortly moving up a mountain for the next ski season, Jean Robert has been getting down to work in preparing the van for our Western Canada road trip.
The main improvement since you last saw the van is the cabinet, built between the bed and the driver’s seat.

The cabinet is an important feature to us as it drove us (well, me at least) nuts always having to search for clothes and other stuff underneath the bed in our last conversion.
It also provides a solid worksurface, either for preparing food inside on bad weather days or storing items when stopping in one place for a while.
The height of the cabinet was limited by the window, as the open/close fixings are right at the bottom.
As we only have two opening windows at the back, we wanted to keep this functioning.
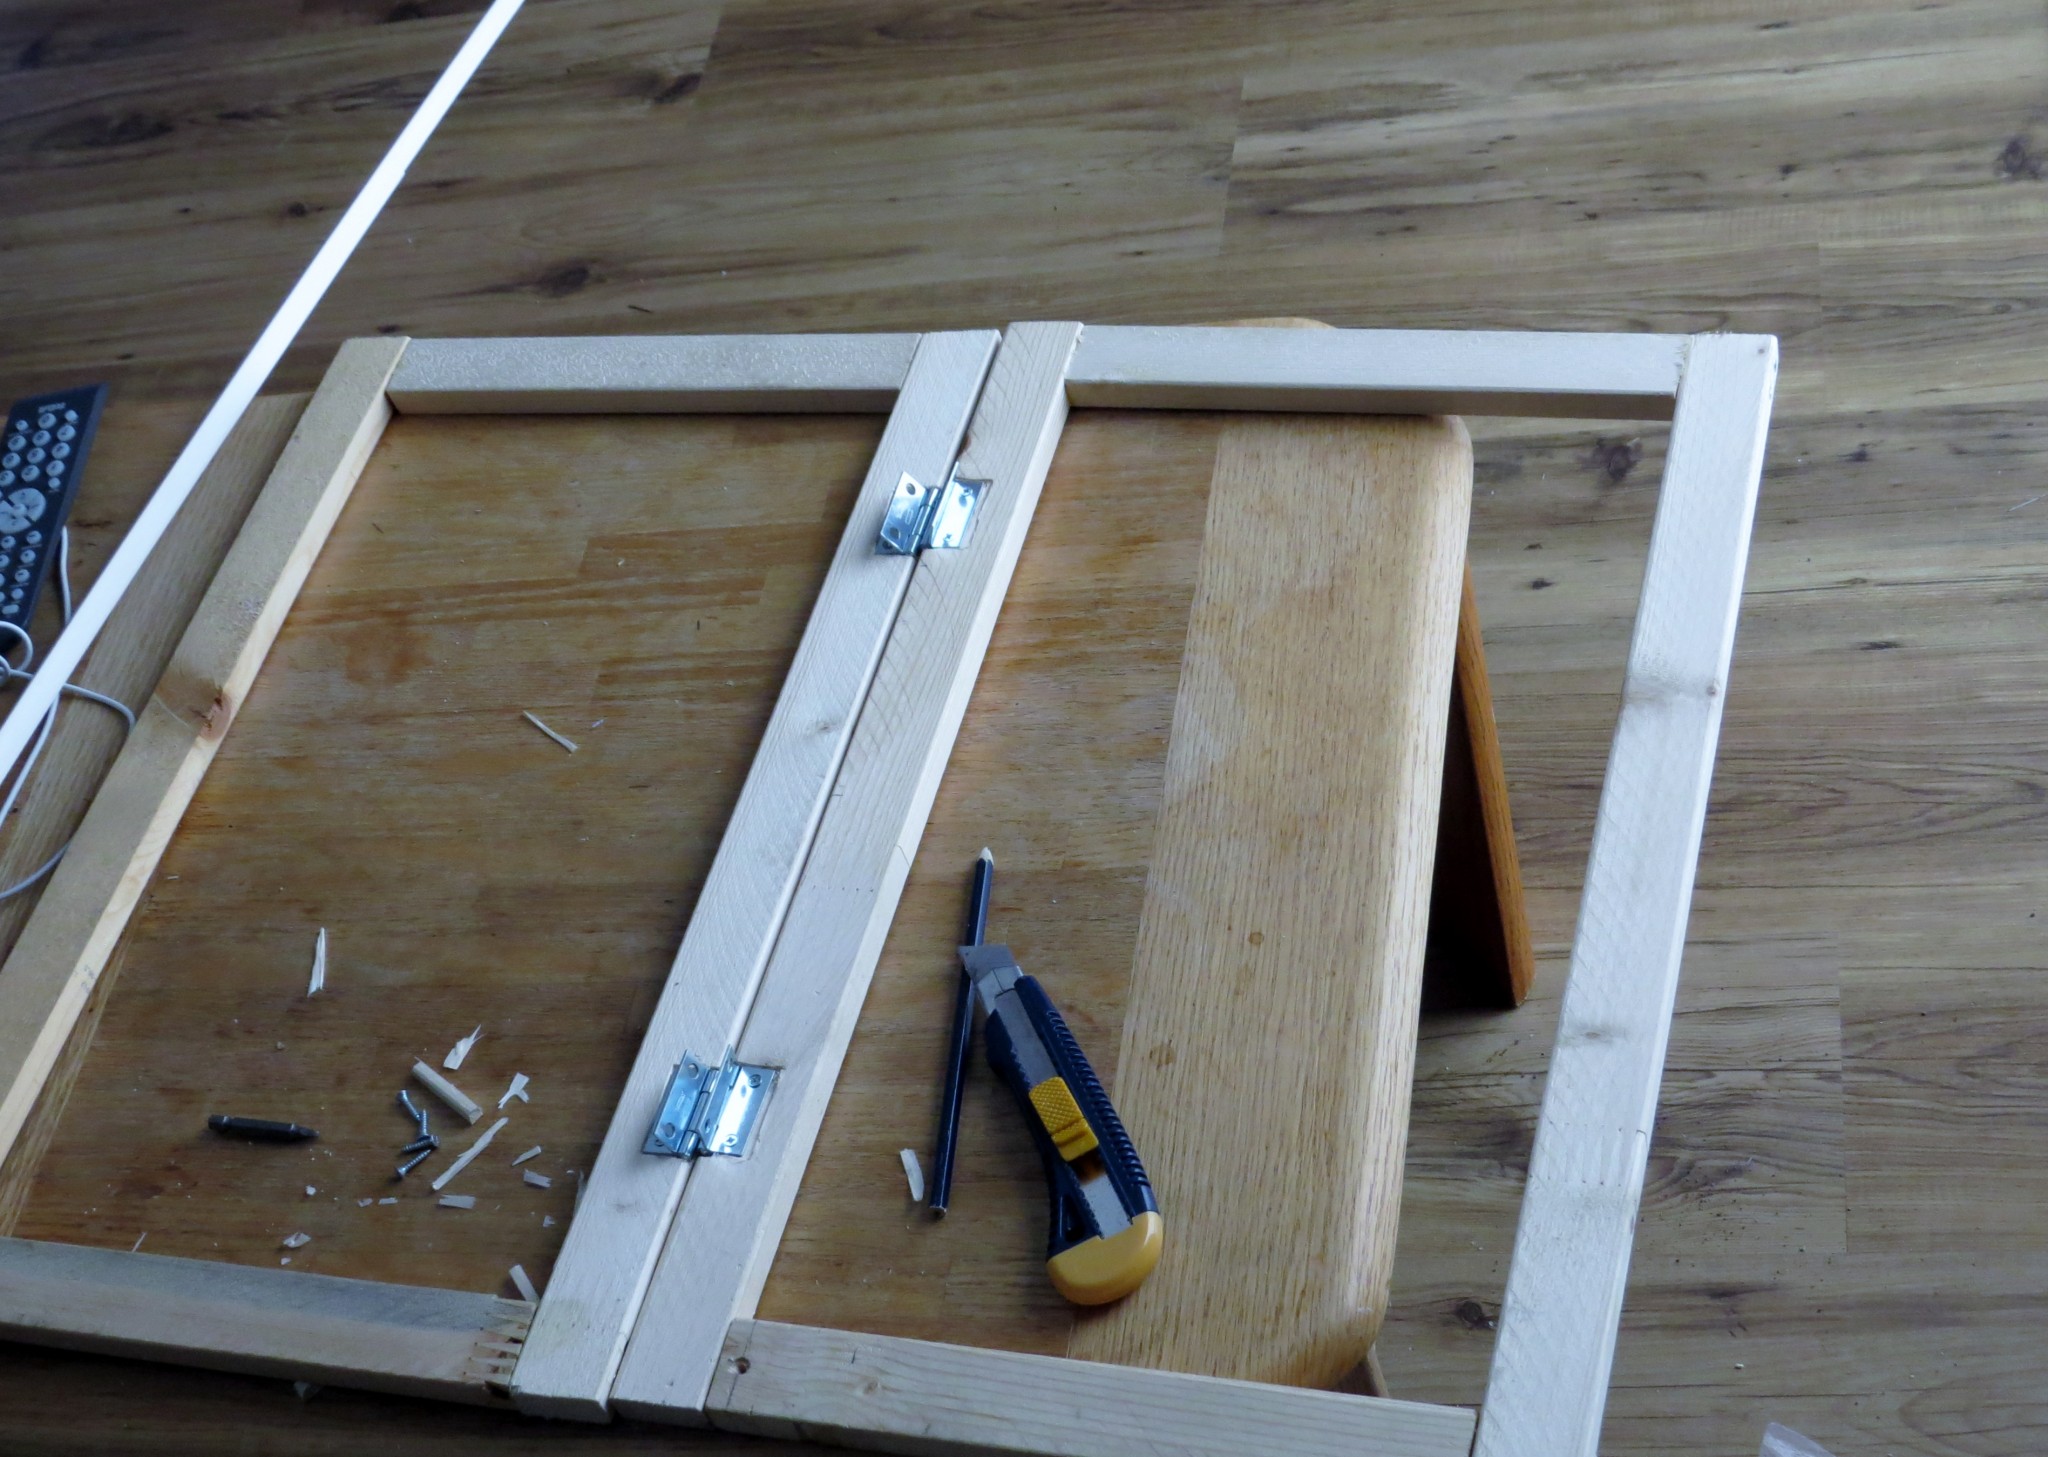
The shape of the cabinet is not a standard rectangle as Jean Robert didn’t want to feel claustrophobic when he was sleeping (the red cushion is where his head will be).
Having the small shelf next to the bed will be super helpful to store things like a torch, alarm clock, cell phone etc.

The table top and shelf are simple hardboard; we didn’t really need anything fancy for this. Jean Robert chose to not put flooring on the cabinet to make the most use of the space.
The doors connect with the cabinet in the middle with ball bearing clips; they hold really well.
Inside the cabinet
With the doors on, Jean Robert stuffed the cabinet with everything lying around the car so apologies for the mess. He built one higher shelf and may still add another, we’re still working out exactly what we will keep in the cabinet.
In the bottom section, you can see our new 5l propane tank on its side. Although the small propane bottles are great, a large tank like this will last so long (for relatively little $$ too) and it is convenient to get filled up.

Most gas stations seem to offer this service. We had a fair amount of trouble in Europe with finding places that stocked the type of stove gas we used – we definitely won’t have a problem in North America!
The finished cabinet! Jean Robert has finished the edges and corners with caps, usually found on protective plastic walls.
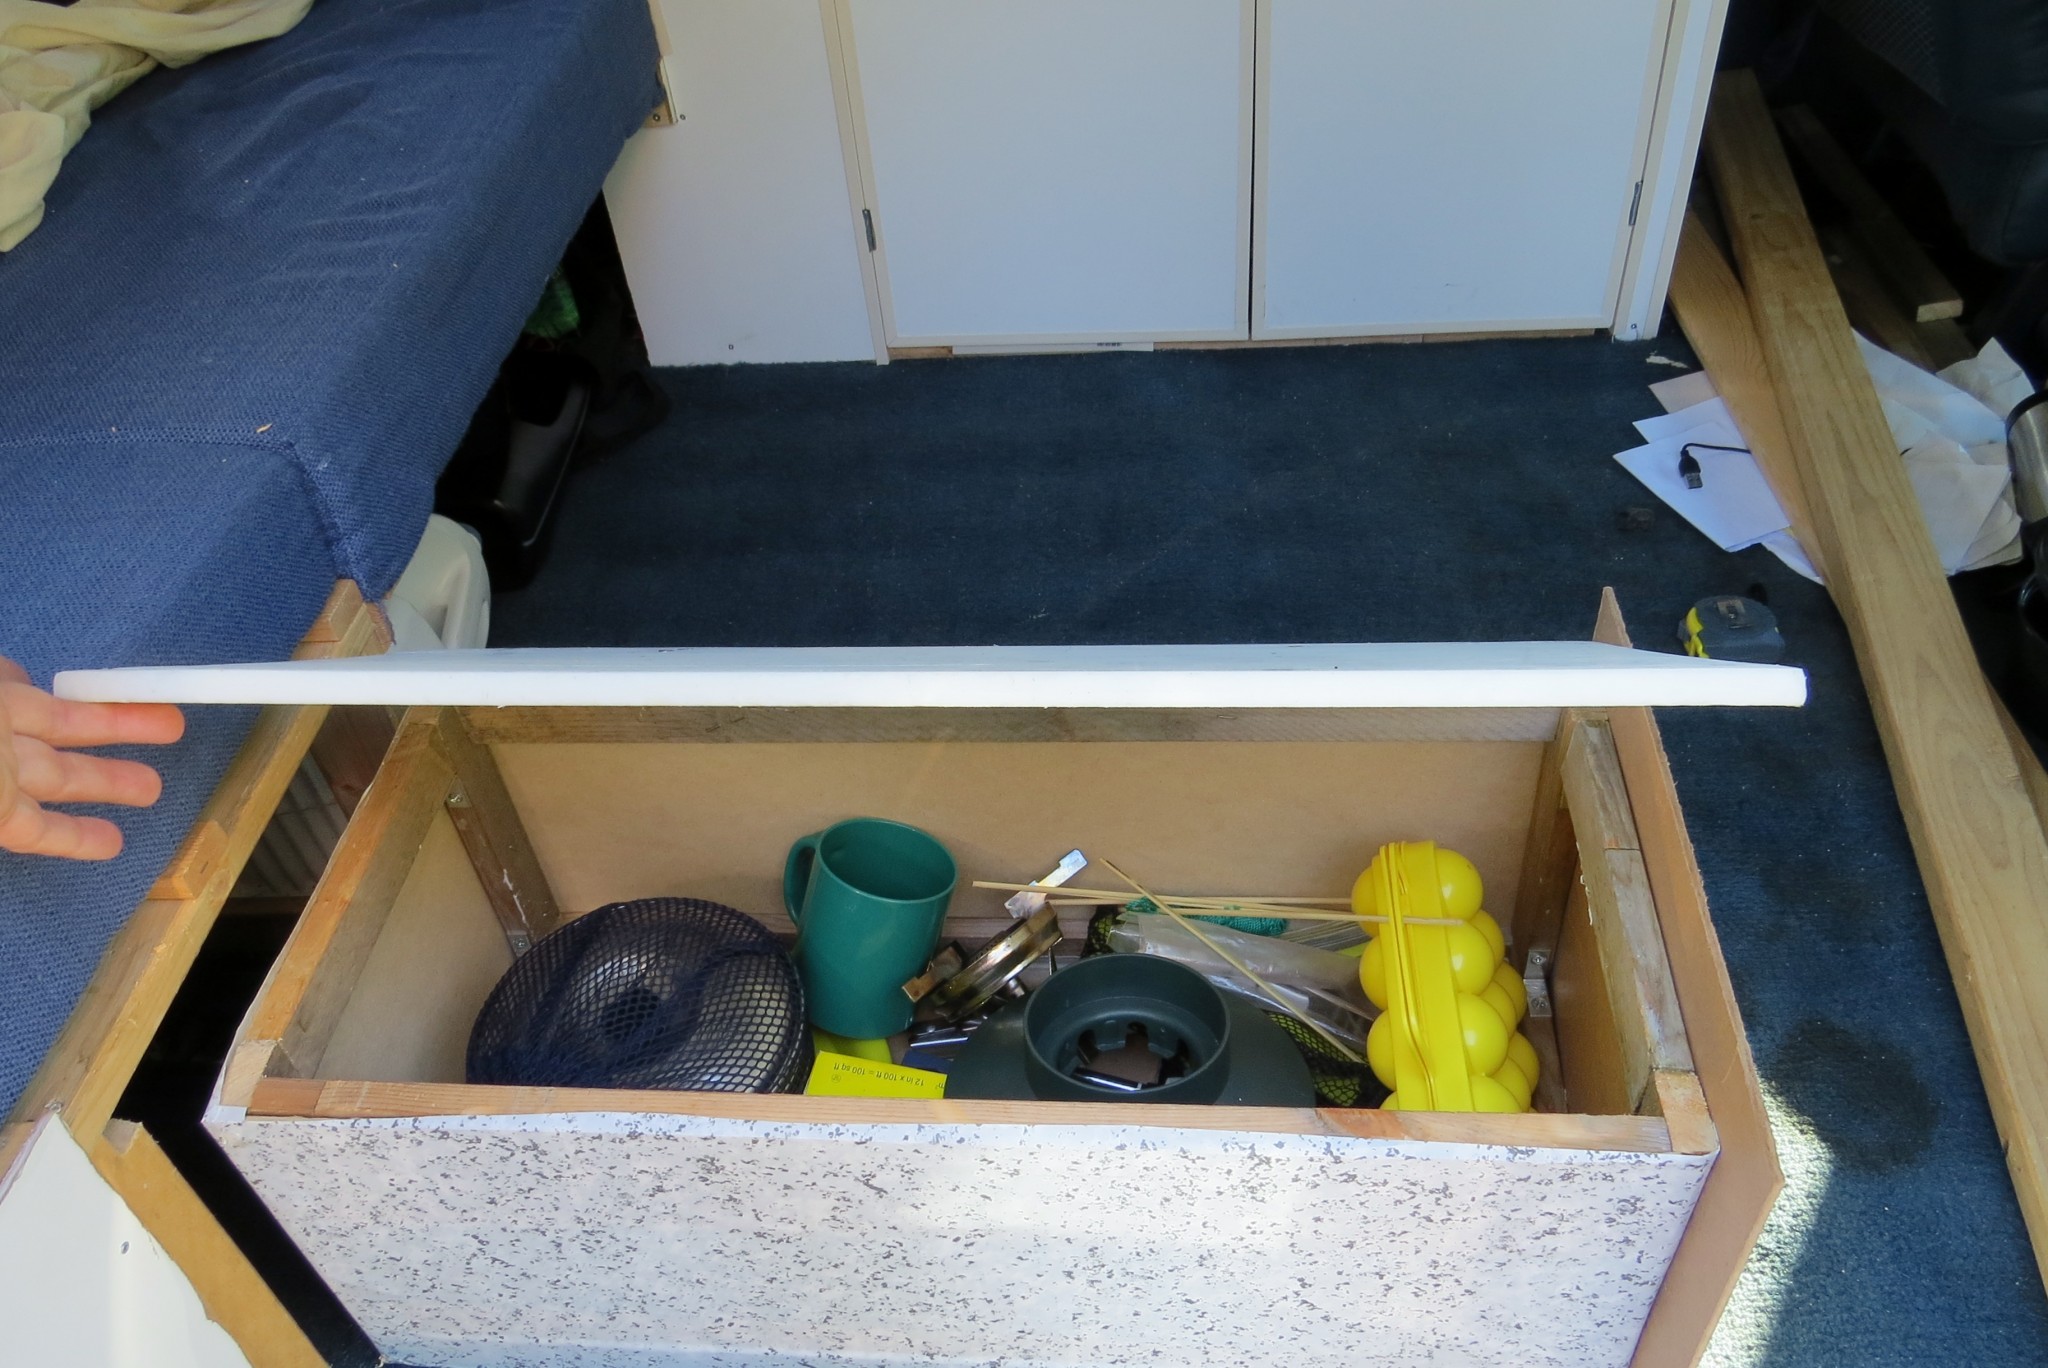
Pull out bed storage
Another section Jean Robert has been working on is the front under-bed storage.
This was originally where JR was going to store his own clothes but we have since decided to keep all clothes in the cabinet and put kitchen equipment here.
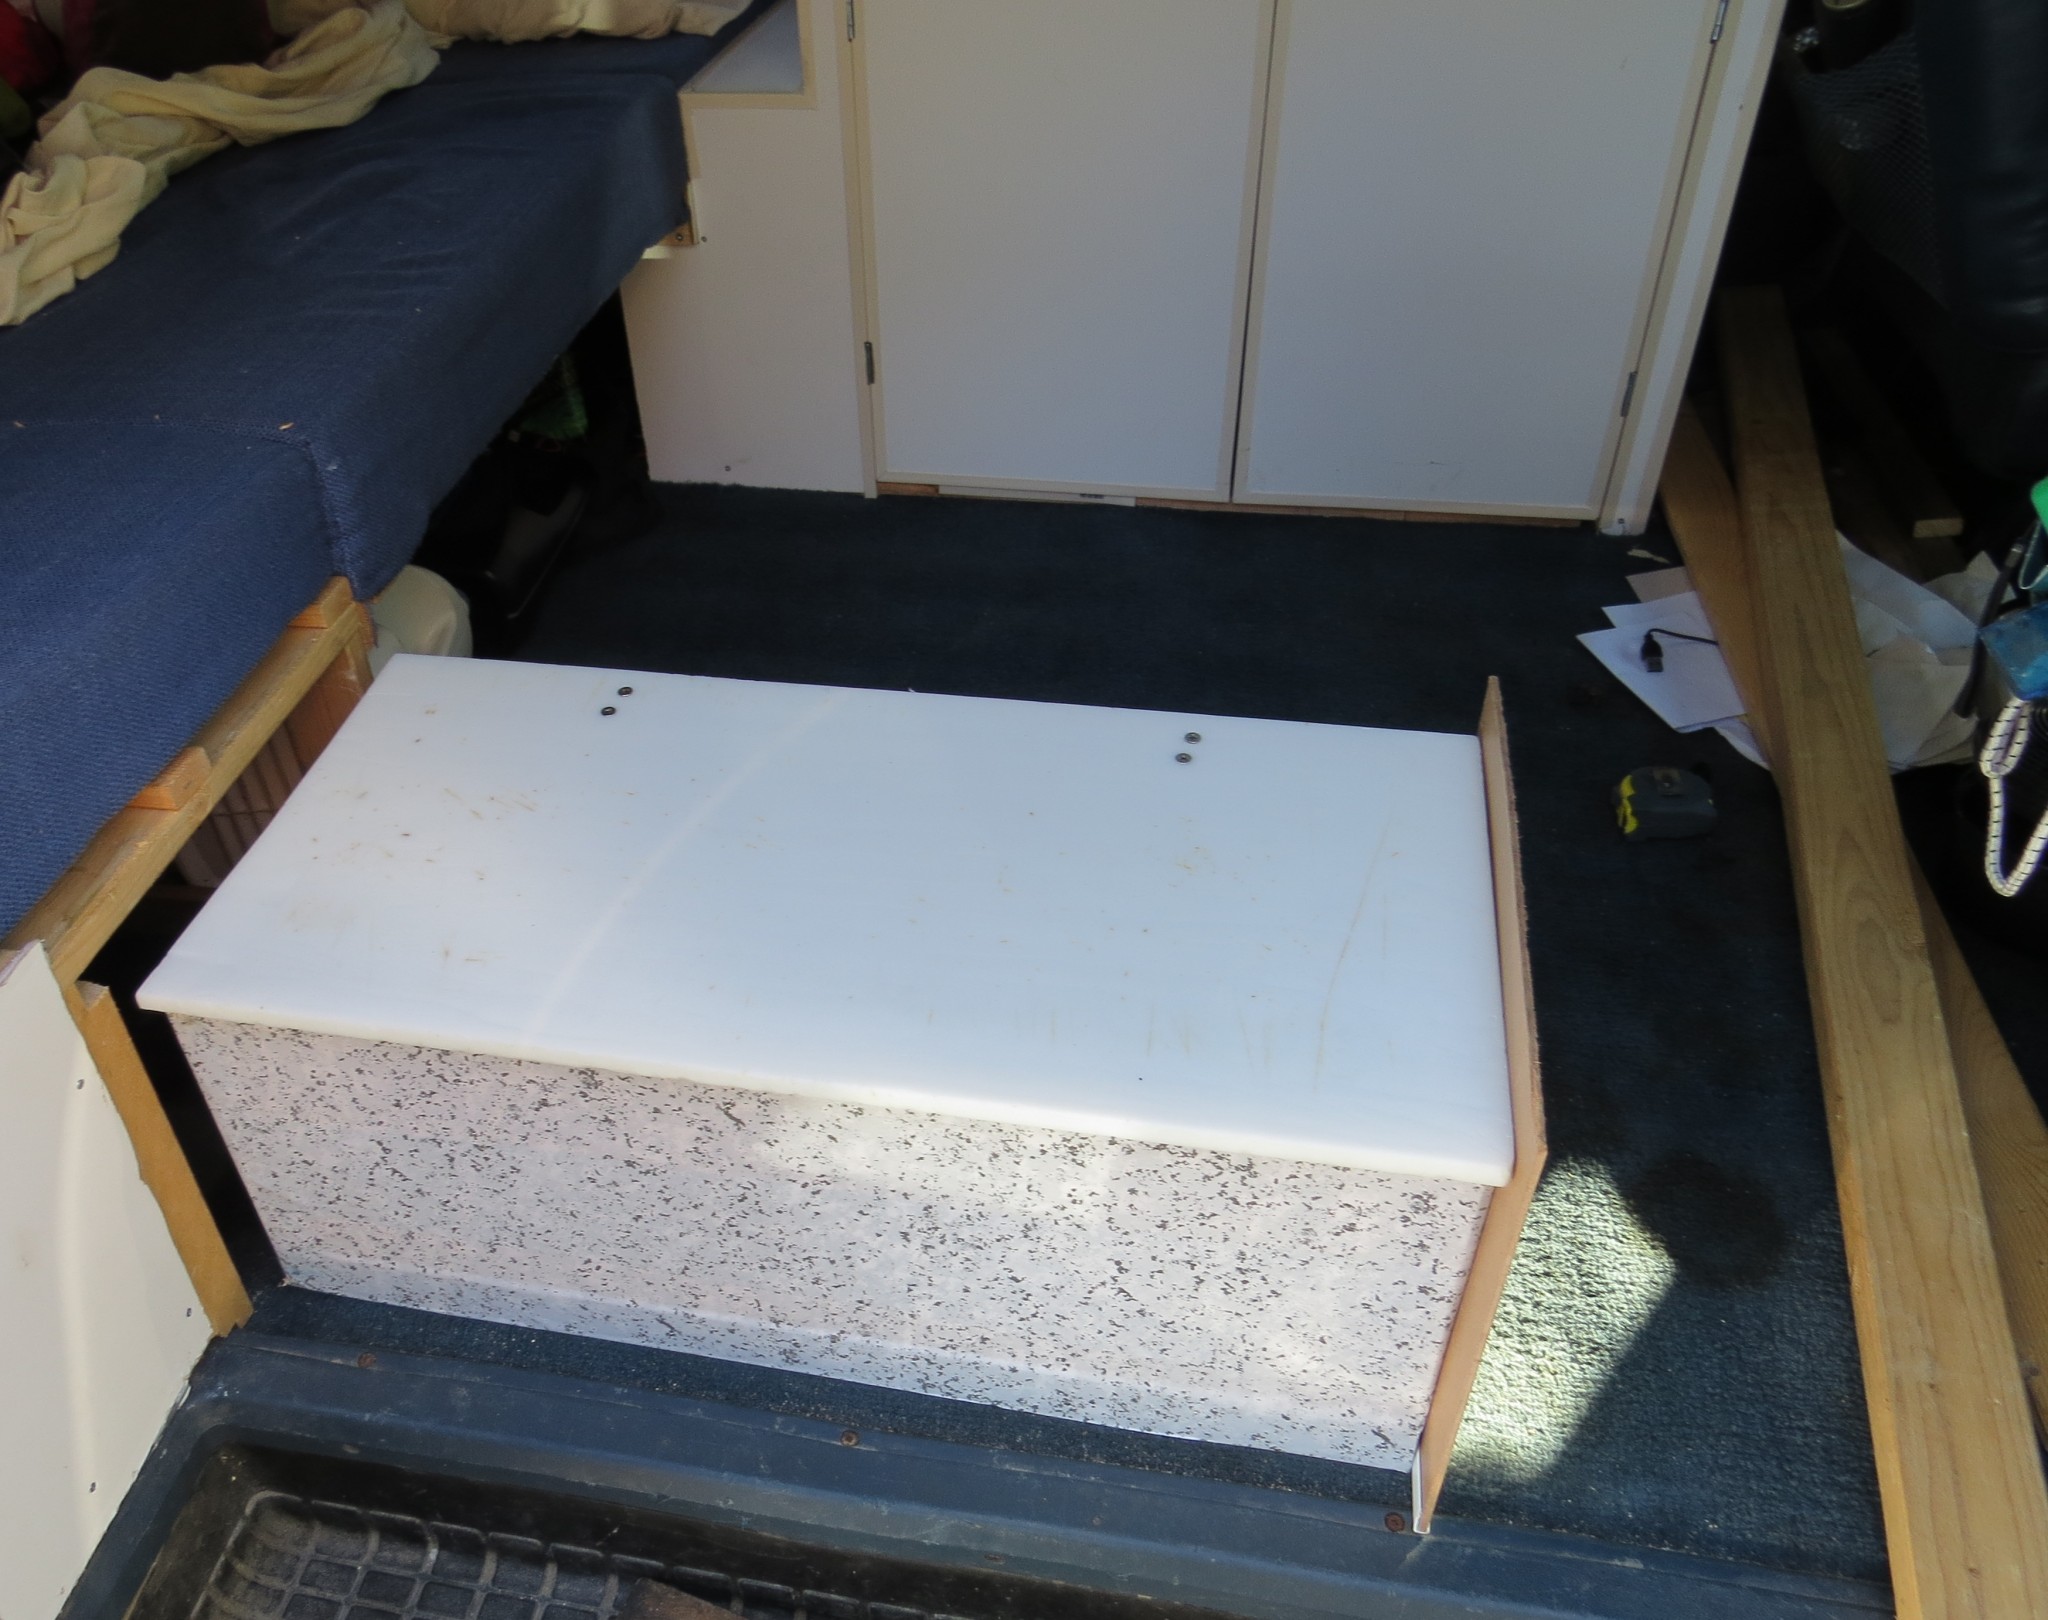
This is a great place to keep cooking items as the storage box slides out into the middle of the van and so can be accessed from inside or outside.
The box, built within the bed frame, slides out and has a chopping board as the lid. Bonus multi-function!
There’s a fair amount of space here, there’s quite substantial depth. Again, we’ve just got the stuff that was lying around the car stored in it right now.
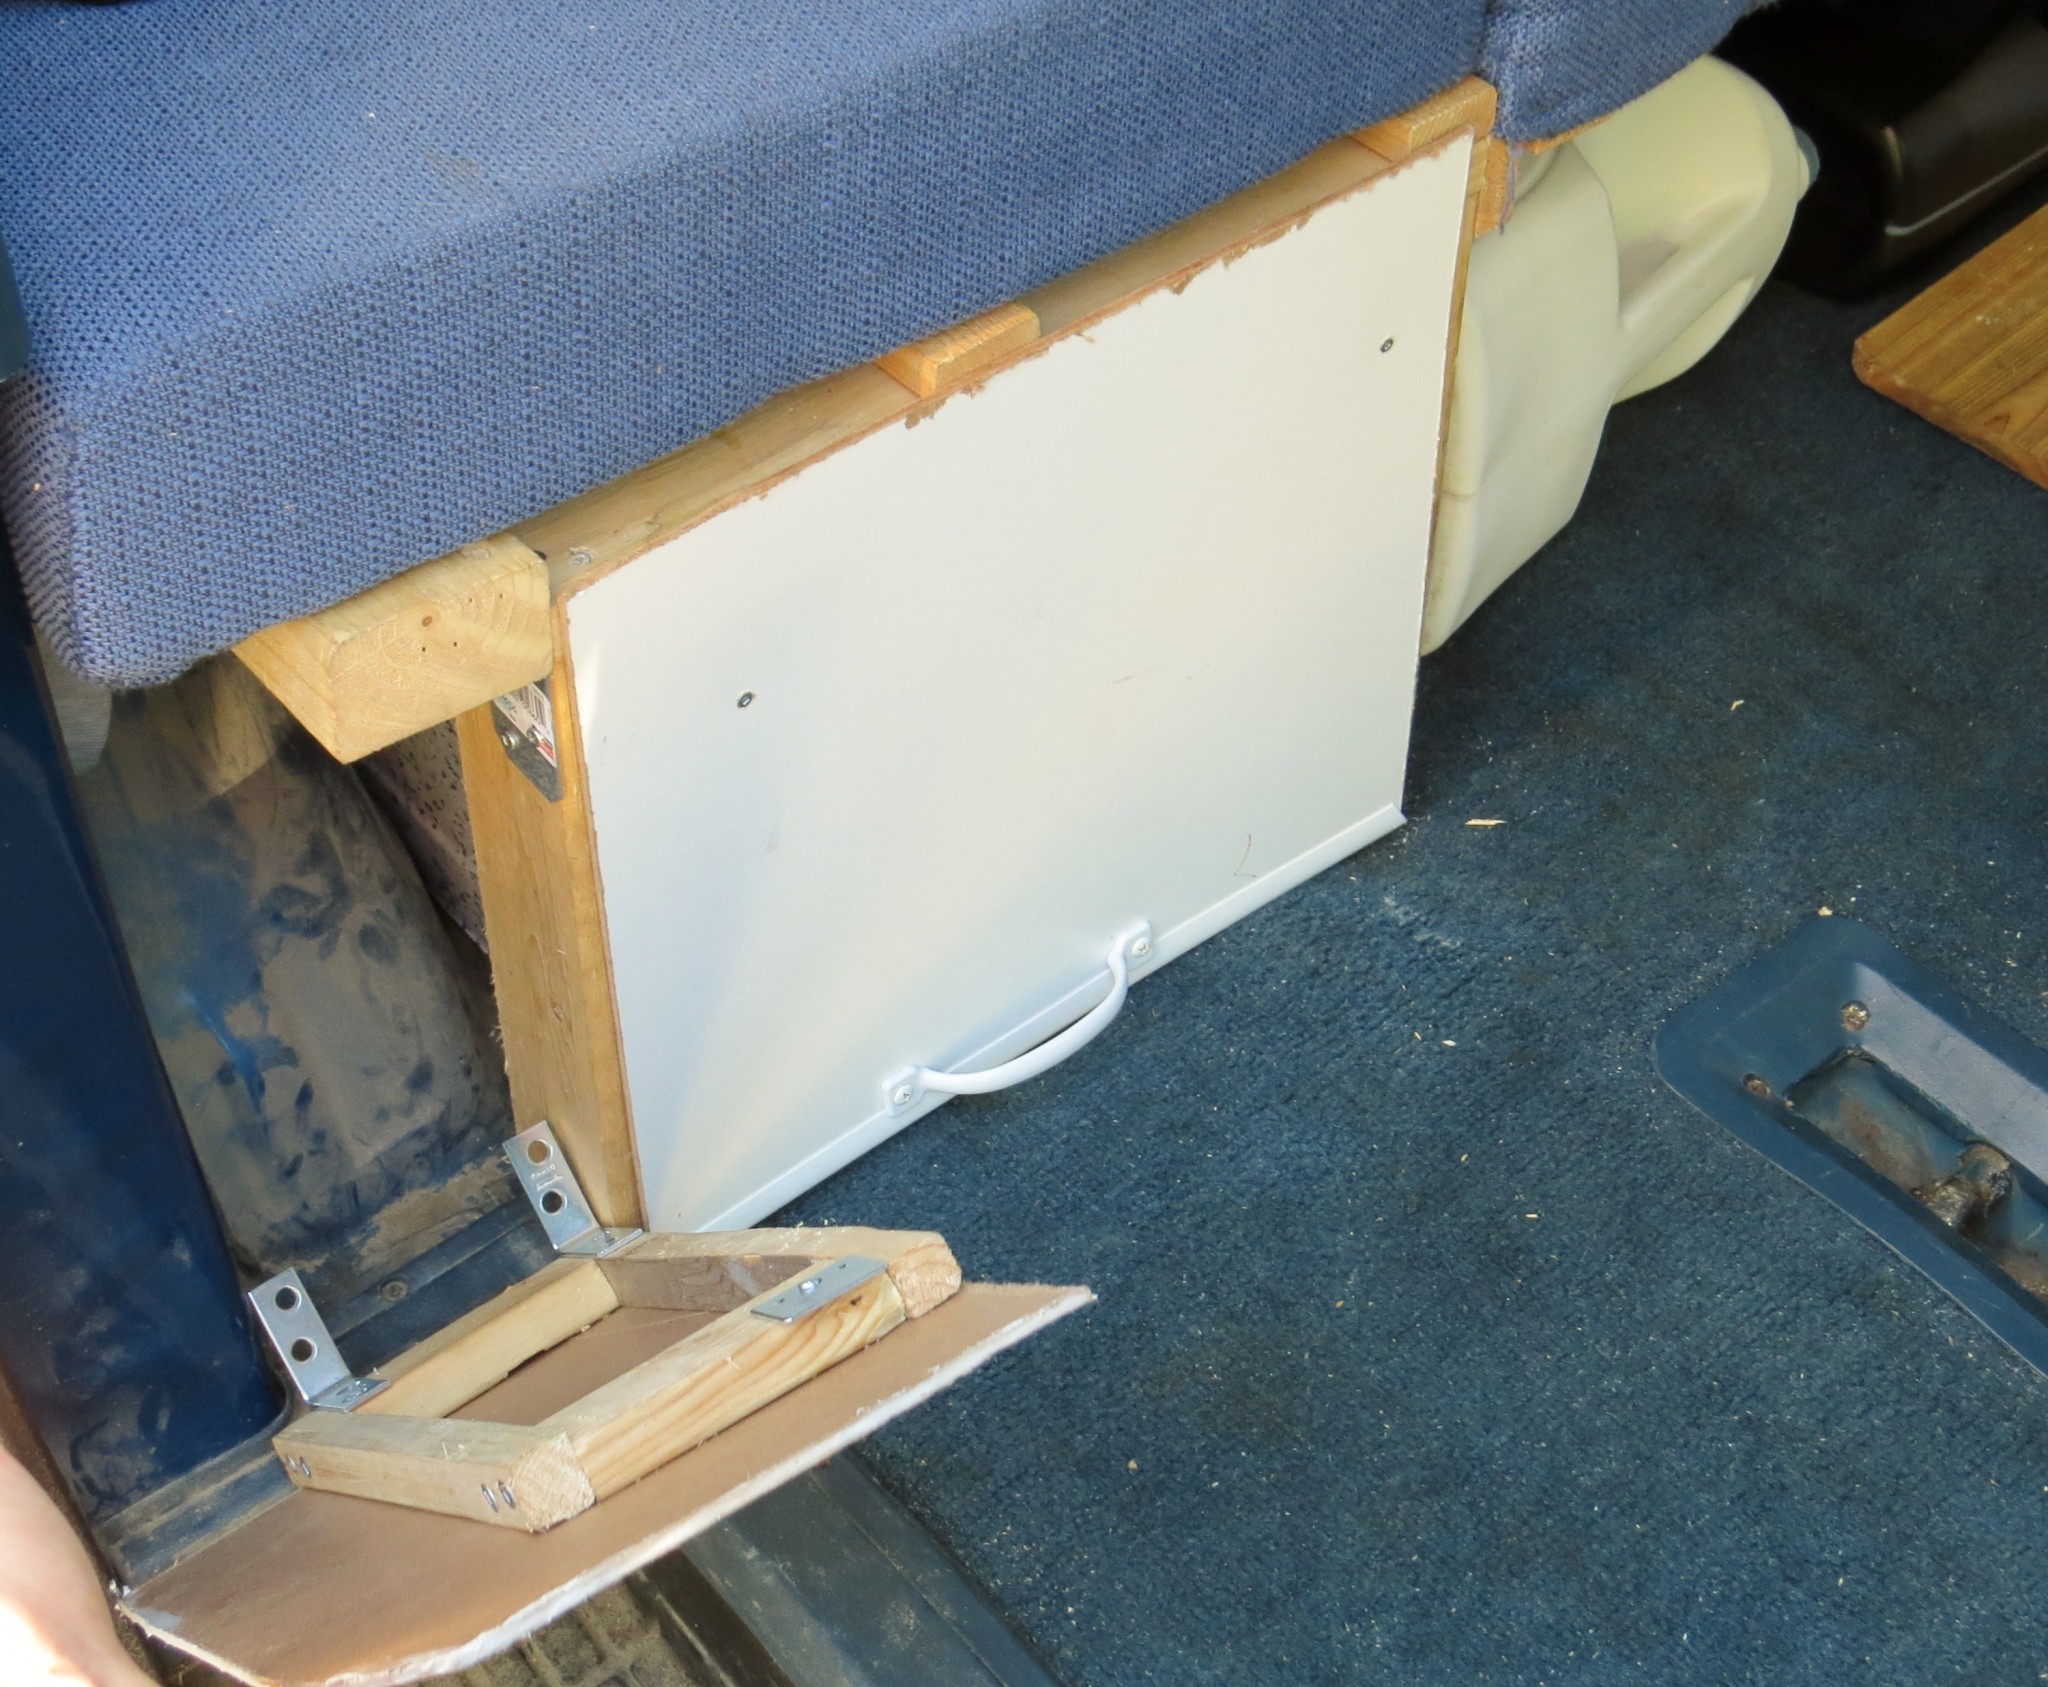
In this type of conversion, all space is valuable, so Jean Robert has fixed a magnetic door onto the space to the left of the kitchen equipment storage.
This is the space between the door and the tire (tyre!) and we will probably use it to store something we will use a lot, such as kitchen towel, toilet paper or spices for example.
No decision made yet! Hopefully, the magnets will stop the door opening while travelling, we will see. It’s been holding until now.
Almost there
With the cabinet and bed made, we could just leave now and comfortably live in the van (it actually feels pretty spacious right now!), but there is still a fair amount of work that we want to do.
There are lots of little things that need to be done, such as the installation of a water tank underneath the bed as well a curtain between the front seats and the back.
One major modification we need to think about is an awning. After travelling and camping in 30 degree heat in Croatia back in 2011, we think that extra shade outside of the van is important.
It’s only going to be hotter in Mexico and Central America! A fridge or some kind of cooler is also in the back of our minds right now, with the same reasoning.
Future upgrades?
The main two areas of research at the moment are solar panels and a swivel passenger seat.
The latter seems tricky to get ahold of’; there are suppliers in the USA, but none that we can find in Canada.
This is frustrating as we do not want to have to pay extra taxes and customs fees to import it into Canada.
With solar panels, the trouble isn’t finding them, it’s the cost! They are not cheap but definitely seem like the best option to have power on and off the road.
Finding Extra Space in Our DIY Astro Van Conversion – May 2014
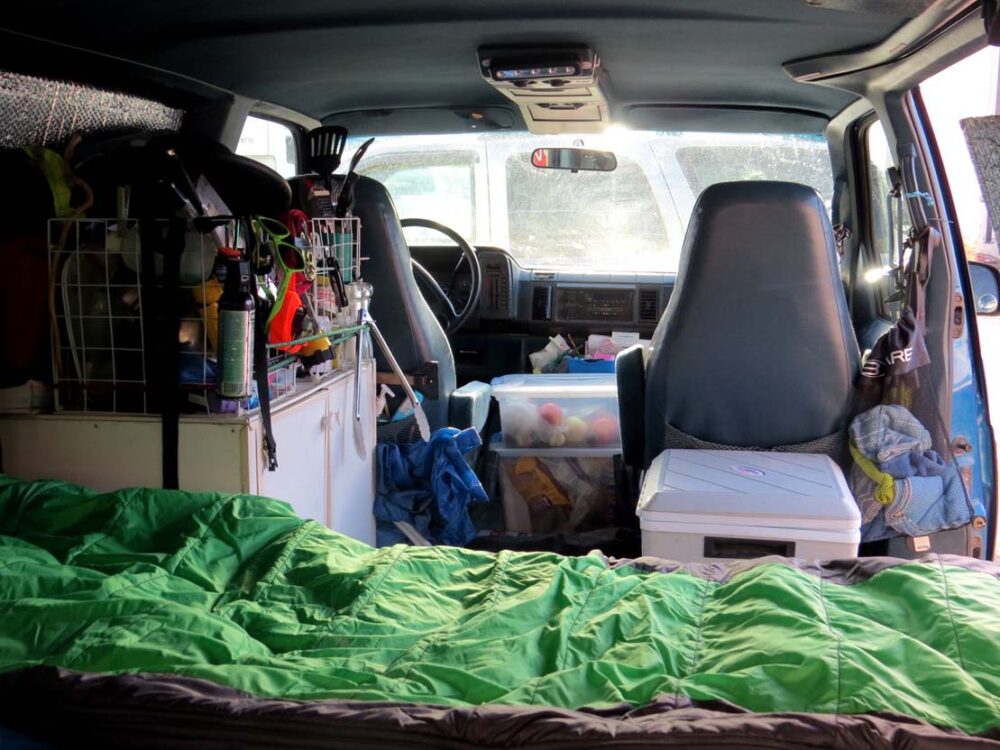
It has been over a month since we traded the comfort of our apartment for the small space of our beloved Astro van. The transition was definitely not easy but I’m pleased to say that we have survived!
However, it would be lying to say it was easy. We are still adapting and I am sure other van dwellers will say the same thing; you keep adapting, moving, changing things around all the time.
Reducing our possessions
One of the first things we realised is that we had way too much stuff. I had underestimated the storage against the bulk of all our winter gear. We had to find a way to put more of our winter gear in storage (my father’s house).
It was far cheaper to send our winter clothes and boots to New Brunswick by Greyhound than to rent storage space and then have to drive back to get it later (especially since we do not know where we will be in winter).
It takes some time for everything to find the right place but every time you realise you can’t find something, it means your stuff is still wandering around looking for a home. Since the van was over crowded already I had to create more space.
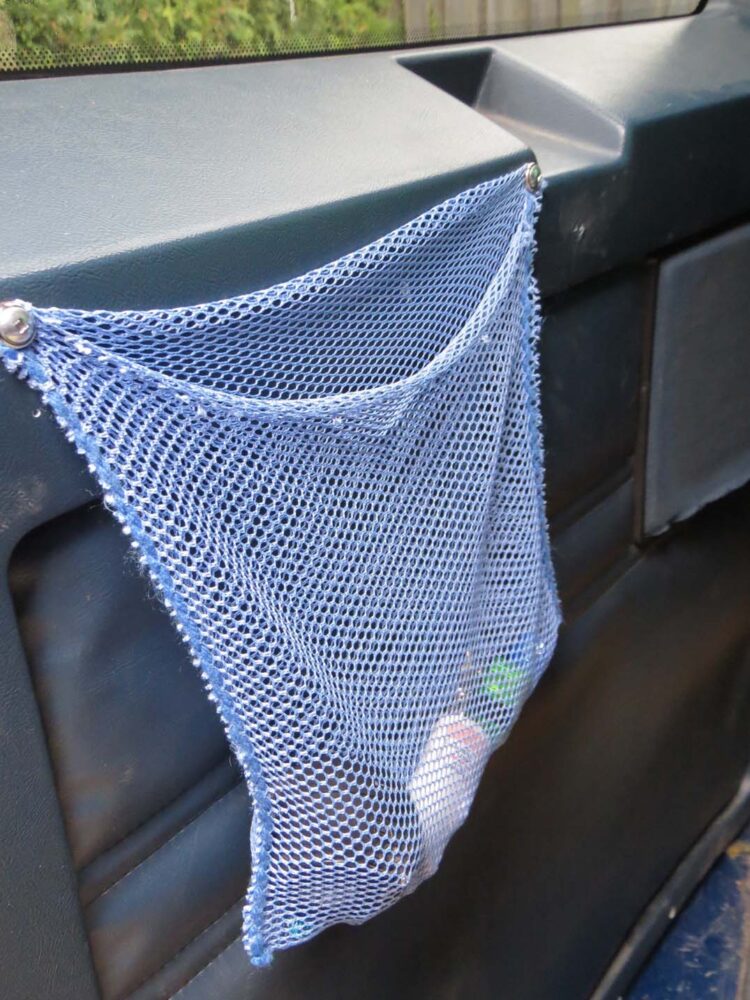
Creating space
I started with a small pouch attached to the back of the door. With some mesh fabric and some yarn I made a mesh that I screwed directly to the back door.
I made this addition to the car after Gemma was complaining of losing her cell phone and Kindle.
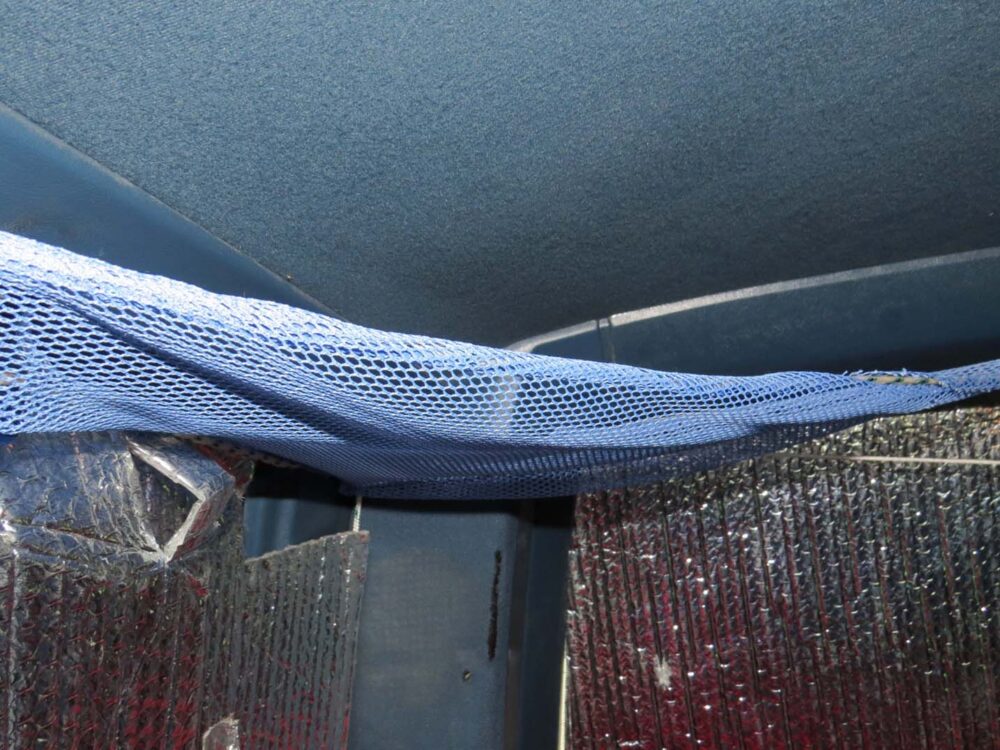
A few days after we got on the road Gemma’s clothes kept finding their way to my side of the bed and I realised another storage area was needed for the back of the van.
The only place left around there was the celling. I made a triangular pouch with the mesh fabric and screwed it to the celling. I used a piece of small rope across witch I sewed to the mesh before I installed it just for the extra strength.

Kitchen storage in an Astro Van conversion
As well as clothes, there were other things we wanted better and quicker access to, such as pans and pots for cooking.
I used some stacking baskets from the Dollar store which I zip-tied together instead of using the cheap plastic corner it came with and then zip-tied the basket to the desk. I just love Zip-ties, they’re so quick, easy and hassle free.
One more thing I just love (and did not think would work but it does) are the no nails hooks. They work brilliantly and they are really fast to install.
They can be a bit pricey but they are just so easy it’s worth the extra dollars. I installed a few all around the van because we work on flashlights at night and it’s a really convenient way to have them handy.
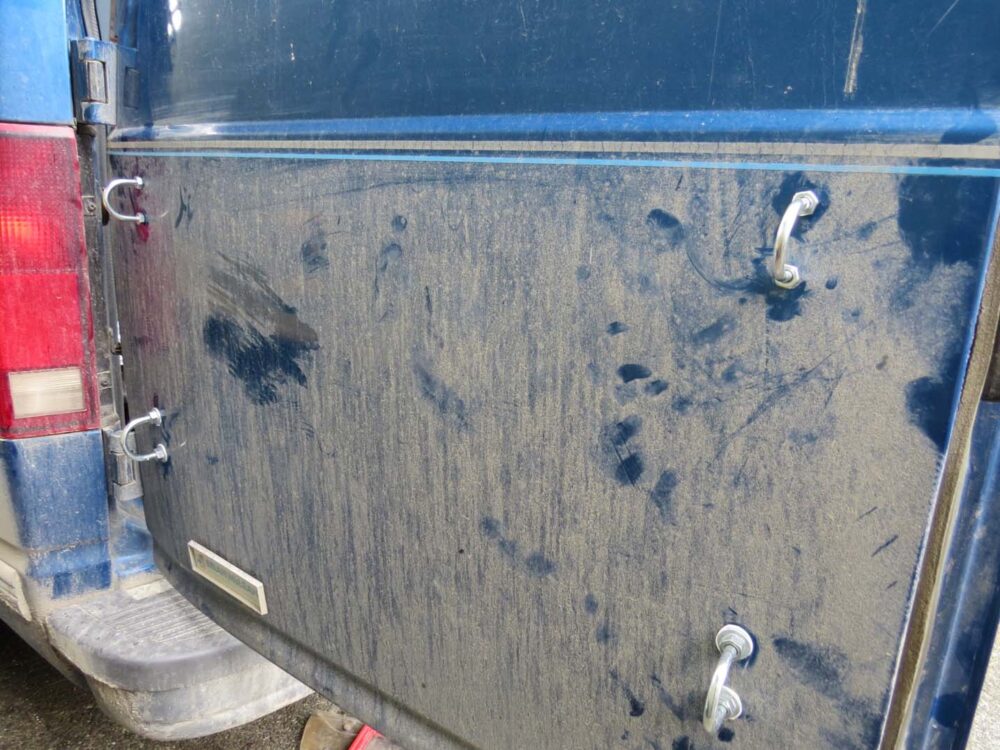
Back door storage
One big issue that has been bothering me for a while was how to carry an extra gas tank.
I had found nice expensive hitch add-on. But a couple of weeks ago I got this idea from an awesome couple who lived over two years in an Astro van conversion.
I thought it was just so simple but so brilliant I had to add it to my van too. Two U-bolts installed on the back doors and a strap will give me the extra space to have water, gas and maybe some gear outside the van for the longer trips.
Chevrolet Astro Conversion Construction Update 5 – April 2015
It’s been a while! I’ve been meaning to do this post ever since finishing our five month Western Canada road trip in September. We drove 17,000km around British Columbia, Yukon, Northwest Territories and Alaska with great success!
The Astro performed really well overall, only having a few issues on the notorious Dempster Highway leading to the Arctic Circle. The conversion design worked a lot better than our first attempt for our 2011 Europe trip but still had some flaws.
Engine problems with our Astro Van
We were around 350km into the 1500km return trip to Inuvik on the Dempster Highway when we started to experience problems with Big Blue cutting out at low speeds.
Halfway and two days in to our adventure in the Arctic and we weren’t sure what to do.
Luckily we had just passed Eagle Plains, the only ‘full service’ station on the road, so we doubled back and got some oil and transmission fluid.
Losing a tire on the Dempster Highway
Back on the road, we lost one of our BFGoodrich All Terrain Tires (around a year old at this point) on the sharp shale that makes up the Dempster’s surface. This happened only 30km after the revving issues. It wasn’t a good day!
We made it to Inuvik on our full size spare and replaced the tire for basically the same price we originally paid on Vancouver Island.
Still running on the same tires now, I really would recommend them to any Astro owners. It is a fair outlay for these tires, but they are pretty solid.
As mentioned, the design was a bit improvement on our previous one, but still has some minor issues.
The main problem we had on this trip was just too much stuff. We had been living on Vancouver Island for two and a half years and had collected a fair amount of possessions in that time.
The plan after the road trip was to set ourselves up in another town, so while we had sorted through our things and given plenty away, we still had held on to a lot of items for the next place.
In hindsight, we should have just put it all in storage somewhere like Vancouver or Prince George (central BC), but we didn’t want to have to return somewhere specific after the trip.
Too much stuff
So we had too much stuff. One solution was to send most of our winter gear away to JR’s dad in New Brunswick via Greyhound. This ended up being cheaper than we thought ($50 for four large boxes?!) so was worthwhile.
Next, JR added some Dollar Store wire baskets on top of the cabinet within the first couple of weeks to allow for better storage.
It did help but we still ended up with our most used items always in the middle section of the van for lack of a better place to put them. This meant we had trouble opening the doors to the cabinet without shuffling everything around.
Wild camping
On the more positive side of things, we loved having a bed always made up at the back as it made for easy wild camping.
We were able to park up anywhere and go to bed very quickly; this was super helpful for non-traditional camping locations such as cities, towns and rest stops.
Having said that, we are going to tweak the design for the next version to prioritise space over a ‘ready’ bed.
Although we don’t intend to carry as much stuff on the next trip (no way are we doing that again!), we want to have a much tidier and efficient living space overall.
Also on the ‘next design’ list is an awning (to avoid both rain and shade), solar panels and some kind of cooking area (so we don’t always require an external table).
Both the panels and cooking area were intended to be on the current design, but our overall budget for the trip fell short due to lack of employment before we left so we reallocated the money.
Improvements
The trip solidified our belief that an Astro is an awesome choice for a van conversion. For two people it can be a bit snug at times, but it is still perfectly viable with a good design.
I think an awning will really help to extend the space – we used tarps a lot over the summer for shelter and an awning would be a great upgrade.
We both travelled in the van separately in 2014 and thought that our design worked really well for a solo person. There is just a bit of tweaking to be done to make it better for dual living.

2024 update – final thoughts
Fast forward almost a decade and it’s time for a final update.
After our five month long road trip in the Astro, we lived in Fort St John for the winter before moving to Penticton in June 2015. We continued to use the Astro for many shorter BC road trips.
After being gifted a pair of kayaks, we decided that it was time to upgrade. We sold the Astro in June 2017 to a friendly couple who planned to keep using it for camping.

The Astro was replaced by a 2005 GMC Savana, which JR converted over the next year.
Although we love the additional space of the Savana, we still feel fondly of the Astro, not only for the trip experience we had but also the AWD!

The Astro got us safely through a number of sketchy winter driving situations, while we try to avoid using the Savana in the winter at all (RWD).
If you’re reading this considering converting an Astro, we would both heartily recommend it. Especially if it’s AWD!


One half of the Canadian/British couple behind Off Track Travel, Gemma is happiest when hiking on the trail or planning the next big travel adventure. JR and Gemma are currently based in the beautiful Okanagan Valley, British Columbia, Canada. Consider buying us a coffee if you have find any of our guides helpful!
I have the same van, looking to do the same thing. Looking forward to reading about your adventures. Your site is very inspiring.
Hi! Thanks for your comment. We should have another update on the van coming soon so keep an eye out! Progress is unfortunately a lot slower in the winter as we won’t be realistically using the van until April or May. Good luck with your own conversion! Let us know if you start a blog about it
Gemma and Jean Robert
Hi there, I was interested to see that bed could be fitted width wise in Astro! This must make huge difference to available space inside van. But I test drove an Astro and tried to lie down across the back and could not see how it could be done. I’m 5’7″ and seemed to be cramped even if I imagined I was lying above the wheel wells. Can you give me some details about how you removed the paneling to make a side to side bed possible and what the dimensions are once the paneling is removed? If I can work out how it’s done, I’m definitely getting me an Astro! Thanks and safe travels to you both.
I have the same question, I am looking to buy a van for conversion, and considering an Astro, but from what I could find on internet is that the width is just close to 60 inches, which isn’t much!
Hi there,
I missed the other comment at the time but I can answer your questions.
The length of our Astro van bed was 176cm and the width 130cm. It is a tight squeeze for anyone around 5″9 and above. JR, who is just under 5″9, had to sleep a little curled to fit. It was doable short term, but when we decided to live in a van full time, we decided to upgrade to a GMC Savana instead.
To make the bed that bit bigger, JR removed all the chunky plastic wall moulding in the back. By doing that, he then had to re-insulate the walls and re-finish with a pleather/fake leather material. This conversion was done back in 2012/2013 and I unfortunately no longer own the vehicle, so have no more photos to share. Perhaps our Astro model had chunkier wall moulding than others, but removing it certainly freed up a lot of space.
If your height is also around the 5″8/5″9 mark and you plan on living/travelling with someone else in this van, I would personally look for a wider vehicle. For anyone 5″7 and below, this conversion works really well!
I am currently building a 1995 astro 4×4 conversion van into a camper van. Jacked it up 5 inches has a fridge composting toilet queen bed and kitchen out the back doors
Sounds awesome! Thanks for sharing Dan.
Although the Astro is a rugged vehicle, they are not built on a truck chassis. It is a unibody vehicle with a subframe holding the engine and front suspension components.